
We noticed you are blocking ads. DO THE TON only works with community supporters. Most are active members of the site with small businesses. Please consider disabling your ad blocking tool and checking out the businesses that help keep our site up and free.
You are using an out of date browser. It may not display this or other websites correctly.
You should upgrade or use an alternative browser.
You should upgrade or use an alternative browser.
Guzzi Cali Cafe - Build Thread
- Thread starter Bevelheadmhr
- Start date
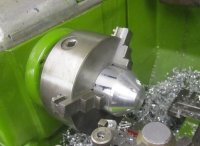
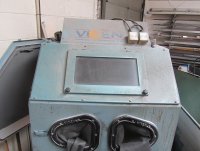
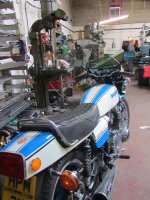
Made some useful progress today with the wheels. I took the now dismantled wheels to a local machine shop who let me use their bead blasting cabinet, at the cost of a packet of biscuits and me making everyone cups of tea while I'm there.. a fair exchange !
Here's a couple of pics of the set up, the hose / nozzle which fires out the blasting medium has a heck of a kick to it, you need to hold it tight, they've got a big old compressor that drives it. The shop owner likes bikes too, and keeps his owned from new GS1000S at the shop, though these days it doesn't get ridden much.
Here's a couple of pics of the set up, the hose / nozzle which fires out the blasting medium has a heck of a kick to it, you need to hold it tight, they've got a big old compressor that drives it. The shop owner likes bikes too, and keeps his owned from new GS1000S at the shop, though these days it doesn't get ridden much.
Attachments
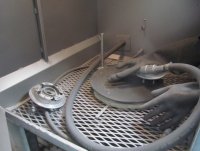
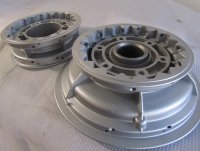
The hubs were blasted, as were the disc mounts, and both came out well, then I moved on to the rims which were anodised, so I blasted the anodising of one rim to see how it looked. At this point I wasn't sure if I could reuse the rims, and whether they should be polished, re anodised, painted or powder coated. While the hubs could be painted or powder coated, I think they are too rough to be anodised. For now, I've sprayed the hubs with etch primer to protect the alloy.
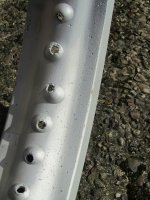
After cleaning up the first rim, I stopped as it was clear the corrosion pitting in the rim was worse than I thought, they could still be painted or powder coated, but at this point I'm more inclined to order new rims.
After cleaning up the first rim, I stopped as it was clear the corrosion pitting in the rim was worse than I thought, they could still be painted or powder coated, but at this point I'm more inclined to order new rims.
Attachments
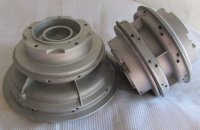
When it comes to the hubs the obvious solution is to have them powder coated, maybe silver, maybe black, whatever. But I could see a problem... the holes for the spokes are about a cm deep and with the powder coat being so thick, there's a good chance that they would be blocked or a least narrowed enough for the spokes no longer o fit. Then I'd have to remove the powder coat from the holes, a pain to do and possibly causing corrosion problems in the future.
The hubs are too rough for anodising, which left two options, leave them as is, and hope for the best or paint them and hope the paint doesn't fall off in a year or two.
I went for the paint option.. etch primer, under coat and a few light coats of 'alloy' look paint. It looks a bit too bright when first sprayed on, but it darkens a touch when its dry and looks more 'alloy like' ..
Attachments
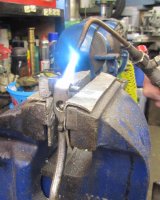
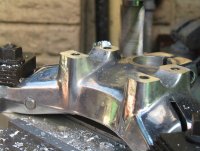
The gearbox was easy enough to remove so I could get the broken clutch arm mount welded. But first had to use heat to get the pivot pin out of the broken casting. The next step was to make a temporary spacer to hold the broken casting in place when it was welded back on. Turned out the pivot pin was 7mm diameter, an odd size, so I reamed the mount and arm out to 8mm so I could use an 8mm stainless bolt to replace the rusted out pin.
Then I took the whole lot to the local welder, who did the job while I waited, just need to polish the arm and fit a shorter 8mm bolt to finish things off..
Then I took the whole lot to the local welder, who did the job while I waited, just need to polish the arm and fit a shorter 8mm bolt to finish things off..
Attachments


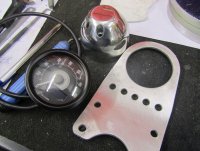
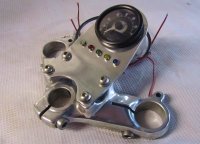
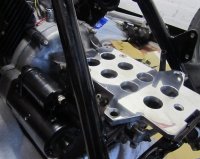
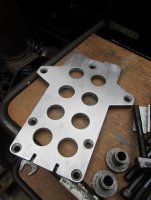
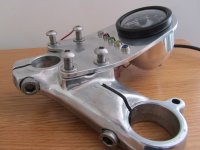
Talking of polishing, I finally got round to polishing the speedo mount and putting it together, it needs a couple of M5 button heads to bolt the speedo in place, which I need to order. I'd hoped to have the ignition barrel in the bracket too, but there isn't enough clearance below...
Attachments
After all the hassles of the broken gearbox bracket last week, this week the gearbox has been bolted back onto the engine, and the frame reunited with the engine/gearbox. The next big expenditure will be on the alloy tank and new rims / spokes, which will have to wait for a week or two.
In the meantime there are still lots of small improvements to be made, the devil is in the detail..
First I decided the gloss black paint I'd used on the starter motor didn't look quite right. In the end I re-sprayed it satin black, not sure how durable the finish will turn out to be, but it looks better to me now.
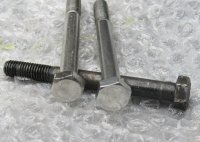
Next the two old bolts which fasten the starter to the crankcase were replaced by new stainless bolts, but not before their heads were machined smooth..
The billet battery tray was looking dull, as I hadn't spend much time polishing it when I drilled and modified it a couple of years ago. I prepped it carefully, working my way to using 400 grade wet and dry, before using my mates homemade buffer. Its about thirty years old and still works really well. Once fitted to the top of the gearbox, its clear a couple of spacers will be needed to take up the gap to the rear frame mounts. Last time I just used a few washers, this time I'll do things properly.
Tomorrow I'm going to collect the two carbs which have been cleaned in an ultrasonic bath, be interesting to see how they look..
In the meantime there are still lots of small improvements to be made, the devil is in the detail..
First I decided the gloss black paint I'd used on the starter motor didn't look quite right. In the end I re-sprayed it satin black, not sure how durable the finish will turn out to be, but it looks better to me now.
Next the two old bolts which fasten the starter to the crankcase were replaced by new stainless bolts, but not before their heads were machined smooth..
The billet battery tray was looking dull, as I hadn't spend much time polishing it when I drilled and modified it a couple of years ago. I prepped it carefully, working my way to using 400 grade wet and dry, before using my mates homemade buffer. Its about thirty years old and still works really well. Once fitted to the top of the gearbox, its clear a couple of spacers will be needed to take up the gap to the rear frame mounts. Last time I just used a few washers, this time I'll do things properly.
Tomorrow I'm going to collect the two carbs which have been cleaned in an ultrasonic bath, be interesting to see how they look..
Attachments

Got the carbs back from their ultrasonic bath, cant say I'm too impressed, they don't look much different from before. I'll just clean and polish them by hand.
There are a couple of chrome parts that need attention before being refitted. First the side stand pivot bolt, and second the two wheel spindles, both of which are corroded in places. Rather than have them re-chromed, I decided to make replacements, so I've ordered a length of 17mm stainless Hex bar to make a new pivot bolt. While my initial idea of making new spindles from Grade 5 Titanium wasn't such a good one, as Ti has issues with fatigue, I was told Ti spindles are banned from racing for that reason. Instead I've ordered 600mm x 25mm diameter 303 (marine grade)stainless bar, which will be enough to make two spindles. Luckily the thickest part of each spindle is exactly 25mm.
Apart from that, I gave the stainless splash guard a polish and fitted it to the frame, though its covered in my oily fingerprints in the photo, so doesn't look its best.
For the next few weeks there wont be any progress in the big changes I'll be making, just lots of small fiddly jobs..
Attachments
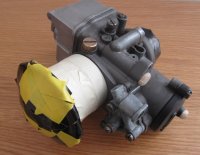
I dipped my toe in the cleaning of the carbs, by bead blasting the float bowls today, only took a few seconds to remove all the old staining and corrosion. This left the surface with a matt slightly rough finish, which wouldn't remain clean for long on the bike, so I gave one of the float bowls a quick polish with Autosol. Needs more elbow grease yet, but it should give a good overall finish.. clean but not overly bright and shiny.
Attachments
Also made a start on sorting out the engine breather hoses. There are three different sized hoses needed, only had one to hand that was left over from my Harley drag bike project.. cotton over braided Nitrile hose. This was used to make a couple of short hoses which vent the heads into the frame, along with stainless clamps. The Guzzi is unusual in using the frame as part of the breather system, pretty good idea really.
Attachments

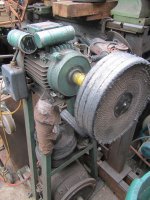
Got a couple of small jobs done today when I went round to see my mate Jeff and use his miller..
First, we milled the top yoke bar mounts down as far as we dare, as the speedo bracket that now uses the bar mounts sat a bit high, it looks better now it sits as close to the yoke as possible.
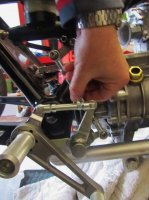
Then we made four alloy 'top hats' for the Tarozzi rear set mounting bolts. The problem here was that the rear sets have 12mm holes (a bit OTT) while the equivalent mounting holes in the frame were a more sensible 10mm. Using 10mm bolts through a 12mm hole worked ok I guess, but I didn't like the idea, so we made top hats to take the rear set holes to 10mm... much better.
First, we milled the top yoke bar mounts down as far as we dare, as the speedo bracket that now uses the bar mounts sat a bit high, it looks better now it sits as close to the yoke as possible.
Then we made four alloy 'top hats' for the Tarozzi rear set mounting bolts. The problem here was that the rear sets have 12mm holes (a bit OTT) while the equivalent mounting holes in the frame were a more sensible 10mm. Using 10mm bolts through a 12mm hole worked ok I guess, but I didn't like the idea, so we made top hats to take the rear set holes to 10mm... much better.
Attachments
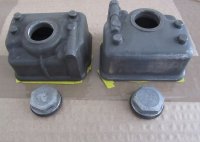
After that, I went to the local machine shop to use their blasting cabinet on the whole carbs, having first spend a lot of time carefully sealing the carb bodies to protect the internals from any blasting medium. It worked ok for one carb, but the other somehow got a small amount of medium inside (its very fine, almost like talc powder). Oh well, I'd already ordered new gasket kits for the carbs just in case, so when they arrive, I'll dismantle the carbs completely and use new gaskets throughout, they're nearly thirty years old, so new gaskets aren't a bad idea anyway.
Attachments
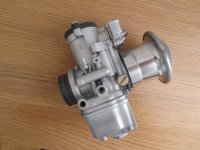
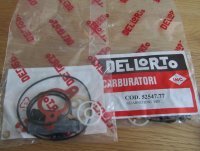
The carb gasket kits arrived, you don't get much for the money, so I had a look online to check the price of a few Dellorto spares, e.g. alloy carb tops would be a nice replacement for the standard black plastic ones, but not at £30 each. If I ever need to completely rebuild such a carb, it may be cheaper to just buy a complete new carb.
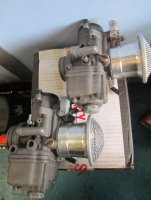
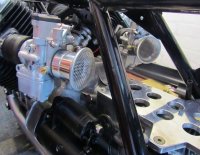
I'm away from home for a while, so wont be any progress next week, I have fitted the carbs to the bike, they do look good.. strange they are both left handed carbs, when Dellorto offer both left and right handed options for the same cost. Mine are stamped 'DS' the 'S' short for Sinistra, or left in Italian.... Being left handed has always been associated with the devil, hence the 'Sin' in Sinistra.. Charming! I am of course left handed lol..
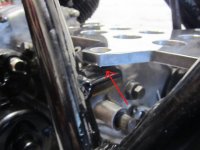
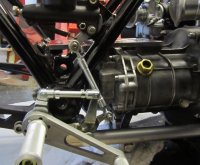
Also had to shim the gearbox mount out 3mm to get the engine / gearbox exactly inline with the frame, which in turn aligned the billet battery tray with its mounts on the frame.
The alloy top hats we made for the rear sets worked well, and bolted back on the frame without any problems. Though the stainless rear brake link rod is about 10mm too long, and a bit on the heavy side, so it'll be replaced by an alloy version when I have time.
I'm away from home for a while, so wont be any progress next week, I have fitted the carbs to the bike, they do look good.. strange they are both left handed carbs, when Dellorto offer both left and right handed options for the same cost. Mine are stamped 'DS' the 'S' short for Sinistra, or left in Italian.... Being left handed has always been associated with the devil, hence the 'Sin' in Sinistra.. Charming! I am of course left handed lol..
Also had to shim the gearbox mount out 3mm to get the engine / gearbox exactly inline with the frame, which in turn aligned the billet battery tray with its mounts on the frame.
The alloy top hats we made for the rear sets worked well, and bolted back on the frame without any problems. Though the stainless rear brake link rod is about 10mm too long, and a bit on the heavy side, so it'll be replaced by an alloy version when I have time.
Attachments
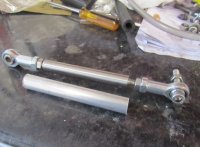

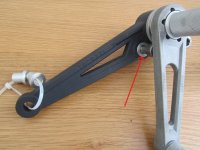
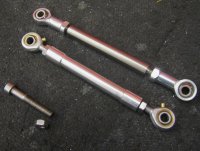
Made the new shorter gear link rod today, in alloy rather than stainless as its lighter. Started off by drilling a suitable hole through the middle of the alloy rod, then tapped an M6 thread into both ends, before machining the centre section to narrow it a bit..
Attachments
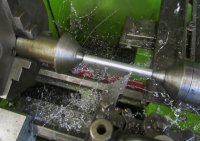
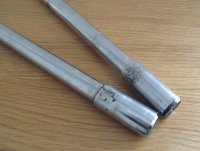
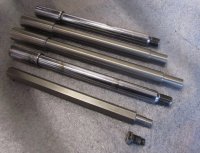
The 25mm stainless bar has been machined to duplicate the original chromed steel wheel spindles, the threads will be cut on a capstan lathe when I take them to a local machine shop, which is why the thread end is longer than needed for the time being. At the fatter end, I've made the spindles 10mm longer because they'll be getting a hex end machined to take a socket in place of the original slot which I didn't like. It'll also provide a useful mount on the LHS for a paddock stand.
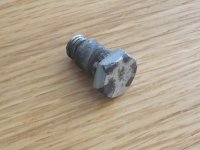
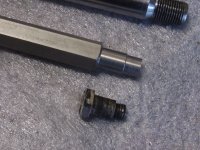
The stainless hex bar has been shaped to make a replacement side stand pivot, again it needs its thread cutting, which will be done at the same time as the new spindles are done, hopefully this week.
The stainless hex bar has been shaped to make a replacement side stand pivot, again it needs its thread cutting, which will be done at the same time as the new spindles are done, hopefully this week.
Attachments
K
Kamn
Guest
Nice work
And I like the stainless axles....what grade stainless??
And I like the stainless axles....what grade stainless??
Kamn said:Nice work
And I like the stainless axles....what grade stainless??
303 probably could have gone for 304 marine grade or even 316, but had a lot of conflicting advice, so went for the safe, easy to machine 303 in the end.


