KZ650 Seat from scratch

andreas_boman@hotmail.com

Been Around the Block
Hi guys, would need some help with my KZ.

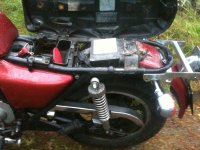
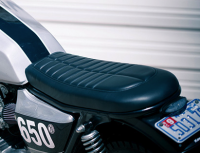
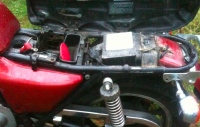
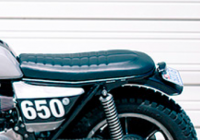
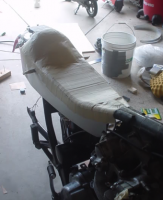
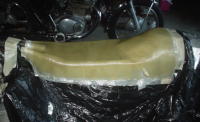
Just about to start with a new seat and what I've heard is that the best way is to buy some sheet metal and cut it like the frame. The problem with my bike is that it's not flat and therefore there might be a problem shaping the metal. I'll attach some pics how my frame looks like, and what I want it to look like.

Measurements are; starting from the front: 18cm by the tank, 24cm at the widest point, and 23cm when the rear starts to bend.

What would be the best way of continuing? Lowering the fender or not.. Shaping the metal and how..etc.
 

Attachments

  • IMG_3406.JPG
    IMG_3406.JPG
    1.4 MB · Views: 279
  • Bobs.png
    Bobs.png
    226.3 KB · Views: 1,265
I have a KZ550, so I understand what you mean. May I suggest fever glass for the seats pan. Wrap the frame section from the tank back(the whole section, cover the battery box and all) with plastic wrap, and also make sure that the side of the the bike below the seat are cover to prevent shy stoppage from getting on the bike. Once the you have that frame section wrapped with plastic wrap, apply a generous coat of fiberglass resin. Stretch and apply a solid sheet of fiberglass that is big enough to cover everything and still have excess around the edges. Once you have spread the resin over the entire piece of fiberglass, insuring that the fiberglass is saturated, apply a second sheet. Apply a second coating of resin. Allow to set. Once fiberglass has set, simply lift off. Sometime you may have to cut the plastic wrap, as they can become set together. No big deal. Trim the now solid fiberglass seat pan down to size and then apply a final coat of resin. This final coat of resin will seal the edges that you have cut. Once the resin has set, you have your finished fiberglass seat pan. From there, you can style the seat however you like. I hope this helps.
 
Matts69cbproject said:
I have a KZ550, so I understand what you mean. May I suggest fever glass for the seats pan. Wrap the frame section from the tank back(the whole section, cover the battery box and all) with plastic wrap, and also make sure that the side of the the bike below the seat are cover to prevent shy stoppage from getting on the bike. Once the you have that frame section wrapped with plastic wrap, apply a generous coat of fiberglass resin. Stretch and apply a solid sheet of fiberglass that is big enough to cover everything and still have excess around the edges. Once you have spread the resin over the entire piece of fiberglass, insuring that the fiberglass is saturated, apply a second sheet. Apply a second coating of resin. Allow to set. Once fiberglass has set, simply lift off. Sometime you may have to cut the plastic wrap, as they can become set together. No big deal. Trim the now solid fiberglass seat pan down to size and then apply a final coat of resin. This final coat of resin will seal the edges that you have cut. Once the resin has set, you have your finished fiberglass seat pan. From there, you can style the seat however you like. I hope this helps.

Thanks for the tip. Fiber glass might do it! Sounds it could be easier than sheet metal so form, but do you think it's strong enough to bear the weight from 1-2ppl sitting? Also, how to make it fit to the frame? Screws into the frame maybe? Trying to find a link to someone that has made the same thing..
 
ABOM said:
Thanks for the tip. Fiber glass might do it! Sounds it could be easier than sheet metal so form, but do you think it's strong enough to bear the weight from 1-2ppl sitting? Also, how to make it fit to the frame? Screws into the frame maybe? Trying to find a link to someone that has made the same thing..
Instead of 2 use 3-4 layers of glass to make it sturdy enough for 2 people. Your seat pan is basically going to be contoured to sit tightly on top of everything under the seat so there won't really be any movement or flexing that can break the pan.

On the KZ in your pic I would make the front about 1" long that slides under the rear of the tank and then just a screw on each side of the seat into the frame rails in back should be all you need to secure it down to the frame.

Looking at the pic of how you want it to look like that builder cut off the bridge holding up the fender and then used some sort of flat stock for a pan. On many bikes this bridge is also a structural support to the open end of the rear frame. I see on the KZ it has a rear hoop to connect to structural 2 sides of the frame. If you want to do it that way I would use a thick piece of aluminum and probably a strap or 2 on the frame rails to secure it to.
 
o1marc said:
Instead of 2 use 3-4 layers of glass to make it sturdy enough for 2 people. Your seat pan is basically going to be contoured to sit tightly on top of everything under the seat so there won't really be any movement or flexing that can break the pan.

On the KZ in your pic I would make the front about 1" long that slides under the rear of the tank and then just a screw on each side of the seat into the frame rails in back should be all you need to secure it down to the frame.

If I understood you correctly you mean that the glass, as described earlier, will be contoured and rely on the frame as it is and therefore won't break the pan?

Do you mean 1" longer without foam that slides under the rear of the tank so it won't pop up, and only secure with screws in the back? Where the fender is mounted on the top or far back?

Also, what would be the best way of mounting it to be able to still get a hold of the battery? Now it has got a hook, but I guess that will be a problem since I want it low...
 
Yes on question #1
Yes on question #2
What do you mean the battery has a hook?
I assume the battery is in the recess at the front of the seat behind the side cover?
If you use a thick piece of aluminum as a seat pan you may be able to utilized the stock lock and hinge set up.

Upon a closer look I see your battery is missing. Post a pic with the battery init to see how high it sits in the hole.
 
I would measure how much shock travel you have and then take a metal strap and drill a hole in each end that is the length of the shock under full compression. This will keep the tire in the highest position so you can see what will need to clear. Right now at full compression you may still have 2"+ of tire clearance. If so you can remove the bridge and mount your fender lower to clear all the seat pan issues.
 
o1marc said:
Yes on question #1
Yes on question #2
What do you mean the battery has a hook?
I assume the battery is in the recess at the front of the seat behind the side cover?
If you use a thick piece of aluminum as a seat pan you may be able to utilized the stock lock and hinge set up.

Upon a closer look I see your battery is missing. Post a pic with the battery init to see how high it sits in the hole.

Nice! The battery doesn't have a hook, I guess I was kind of unclear hehe.
What I meant was that the seat has got the stock lock and hinge as you said, and if it is possible to still use it? This if I'm using fiber glass instead of sheet metal.

The battery is at the front where you can se the red wire. I was charging it when taking the picture. I don't have a pic. right now but the battery is not higher than the mounts where it sits. As you said in recess in the cover by the mounts. The +wire takes some place though (1-2cm)..

Do you mean that if I want to still use the lock, fibre glass won't do it and aluminum would do it instead? Or maybe drill some alu. onto the glass?

OK, I see how you mean that I should measure the full compression to be able to se how close the wheel is to the fender but I don't understand the metal strap part? Would be great to be able to remove the bridge and have a more straight line.
 
You can incorporate metal plates that are tapped into the base of a fiberglass construction but it's a lot more work.

The strap I meant is like making a solid strut to replace the shock that would keep the wheel in the highest compression height. If you want a seat like the one you have pictured at the beginning I would use a flat sheet of aluminum and bolt the hinges to it.

If you don't want to use the strut method just measure the travel and see how much clearance on top of the tire you still have and see where the bottom of the seat would be in relation to that and go from there.
 
o1marc said:
You can incorporate metal plates that are tapped into the base of a fiberglass construction but it's a lot more work.

The strap I meant is like making a solid strut to replace the shock that would keep the wheel in the highest compression height. If you want a seat like the one you have pictured at the beginning I would use a flat sheet of aluminum and bolt the hinges to it.

If you don't want to use the strut method just measure the travel and see how much clearance on top of the tire you still have and see where the bottom of the seat would be in relation to that and go from there.

Ok, so you mean use the aluminum as a temp. shock? Don't really understand why. Isn't it easier to unbolt the shocks, and see how close the tire gets to the top of the bottom of the new seat as you said?

I've now bought some glass and will cover the seat as it is right now with some plastic foil and later cover it with glass to be able to form a seat with glass. The problem is how I should bolt it to the frame, and how to lift it away if I want to charge the bats. I can't figure out how to still be able to use the hook as the old seat used though..
 
If you unbolt the shocks the tire an come up higher than it would with the shock compressed. This not the clearance you want to measure with. The strap would hold the wheel in the uppermost position of shock travel and you would be able to work around it this way and still be able to roll the bike around.
 
o1marc said:
If you unbolt the shocks the tire an come up higher than it would with the shock compressed. This not the clearance you want to measure with. The strap would hold the wheel in the uppermost position of shock travel and you would be able to work around it this way and still be able to roll the bike around.

Aaa OK I see! Sound like a good idea! Thanks!
 
Have been thinking for some time and now I think I have decided to go with fiber glass instead of a metal pan. Mostly because it's easer to form it like the frame I have now. I'm thinking about glassing it as it is, having less foam in the back and more in the front to have the same level.

Maybe later I'll cut the frame and make it shorter and thereafter cut down the foam and pan as well... But I'm thinking about starting with the size it has got now.

1: Frame as now
2: Seat that I want
3 & 4: How I'm thinking of making it (you think it's possible to have less foam at the back and more in front?) I mean. I will sit at the front...

Thanks!!
 

Attachments

  • Skärmavbild 2013-08-30 kl. 22.12.55.png
    Skärmavbild 2013-08-30 kl. 22.12.55.png
    974.1 KB · Views: 265
  • Skärmavbild 2013-08-30 kl. 22.13.14.png
    Skärmavbild 2013-08-30 kl. 22.13.14.png
    201 KB · Views: 826
  • Skärmavbild 2013-08-30 kl. 22.13.52.png
    Skärmavbild 2013-08-30 kl. 22.13.52.png
    194.5 KB · Views: 853
  • Skärmavbild 2013-08-30 kl. 22.13.58.png
    Skärmavbild 2013-08-30 kl. 22.13.58.png
    290.2 KB · Views: 819
One suggestion is to add strips of wood on the top side where you will attach the foam then glass/resin them on there. This will help later when you attach your leather/vinyl. I used those large paint stirrers from home depot. They can be had for free and are soft enough to get some staples in there. If you are not using staples and are using something else like rivets then disregard. In my application rivets would have been a bit too long and would have possbily have stuck through the fabric.

Looks good so far.

Good luck!
 
Doogie said:
One suggestion is to add strips of wood on the top side where you will attach the foam then glass/resin them on there. This will help later when you attach your leather/vinyl. I used those large paint stirrers from home depot. They can be had for free and are soft enough to get some staples in there. If you are not using staples and are using something else like rivets then disregard. In my application rivets would have been a bit too long and would have possbily have stuck through the fabric.

Looks good so far.

Good luck!

Explain more on the location of the wood strips on top side? How would you use rivits? Rivits come in different lengths, get shorter ones if they are too long.
 
o1marc said:
Explain more on the location of the wood strips on top side? How would you use rivits? Rivits come in different lengths, get shorter ones if they are too long.

Thanks Doogie for the tip. But as o1marc stated it would be great with some more info. How do you mean to staple the leather/vinyl?
 
Hey ABOM, do you have a finished product at this point using the fiberglass pan?? I would love to see some pictures if you got em, thanks
 
nemo said:
Hey ABOM, do you have a finished product at this point using the fiberglass pan?? I would love to see some pictures if you got em, thanks

Hi Nemo,

Unfortunately I haven't been able to work on it for a while since I'm not in the country where my bike is ATM. Will hopefully be able to start/finish it during spring! Will update you then :)
 
Back
Top Bottom