We noticed you are blocking ads. DO THE TON only works with community supporters. Most are active members of the site with small businesses. Please consider disabling your ad blocking tool and checking out the businesses that help keep our site up and free.
You are using an out of date browser. It may not display this or other websites correctly.
You should upgrade or use an alternative browser.
You should upgrade or use an alternative browser.
Next Project - Plate Alloy 5.5m Xtracab
- Thread starter XS750AU
- Start date
XS750AU
Coast to Coast
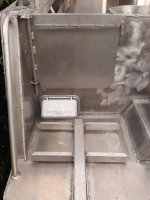
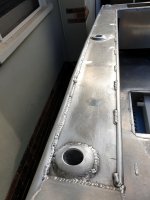
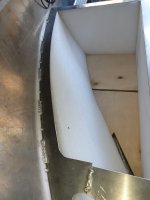
The leak test was done earlier by blasting compressed air from the inside and soapy water on the outside - 2 person job. Maybe not 100% accurate, but it should have shown any significant leaks.
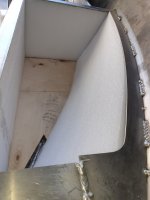
The certified buoyancy foam is in sheets, and it sits above the stringers. Thus any water can freely drain out through the limber holes.
On alloy boats apparently you do not pour in PU foam, it reacts with the alloy.
There are a few more pieces to weld in, the motor and basic controls, then it will get a splashdown prior to finishing.
XS750AU
Coast to Coast
I guess it is more that I understand the settings of the welder better. Now that I have reduced the frequency of double pulse and changed the high current to only 40% of the cycle and the bottom of the pulse is 50% of the max current I am really getting that stacked coin look. The other benefit is that I can control the weld better without burning through (as often). The big lesson has been to limit the amount of heat that I get into an area to minimise distortion. It is very important to weld symmetrically. Weld a bit on the port then the opposite position on the starboard, limit the welds to about 200mm and then move.
Now that I have the welder set up I only change the current to suit the thickness and joint type, butt, edge,etc.
At least the ugly welds done early on, are hidden under the deck!
Now that I have the welder set up I only change the current to suit the thickness and joint type, butt, edge,etc.
At least the ugly welds done early on, are hidden under the deck!
XS750AU
Coast to Coast
Interesting times, apparently we are in lockdown after Monday. Luckily my wife and I can work from home.
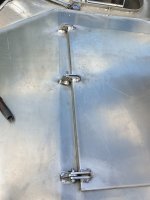
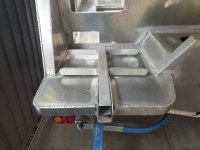
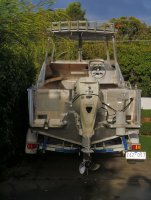
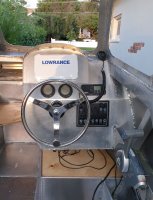
Managed to get some more work done on the boat. The rub rails are stitched on. The front hatch hinges are done. The double height shelves are installed all the way from the transom to front benches. With the bait tank where it is, there was no path to get to the batteries, I used some 20mm X 50mm hollow section, to make up a conduit to go under the bait tank and up into the starboard shelf. The sun shade that shades the electronic dash (Lowrance HDS9) has been formed and welded in. The cutout has been enlarged to fit the unit. There are 3 rod holders per side that are welded in.
My argon is 80%, but I probable need to get some wire tomorrow to see me through the next couple of weeks.
Hope you all stay safe and well, best wishes.
Attachments
-
 1 Hinge tacked.jpg334.9 KB · Views: 267
 -
 2 Hinge welded.jpg300.7 KB · Views: 259
 -
 3 double height shelf.jpg352.4 KB · Views: 239
 -
 4 double height shelf.jpg527.3 KB · Views: 240
 -
 5 transom.jpg357.2 KB · Views: 244
 -
 6 rod holders.jpg321.2 KB · Views: 242
 -
 8 Hatch & rub rail.jpg296.2 KB · Views: 244
 -
 7 dash sun shade.jpg402 KB · Views: 246
XS750AU
Coast to Coast
Interesting times - hope you are all doing OK.
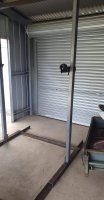
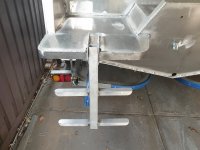
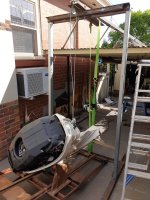
With staying isolated, has meant having to adapt. For my boys that means their gym has closed. They are a very close knit community, and we are maintaining our membership payments (luckily we still have work) thus the gym has allowed us to take some equipment home for the boys to train (stay sane). They have bars, plates and a bench press but they did not have a squat stand. Saturday was spent re-purposing the angle iron from the boat hardback building frame into a squat stand. I did not MIG weld it, it was back to a $100 Rossi inverter stick welder, that worked perfectly OK. I figure if the stand is OK with 230Kg for squats training, then it will be perfectly OK hoisting 180kg outboard so I can get it onto the boat.
The only other item completed was the boarding ladder. The hinge is a stepped bush turned out of delron rod, attached with a M8 bolt and nut.
Stay safe, best wishes.
Attachments

XS750AU
Coast to Coast
I have been given an opportunity to get stuck into the boat. Orders have dried up at work (no surprise), so half the staff have been stood down for the 4 days before Easter and the other half will be off after Easter. I am back to work Tuesday after Easter. Then I guess we will see what happens. Certainly better than other alternatives!
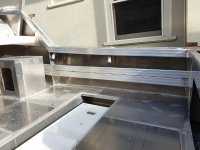
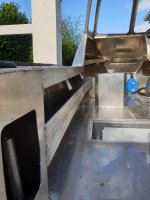
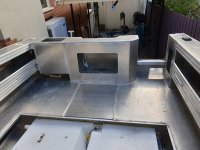
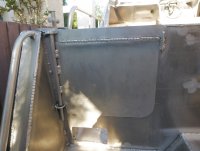
Made the rear access door, very simple lifting hinge that allows you lift it out of the catch and then swing open.
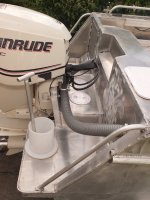
Finally found some 63mm flexible conduit to take the cables, harness, oil & fuel, steering hydraulic lines etc from the transom to the outbourd. Made a "grommet" from 60mm alloy tube and tacked it into position.
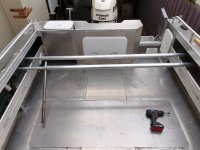
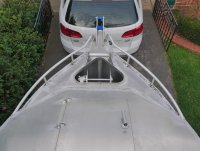
When standing against the gunnels they only came up to just above the knee ( the compromise of having a self draining cockpit). Not ideal when in rough seas fighting a decent fish. Added rails along the side, that add support half way up my thigh - much more comfortable.
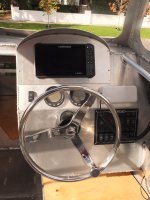
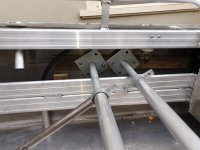
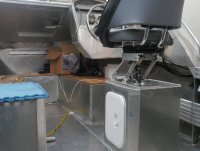
Seats have been lost by Australia Post, but I started on the helm by fitting the steering pump and wheel and the 2 Evinrude multipurpose gauges. The cabin side rails took a bit of fiddling to get right, best to start with the middle bend.
Finally fitted a fuel water separator / filter under the gunnel just in front of the bait tank. The plastic hatches have just been temporally fitted.
Onto the front rails tomorrow.
Made the rear access door, very simple lifting hinge that allows you lift it out of the catch and then swing open.
Finally found some 63mm flexible conduit to take the cables, harness, oil & fuel, steering hydraulic lines etc from the transom to the outbourd. Made a "grommet" from 60mm alloy tube and tacked it into position.
When standing against the gunnels they only came up to just above the knee ( the compromise of having a self draining cockpit). Not ideal when in rough seas fighting a decent fish. Added rails along the side, that add support half way up my thigh - much more comfortable.
Seats have been lost by Australia Post, but I started on the helm by fitting the steering pump and wheel and the 2 Evinrude multipurpose gauges. The cabin side rails took a bit of fiddling to get right, best to start with the middle bend.
Finally fitted a fuel water separator / filter under the gunnel just in front of the bait tank. The plastic hatches have just been temporally fitted.
Onto the front rails tomorrow.
Attachments

The leak test was done earlier by blasting compressed air from the inside and soapy water on the outside - 2 person job. Maybe not 100% accurate, but it should have shown any significant leaks.
The certified buoyancy foam is in sheets, and it sits above the stringers. Thus any water can freely drain out through the limber holes.
On alloy boats apparently you do not pour in PU foam, it reacts with the alloy.
There are a few more pieces to weld in, the motor and basic controls, then it will get a splashdown prior to finishing.
Interesting that there is a problem with liquid foam mixes on the alloy. But now that you have mentioned it I can't remember seeing spray/pour in foams in any tin boats.
I don't remember you mentioning, are you going to paint it and what are you thinking for horsepower?
XS750AU
Coast to Coast
Hi BrentInteresting that there is a problem with liquid foam mixes on the alloy. But now that you have mentioned it I can't remember seeing spray/pour in foams in any tin boats.
I don't remember you mentioning, are you going to paint it and what are you thinking for horsepower?
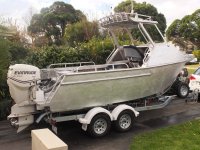
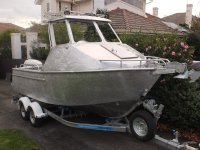
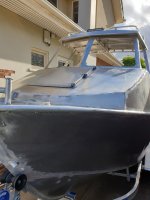
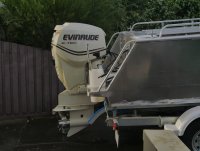
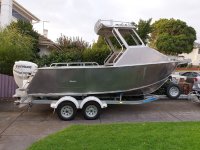
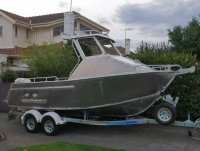
Vinyl wrap above the waterline and 130hp Evinrude ETEC is hopefully going on tomorrow.
XS750AU
Coast to Coast
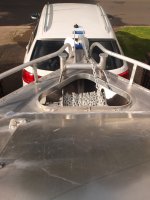
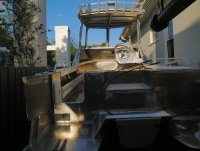
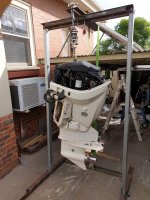
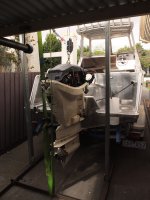
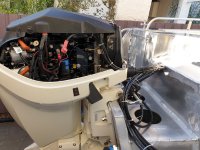
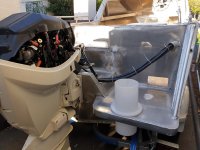
Motor is on. Apart from getting the wrong bolts to lift from the flywheel. I bought 5/16UNF per other blogs, needed to race out to Bunnings (hardware store) and get 3/8UNF bolts. After that it all went smoothly. The main bolts holding the motor to the transom are 1/2UNC SS316 torqued to 45FTLBS. Sikaflex 291 silicon to glue on the nylon pad and take up any gaps. The motor was bought second hand with 300hrs on the cpu, that is the first service for an Etec!
Attachments
-
 1 3-8UNF lifting points.jpg785.6 KB · Views: 214
 -
 2 Modified squat rack.jpg737.9 KB · Views: 217
 -
 3 Up she goes.jpg719.4 KB · Views: 222
 -
 4 On it goes.jpg562.9 KB · Views: 226
 -
 5 emerging.jpg797.4 KB · Views: 214
 -
 6 on.jpg430.8 KB · Views: 208
 -
 7 Side on.jpg772.4 KB · Views: 218
 -
 8 stern view.jpg626.2 KB · Views: 227
XS750AU
Coast to Coast
Last day before returning to work.
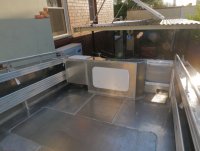
Plumbed up the fuel tank.
Made up new 5m battery cables, tinned the ends, swaged on the terminals using hydraulic pliers.
Initially, I thought it might have been an overkill using 63mm conduit (not fitted yet) but as you can see the cable run is filling the 60mm grommet going through the transom. I still need to add the Lowrance transducer cable. 63mm conduit is going to be full!
Attachments


XS750AU
Coast to Coast
The welding is now complete after today.
Added a rub rail on the sides, that really was to pull some weld distortion out. Used scaffold screw jacks to push out the concave section, then welded on the rub rail. To make sure it would hold the panels true, I slit a 50mm tube with 6mm wall in half with a saw bench. All worked out well - would have been better to avoid the distortion in the first place! Next boat will be much easier.
All major seams are now fully welded.
Now onto the fitout. Covid 19 keeps giving, we are down to 3 days work per week, so more time to get it done.
Attachments
XS750AU
Coast to Coast
Lights Action!
Solar cell has been installed, charging controller connected = Batteries are now charging via the solar system. Woo Hoo!
Still have to install the duel voltage sensing relay, to make sure the starter battery is protected from being drained to a point the motor will not start.
Anchor winch is 80% wired, need to mount the switch into the dash and connect the feed wires to the winch.
Lights,
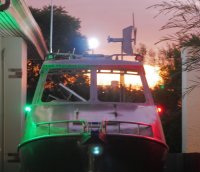
Navigation lights installed and working.
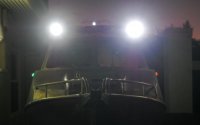
I have 2 LED flood lights mounted on the corners pointing out at 45deg to the center line.
There is also a 10" LED light bar centrally mounted pointing forward that is a spot beam.
Pointing to the rear is an LED flood centrally mounted.
Getting closer, need to do the buoyancy foam and windows.
Seats have arrived, now need to mount them. I have a spare mountain bike rear air shock that might make and interesting seat suspension system.
Solar cell has been installed, charging controller connected = Batteries are now charging via the solar system. Woo Hoo!
Still have to install the duel voltage sensing relay, to make sure the starter battery is protected from being drained to a point the motor will not start.
Anchor winch is 80% wired, need to mount the switch into the dash and connect the feed wires to the winch.
Lights,
Navigation lights installed and working.
I have 2 LED flood lights mounted on the corners pointing out at 45deg to the center line.
There is also a 10" LED light bar centrally mounted pointing forward that is a spot beam.
Pointing to the rear is an LED flood centrally mounted.
Getting closer, need to do the buoyancy foam and windows.
Seats have arrived, now need to mount them. I have a spare mountain bike rear air shock that might make and interesting seat suspension system.
Attachments

XS750AU
Coast to Coast
Spent 2 days making up a bit of indulgence. A suspension seat using a mountain bike air shock.
And it works, needs a bit of a clean up with the shock mounting bolts and then bolted down onto the pedestal.
And it works, needs a bit of a clean up with the shock mounting bolts and then bolted down onto the pedestal.
Attachments
XS750AU
Coast to Coast
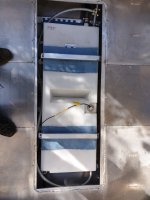
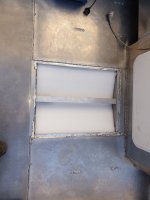
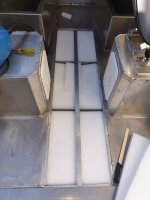
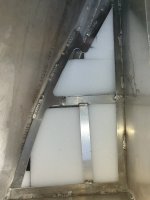
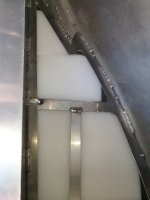
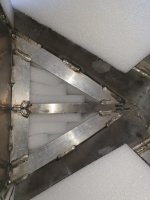
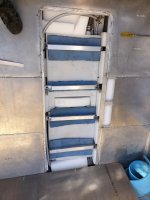
Its not going to sink. Put 1.3 cubic metres of PE closed cell certified buoyancy foam filling the hold. The sheets are supplied as 2m X 1m X 50mm, I used a bread knife to cut the sheets down into smaller blocks to get them in under the deck. It was probably the most physically demanding task of the build, to get all that foam into position. With all that foam filling the hold it is going to cut the water noise on the alloy hull, which is a good thing.
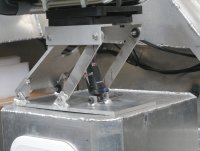
I also finally connected the hydraulic steering, and the instructions were not that clear as to which side of the steering pump was connect to which side of the ramp. You guessed it, I got it reversed. A geezer of oil and the hoses were swapped. I then purged another litre of oil to clear the lines of air. All good now.
I also finally connected the hydraulic steering, and the instructions were not that clear as to which side of the steering pump was connect to which side of the ramp. You guessed it, I got it reversed. A geezer of oil and the hoses were swapped. I then purged another litre of oil to clear the lines of air. All good now.
Attachments
-
 1 Rear floatation.jpg489.7 KB · Views: 172
 -
 4 centre filled.jpg456.1 KB · Views: 173
 -
 7 front filled.jpg553.3 KB · Views: 176
 -
 8 Front filled.jpg531.8 KB · Views: 175
 -
 9 point filled.jpg664.2 KB · Views: 168
 -
 10 bench lined.jpg543.7 KB · Views: 173
 -
 11 bench lined.jpg504.2 KB · Views: 171
 -
 12 scraps around fuel tank.jpg533.8 KB · Views: 179
XS750AU
Coast to Coast
Getting close to throwing it in the water.
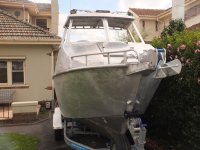
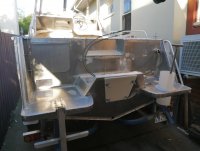
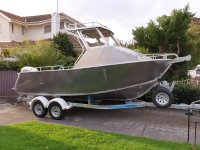
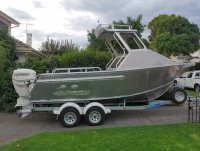
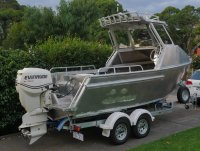
Everything is connected and working. Spent Saturday sanding the outside of the hull and cabin. First went over it with 80 grit on the 125mm velcro pad on the angle grinder to sand down the high spots (weld). If you keep the disk well lubricated with wax it comes off very quickly as the grit does not load up. Only used 1 disc per side. Once the high spots were ground off then all over it with the orbital sander, again with 80 grit and more wax. It needed 4 discs per side.
The most important piece of equipment is the twin filter gas mask to keep all that aluminium dust out of my lungs. I was sparkling all over.
I am very happy with the sanded look, and it is extremely low maintenance. What do you guys think, leave it sanded or go with the vinyl wrap.
Next weekend the windows go in and once the registration comes through then it getting wet!