Rocky Mtn high build: '74 CB350F

bradj said:
Keep you clutch on the old oil while it out of the engine ball hone the cylinders
brad, pls decrypt the above, I haven't had enough beers to understand wtf you're trying to say.
 
Your clutch disc need to stay wet with oil while there not in your motor. if you pull the clutch basket apart. wrap a zip tie around the fiber disc and throw then in a bucket of oil untill you pit them back in. if you replace them soak the new one in oil for a few days or at least a few hours
 
Makes complete sense now, thanks. ;)
What else do you think I should do for maint/preventative maint while I have it apart?
 
So finally back at this, and FINALLY got the case cracked wide open, so that I could access the starter clutch. Of course then I realize I probably could have gotten to it from under the oil pan, oh well. Now I can learn more about the guts. Hopefully I'll be able to get'r back together nice and smooth!

Anything else I should do while I'm in here?
 

Attachments

  • crack.jpg
    crack.jpg
    114.6 KB · Views: 630
Love it man. These are great bikes........ wish I had never sold mine
 

Attachments

  • cb350f.jpg
    cb350f.jpg
    153.9 KB · Views: 639
Modify the snot out of the motor now that it's apart. Big cam, big pistons, bore carbs. Create a MONSTER! Not being silly, it's what I want to do to mine once I get to it that is. What a little sleeper it could be. I've seen 400F's moded and they are missles. I think a 500cc big bore would be trick and possible, something to think about, maybe?
 
Small update today. My lag in getting all this, is my wife is a couple weeks from having our second boy, so my time is spent helping getting the house and everything ready for the storm that's about to hit.
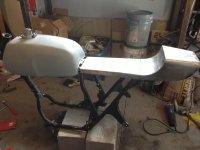
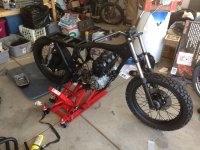
Today I was able to get a lot of the extra crap off the frame, shaving down more weight. Also was able to align up the new seat that Brad made for me, so stoked on how it came out, and can't wait to get the set primed and painted!
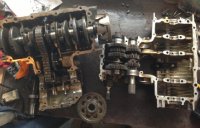
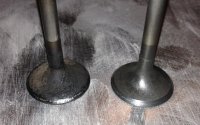
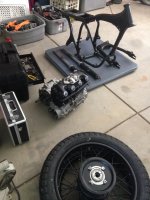
Other then that, spending a lot of time waiting for more parts to come in from all over, especially the starter clutch springs & set, valve spring compressor tool, and piston rings, so I can start putting the engine back together
 

Attachments

  • 2013-03-09 13.34.04.jpg
    2013-03-09 13.34.04.jpg
    1.7 MB · Views: 247
Good luck all round mate ;) ya build looks cool already 8) great seat work gonna look ace when she's painted up :p guess its gonna slow a bit when ya get the sound of tiny feet ;D all the best, will keep a look out for ya thread
 
Last night got my valves all cleaned off, using a drill and wire wheel buffer. Taped the ends of the valves for protection, then inserted into the drill, and rotated while buffing on the wire wheel, keeping away from the seat of the valve. Came out nice and clean! Waiting on a smaller lapping suction cup, to start the lapping, and cleaning inside of the head. Some before and afters...
 

Attachments

  • Screen Shot 2013-03-13 at 1.59.15 PM.jpg
    Screen Shot 2013-03-13 at 1.59.15 PM.jpg
    162.3 KB · Views: 769
  • Screen Shot 2013-03-13 at 1.59.30 PM.jpg
    Screen Shot 2013-03-13 at 1.59.30 PM.jpg
    361.9 KB · Views: 242
  • Screen Shot 2013-03-13 at 1.59.23 PM.jpg
    Screen Shot 2013-03-13 at 1.59.23 PM.jpg
    273.8 KB · Views: 237
I'm seriously so bad at logging all that I do, mostly cause I'm embarrassed about my working area, which is the shed behind my house - being I have no garage. This is what I've done this week:
- Took all the engine parts to my local transit authority, and used their massive dishwasher style parts washer. Pretty sweet!
- Lapped my valves
- fresh rings on the pistons
- took apart the wheels, painted spokes and nipples so far (waiting on new wheel bearings)
- welded in under-seat pans, with hinging seat (oh it's sweet)
- prepping frame for paint
- painted head black, prepping other engine parts for paint
- rebuilt starter clutch with new springs/posts/etc

not a bad week, but I don't like posts without pics, so I'll get on it...
 
Don't matter whether its out in the back yard or full on workshops mate we're all in it together ( home builds own idea's) your's is gonna look sweet 8) youve gone a lot deeper motor wise than i did I might regret that yet, she still aint running agh ??? hope everyone's ok family wise :) sounds like ya gettin lots done on ya build keep it goin mate always here fella ;)
 
Great to see another CO build on here. I was in Summit County today and man was it comin' down. At least you've got a shed! If it starts snowin' in Denver again that motorcycle cover is all mine has. Poor girl.
 
Anyone know if I can get rid of the top metal cover that's on top of both my fork tubes? Then just have the rubber cover go over what's under it?
 

Attachments

  • Screen Shot 2014-01-12 at 4.50.42 PM.png
    Screen Shot 2014-01-12 at 4.50.42 PM.png
    369.7 KB · Views: 893
Sure, just leave it off. I would put a gaiter there, though, as it is there to stop rocks/debris from pitting your fork tubes. Doing without is rolling the dice on replacing fork seals frequently due to dings.
 
ok, had some time over 4th of July weekend. Parts back from powder, so time to get this girl buttoned back up. Took a bunch of the parts to my parents in law for the week, to keep me busy while not working for the week
 

Attachments

  • 2014-06-30 11.45.27.jpg
    2014-06-30 11.45.27.jpg
    2.3 MB · Views: 264
  • 2014-07-06 08.51.44.jpg
    2014-07-06 08.51.44.jpg
    2.3 MB · Views: 274
In wanting to match the colors from my summer babe:
2mrckzc.jpg


Here are some shots of how paint is coming
n17cb4.jpg

2s8fciv.jpg
 
Back
Top Bottom