S
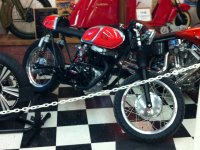
Sin City Cafe Racer
Guest
Re: Sin City CM400 Cafe Racer *NEW PICS*
Sorry it took so long to get back to you on your questions Frankenfe. I have been busy finishing the bike and finished it yesterday. I came here to post pics today and seen your post so I will answer them now before I post the finished pics.
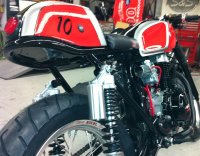
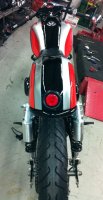
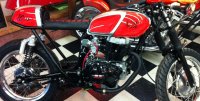
The shocks are sold as 13.5"... but they do have alot of adjustment in them. Right now I have them adjusted to 13.5" but I do want to lower them down to 12.75-13.0". The problem with where I live is that there is sand and salt all over the roads so I have to wait until the roads are clean before doing so. I always have concerns with the rear tire contacting the liscense plate frame. So I will slowly decrease ride height to make sure there is enough clearance.
I have no concern with chain swingarm contact. The reason I don't is the angle of the swingarm has not changed. When I re "engineered" (I use that term loosely) the rear sub frame, I kept the swingarm attached and at the same angle in relation to the frame. All changes made to the sub frame don't affect the swing arm directly. Now I know the shock angle has changed and of course with the new shocks the compression factors also change. But these shocks are definitely more stiff than stock and will provide for less compression. To be sure of my work I also removed the shocks with the chain attached and moved the swingarm through the range of motion and did not have any clearance issues.
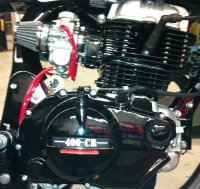
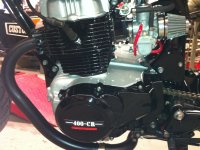
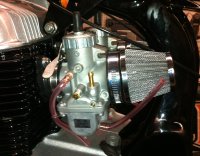
The carbs were bought as a kit from a distributor that I use for the business. They start out life as a sudco kit but are jetted for the cl360 application. Jetting doesn't concern me because I can jet myself when the time came. *so far the jetting seems to be good. I went through the gears easy on the dyno and no carb jetting issues appeared. BUT the road will be the true test, just know that the jetting is good enough to get you in the ball park and definitely on the road.
As you know the manifolds that came with the kit do not fit perfectly. The mounting holes are off a bit. Originally I had not planned on using or making carb spacers so what I did was put the manifolds on the bridgeport and mill slots for the mounting bolts. The manifold I have are aluminum with rubber coating. So even with the slots it is a strong solid and rigid mounting. Had I known I needed the spacers I would have made them so that the holes on one side would fit the manifold and the other side would fit the head. Either way it works fine and I have no concerns with the slots.
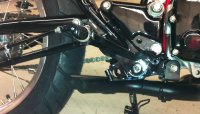
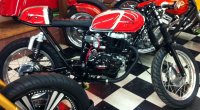
The rear sets.... I have no concerns with pedal length and lever force. I made sure to adjust the pedal so it was in a good spot for the riders foot. There are plenty of bikes out there (stock and modified) with drum brakes and short pedals. I believe that the longer pedals are a product of drum brakes having alot of movement required to activate the brake. I just made sure to put in the time and get the linkage adjusted so that it requires the minumum amount of movement. Also the tab I welded on the pedal was welded so that it pulls the brake arm forward rather that up and forward. This gives the maximum amount of leverage on the drum.
Your last question is a good one but for me it was for a different reason. Like I stated earlier I didnt have any concerns as far as force. But I did have a concern about the fact that there is now effectively 2 different pivot points. One for the swingarm and one for the rear brake. As the suspension goes through its range it does change the distance because they are moving at different ratios. Because of this I did some testing with the shocks off and the change in distance was minimal and didnt have any substantial affect on the adjustment. What I did have to do was put a stop on the rear brake pedal so that it would always return to the same position.
Thanks for the questions and I hope I helped. Dont hesitate to contact me with any more questions
Sorry it took so long to get back to you on your questions Frankenfe. I have been busy finishing the bike and finished it yesterday. I came here to post pics today and seen your post so I will answer them now before I post the finished pics.
The shocks are sold as 13.5"... but they do have alot of adjustment in them. Right now I have them adjusted to 13.5" but I do want to lower them down to 12.75-13.0". The problem with where I live is that there is sand and salt all over the roads so I have to wait until the roads are clean before doing so. I always have concerns with the rear tire contacting the liscense plate frame. So I will slowly decrease ride height to make sure there is enough clearance.
I have no concern with chain swingarm contact. The reason I don't is the angle of the swingarm has not changed. When I re "engineered" (I use that term loosely) the rear sub frame, I kept the swingarm attached and at the same angle in relation to the frame. All changes made to the sub frame don't affect the swing arm directly. Now I know the shock angle has changed and of course with the new shocks the compression factors also change. But these shocks are definitely more stiff than stock and will provide for less compression. To be sure of my work I also removed the shocks with the chain attached and moved the swingarm through the range of motion and did not have any clearance issues.
The carbs were bought as a kit from a distributor that I use for the business. They start out life as a sudco kit but are jetted for the cl360 application. Jetting doesn't concern me because I can jet myself when the time came. *so far the jetting seems to be good. I went through the gears easy on the dyno and no carb jetting issues appeared. BUT the road will be the true test, just know that the jetting is good enough to get you in the ball park and definitely on the road.
As you know the manifolds that came with the kit do not fit perfectly. The mounting holes are off a bit. Originally I had not planned on using or making carb spacers so what I did was put the manifolds on the bridgeport and mill slots for the mounting bolts. The manifold I have are aluminum with rubber coating. So even with the slots it is a strong solid and rigid mounting. Had I known I needed the spacers I would have made them so that the holes on one side would fit the manifold and the other side would fit the head. Either way it works fine and I have no concerns with the slots.
The rear sets.... I have no concerns with pedal length and lever force. I made sure to adjust the pedal so it was in a good spot for the riders foot. There are plenty of bikes out there (stock and modified) with drum brakes and short pedals. I believe that the longer pedals are a product of drum brakes having alot of movement required to activate the brake. I just made sure to put in the time and get the linkage adjusted so that it requires the minumum amount of movement. Also the tab I welded on the pedal was welded so that it pulls the brake arm forward rather that up and forward. This gives the maximum amount of leverage on the drum.
Your last question is a good one but for me it was for a different reason. Like I stated earlier I didnt have any concerns as far as force. But I did have a concern about the fact that there is now effectively 2 different pivot points. One for the swingarm and one for the rear brake. As the suspension goes through its range it does change the distance because they are moving at different ratios. Because of this I did some testing with the shocks off and the change in distance was minimal and didnt have any substantial affect on the adjustment. What I did have to do was put a stop on the rear brake pedal so that it would always return to the same position.
Thanks for the questions and I hope I helped. Dont hesitate to contact me with any more questions

")