The little Ducati Featherweight

irk miller said:
Hurco550 is an excellent welding instructor and a great resource. I'm surprised that dude hasn't jumped in yet.

You must have heard that from my publicist, I guess he earns his wages lol you know what they say, those who can't "do" teach ;)

Maritime said:
I think people pre-heat the head stock but I am not sure, I am not a welder. But I have watched some of our fabricators at previous job weld very thick alloy to very thin and they pre-heated the thicker metal right before welding.

teazer said:
Correct. the larger/thicker part has to be heated first so that both parts are brought up to the same temperature at the weld point. Where the torch is pointed makes a huge difference as you weld. bias it towards the thicker part and watch what is going on with both parts as well as the weld.

xb33bsa said:
all the above =preheat i would go 400 then weld then post heat wave a torch at it so the weld zone continues to spread some heat then cool slow by backing off the torch slowly or better yet wrap it in some insulation
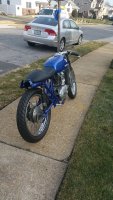
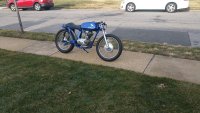
Don't know how I missed this thread so far, but really neat project coming along here!

I'd jump in on some weld advice, but it has all been well covered here. And yes, er70s filler (both mig and tig) aka standard mild steel filler is the go to for chromoly. Not just chromoly to "regular steel" but also for chromoly to chromoly.

I built some roll cages for pulling tractors as well as one for a Baja 500 truck, all using er70s-6 for filler. Baja truck rolled in the first 50 miles, and the cage held up.

Basically, as with brazing, the use of a less hard more ductile filler aids in the avoidance of cracks. If you used a filler with matching tensile strength as the base metal in a focused stress location (I.e. Most weld joints), you will almost un doubtably have cracking. Still though, in er70s wire, the 70 means 70,000 p.s.i minimum tensile strength in a PROPERLY DEPOSITED WELD. That last part is important ha

Cheers with the build my friend, excited to see it come together
 
jag767 said:
Wow.... that i like... ;D
it does look the buisness and the xl hub looks just like that one,even has the little mini fins tween the spokes
i have all the parts here to do one, tuna wanted it the brake plate it needs slight modding to fit hub he has a wheel and hub already
the conical hub i should finish out with those holes and sell to you :)
 
PROPERLY DEPOSITED WELD. That last part is important ha


an old farm welder once told me "aint got no weld without a puddle!"
its just about the truist advice could be given even today and i would only ad-molten puddle to remove any doubt
 
xb33bsa said:
it does look the buisness and the xl hub looks just like that one,even has the little mini fins tween the spokes
i have all the parts here to do one, tuna wanted it the brake plate it needs slight modding to fit hub he has a wheel and hub already
the conical hub i should finish out with those holes and sell to you :)

M ::) M
 
tuna see i got a brake plate and hub
you need the plate modded to fit, somebody like jag only needs the hub and instructions to mod brake plate
2 jobs one stone
 
I'd love to get on that, but I want to put my dollars in the motor before I do anything else. Between buying the motor, carb, exhaust, cdi, and 12v conversion I'm at $1600, and that doesn't even get me into the motor. I figure the clutch, gaskets, piston, machine work, etc I will likely double that number. Then there's getting the frame powdercoated after I screw with it, and the small dollar amount of steel I need.

But yes, after all that we'll talk. Lol
 
If you want a light hub run a disk setup for a Z50. Plenty cheap aftermarket ones. Just need to make an adapter from split rim to spoke.
ZD0792__94754.1401859325.1280.1280.jpg


If you want to stop quick, maybe don't run that. Might be an idea for the rear hub though.
 
if you are going disc the mini mx wheels are just the ticket
kx2.jpg

here is an kx85cc all supermotarded with 17's
 
All good options for the future. Motor should get here today, interested to see what I got myself into with the internals.
 
This is going to be a very very easy swap... All i have to do is cut the cradle on each side by the swingarm pivot partly through, cut the downtube below the two bolt holes, bend the cradle down about an inch, reweld the back, then slug and weld the downtube. Done! And i keep the cradle.
 

Attachments

  • 20161220_174355.jpg
    20161220_174355.jpg
    821 KB · Views: 205
  • 20161220_174415.jpg
    20161220_174415.jpg
    2 MB · Views: 224
  • 20161220_174427.jpg
    20161220_174427.jpg
    2.2 MB · Views: 227
Going to start the cutting tomorrow, figure I can get the motor in and aligned tomorrow, maybe 3 hours work. What are the odds I don't even need a different chain? ::)
 
Umm.... so that was boring. It actually left me wondering if honda ripped off ducati for dimensions. Took 30 mins and i only cut off 1 motor mount which was unused, and shaved down another. The motor fits no tighter than the honda motor did. Even the chain will line up perfect i think. I'm almost disappointed. One or two easy little nothings to fix, and carb placement may get interesting.
 

Attachments

  • 20161221_094146-1.jpg
    20161221_094146-1.jpg
    3.6 MB · Views: 219
  • 20161221_094153.jpg
    20161221_094153.jpg
    1.9 MB · Views: 215
  • 20161221_094134.jpg
    20161221_094134.jpg
    3.8 MB · Views: 217
Maritime said:
Well shit you're almost done now LOL.

Lol im a little let down, I was ready for this big project! 2 hours of metal work and i will have the seat mod, front motor mount plates, any minor tweaks done.
 
Never thought i'd hear it....moaning at how easy and quick a motor swap was ::) ;D

Made for it.
 
Back
Top Bottom