
We noticed you are blocking ads. DO THE TON only works with community supporters. Most are active members of the site with small businesses. Please consider disabling your ad blocking tool and checking out the businesses that help keep our site up and free.
You are using an out of date browser. It may not display this or other websites correctly.
You should upgrade or use an alternative browser.
You should upgrade or use an alternative browser.
TX500 build
- Thread starter JRK5892
- Start date
SrgtBear
The arsenic has oddly shaped feet...
wow that sounds great. Thanks. I am little late though. I already sent my covers out for chrome :-\ FML. Worst case scenario i'll find a cover off ebay, modify it and re-chrome or maybe use a different color. What kind of oil are you using? Brand, weight, reg or synthetic? Thx again.
cloudhopper
New Member
SrgtBear
The arsenic has oddly shaped feet...
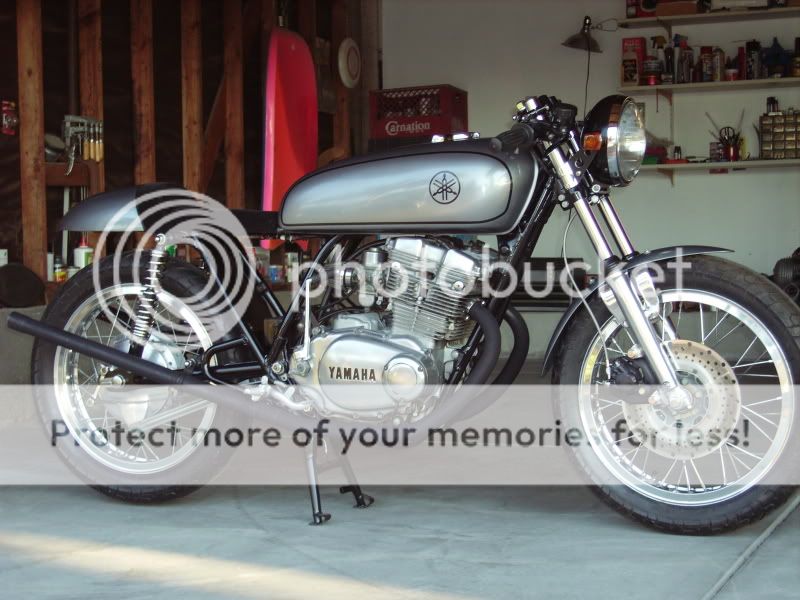
cloudhopper said:hi, what tank is this?
that's a stretched stock tank. I forget where that guys build thread is but I saw his process somewhere on the internet a long while back.
cloudhopper
New Member
actually, i should have been more specific.. what year xs/tx500 tank is that?
SrgtBear
The arsenic has oddly shaped feet...
cloudhopper said:actually, i should have been more specific.. what year xs/tx500 tank is that?
1973-75 Yamaha TX500 / XS500 Tank. Those years and models had the same gas tank. The 76+ models had a boxy and square gas tank. The silver tank above was cut in the middle and then stretched by adding sheet metal then welding it back together.
some of you may or may not know, but my wife is preg... so i am selling a good amount of my bikes. Pulled the cafe out to prep it up... and well... spoke to Tim from in the shop, he had nothing going on... told me to just bring it up to the shop and he and i would work on it saturday... about 2o hours later hahahah we got in a bit deep, now it has became a complete redo. hahaha well a good part of it at least is getting redone
work done:
wheels coated
dyna beads installed
fresh bearings
swing arm coated
swing arm spindall bungs welded in
brake arm fabbed and installed
VM carbs mounted and ready to install
prob more i am sure i missing someting
here are some pics... fresh out of the back of the shop:
looking rough

about an hour later

I really like using a sport bike stand so Tim made some bungs for me and welded those on... then got rid of the polished swing arm and color matched to the frame (with a few other odds and ends)


freshly coated


then on to the brake arm, the old one.... well it sucked!
here is the side by side with the shit old one and the newly bent/welded


welded the threads on the round bar and the clevis to make it work


then assembly (it was late and i wanted to get home, so i did not snap pics of us putting in bearings and installing tires hahahaha)
on the trailer headed home

few pics i snapped this morning just mocking up the tins and seat


more to come!!!
work done:
wheels coated
dyna beads installed
fresh bearings
swing arm coated
swing arm spindall bungs welded in
brake arm fabbed and installed
VM carbs mounted and ready to install
prob more i am sure i missing someting
here are some pics... fresh out of the back of the shop:
looking rough
about an hour later
I really like using a sport bike stand so Tim made some bungs for me and welded those on... then got rid of the polished swing arm and color matched to the frame (with a few other odds and ends)
freshly coated
then on to the brake arm, the old one.... well it sucked!
here is the side by side with the shit old one and the newly bent/welded
welded the threads on the round bar and the clevis to make it work
then assembly (it was late and i wanted to get home, so i did not snap pics of us putting in bearings and installing tires hahahaha)
on the trailer headed home
few pics i snapped this morning just mocking up the tins and seat
more to come!!!
some of you may or may not know, but my wife is preg... so i am selling a good amount of my bikes. Pulled the cafe out to prep it up... and well... spoke to Tim from in the shop, he had nothing going on... told me to just bring it up to the shop and he and i would work on it saturday... about 2o hours later hahahah we got in a bit deep, now it has became a complete redo. hahaha well a good part of it at least is getting redone
work done:
wheels coated
dyna beads installed
fresh bearings
swing arm coated
swing arm spindall bungs welded in
brake arm fabbed and installed
VM carbs mounted and ready to install
prob more i am sure i missing someting
here are some pics... fresh out of the back of the shop:
looking rough
about an hour later
I really like using a sport bike stand so Tim made some bungs for me and welded those on... then got rid of the polished swing arm and color matched to the frame (with a few other odds and ends)
freshly coated
then on to the brake arm, the old one.... well it sucked! thankfully Tim was able to come up with something better!
here is the side by side with the shit old one and the newly bent/welded
welded the threads on the round bar and the clevis to make it work
then assembly (it was late and i wanted to get home, so i did not snap pics of us putting in bearings and installing tires hahahaha)
on the trailer headed home
few pics i snapped this morning just mocking up the tins and seat
more to come!!!
Swagger
Putting boot to ass since 1967!
Honestly Joe....I think it's easy to lose sight of the fact that metal is bitchen when you're coating stuff.
I'd sandblast the aluminum and hit it with satin clear to keep it nice and maybe do the springs and pipes in something muted and interesting like hammertone grey or something
I'd sandblast the aluminum and hit it with satin clear to keep it nice and maybe do the springs and pipes in something muted and interesting like hammertone grey or something
CooperSmithingCo
New Member
Good looking bike, those tx500's are a fun and pack a punch: http://coopersmithingco.com/pjailbird.html
The omni phase balancing chains tend to stretch and throw some horrible vibrations at you. Look for a replacement chain and tighten it up - like magic the problems are gone.
The omni phase balancing chains tend to stretch and throw some horrible vibrations at you. Look for a replacement chain and tighten it up - like magic the problems are gone.


