Vintage Fox Factory Superbike Shox vs Marzocchi vs new Hagon 2810 or YSS Z-362

xb33bsa said:
the strip used on the original that you have is common stuff for the hydraulics industry you should be able to source it,get some new stock and cut it to fit or get an already sized piece
what are the dimensions ?

That sounds GREAT, but do you have any idea what this material is called? I will measure it in the next day or two. THANKS!
 
xb33bsa said:
they also make composite plastic teflon glide rings, the ones in the pic you show are cast iron ?

Thor's replacements are cast iron, as are all but the very first offroad MX Shox version (& our road versions). Must have been a problem with the flexible glider material in heavy/hard useage that they switched to the step cut rigid cast iron style for MX Shox.

Sorry I was typing as you were posting both comments on materials dources. This teflon option also sounds great, any idea where to get it as well???

I suppose the hone + cast iron ring would be the option if the inside of the shock was worn or scored and needed a honing.

Thanks again for all your help. Didnt realize the ebay shox were yours! Wow, $$$$$.... Parts in mine & purchase price will run me under $500 with shaft, psint, oil, etc, so I think I will be doing good. The red ano is faded on the outsides and one reservoir has some cosmetic gouging, motivation to just run them and be happy that I have a great set of shox with some nostalgia behind them as well! Thanks guys.
 
many years ago i worked as a repair tech in a large hydraulic supply/repair shop.... if you can find a shop like that local to you they may be able to help as well take what you have to them
 
I wonder if a very qwick pass with a brake cylinder hone would be beneficial to the insides of the shock cylinders? Only if the surface were just slightly imperfect, of course.
 
ohlins shocks use a bronze impregnated teflon composite, for lower friction
the fox shock is in inch sizes which is a plus in my opinion
 
Chuck78 said:
I wonder if a very qwick pass with a brake cylinder hone would be beneficial to the insides of the shock cylinders? Only if the surface were just slightly imperfect, of course.
no need for that unless it is rusty or has high spots,like grooves with a corresponding ridge
 
So far I am only finding it in bulk, but at least I have an idea of what I'm looking for. Any tips on where to buy a sheet or roll of this material?

http://www.bergmanspecialty.com/pneumatic-hydraulic-seals_wearbands.html

Seems as if they are called wear rings, piston bands, or wear bands. Seems much preferred over a cast iron piston ring to me. They are apparently just as xb33 said a glide, to prevent metal to metal contact. I'll have to inspect the bodies on mine now with that in mind, considering the big gap there... Hope it didnt score the shock body. Maybe a hone and some thicker material could rejuvenate it if so.
 
http://hypax.com.sg/cms/index.php?page=Wear-Ring

http://www.walleseals.com/en/showart-3-152-909.html

Both from China & in bulk, need to find a source for non-wholesale quantities. I guess I could donate the unused portion of a roll to Thor & DEK to show my gratitude for their knowledge & resources, if I had yo buy it in bulk.
 
finally made some progress! In trying to remove the sealhead on the second shock, the whole main cylinder started to unthread. So I made a clamping block by spacing 2 boards apart with 2 sawzall blades (screwed the 2x4's together) and drilling them with a hole saw the exact size of the main cylinder in the drill press, and then removing them from the drill press and removing the screws and clamping the shock in the vice with them. this got the sealhead off, but removing the main cylinder from the rest of the shock body required heating the body to 200 degrees using an infrared thermometer and an acetylene brazing torch, as the manual specifies to break the red loctite off of the permanently attached parts such as the lower clevis mount and the main cylinder and reservoir. this got it spinning freely of immediately!on the same shock, the piggyback reservoir unthreaded with an iron fist grip by hand, but the other shock it seemed much more permanently attached. Fortunately both of the o-rings on the main cylinder and reservoir seem incredibly pliable and in excellent condition , on the shock that was easier to dismantle, so I have no qualms not dismantling the other shock.

I have also just gotten around to ordering 2 new shafts and all rebuild parts from Thor Lawson, who has been incredibly helpful and awesome.

I've had some help in acquiring some better piston bands, or wear rings, rather, for the main cylinder piston. I also have noticed that you can order wear bands or piston bands for newer shocks that look very similar, and could be cut down & made to work as long as they are the same thickness. From manufacturers such as Fox, King, and sway-a-way. the only ones that Thor sells require machining to the road versions of the shocks, and they are a cast iron piston ring.I much prefer the original material that is sort of like refrigerator magnet flexible stock with bronze particles embedded in it. Unfortunately the factory tolerances left me with one band that has a huge gap and one that has a not so bad gap. I think this will slightly affect the dampening as there is definitely a bit of leak through that is figured in with the shock valving.
 

Attachments

  • IMG_20140513_213723.JPG
    IMG_20140513_213723.JPG
    276.1 KB · Views: 211
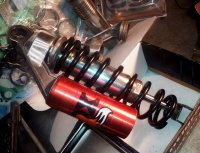
I decided to repaint the springs in a fitting color scheme for my bike/tastes, since I am NOT refurbishing the shocks for resale, but rather to have a nice vintage & fitting shock around my price range (well, that's turning into quite a stretch!) that performs as good as many modern shocks in the $600 to $1000 price range that I definitely cannot afford! the only major advantage to the newer shocks is that they have adjustable dampening and are easier to adjust preload. I will take the cost savings and nostalgic bonus in refurbishing these vintage shocks and putting my own blood sweat tears and elbow grease into them, as opposed to shelling out as much money as the purchase price of my bike in stock form!

after soaking the springs in a tub of paint stripper and then spending some time on the wire brush wheel with them, they turned out looking like a very nice polished steel luster, & I was tempted to clear coat them. Unfortunately I've had problems with rattle can clear coats turning yellowish with ultraviolet light exposure, and I cannot find any durable clearcoat other than paying the powder coaters to clear them. My friend reminded me that clear powder coated bicycle frames typically display spiderweb marks of rust developing underneath the finish over time, and that was enough to deter me.

as I could not find any por 15 chassis coat black locally, my next best and most affordable option was VHT epoxy paint which only comes in semi gloss black, but it's perfectly fine for my color taste! this paint takes 7 days to cure, so I will not get to ride the shocks in West Virginia this weekend, and it looks like rain anyway for Friday's drive down there, so it may be a mountain bike camping trip instead.

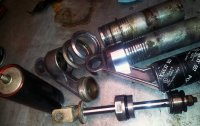
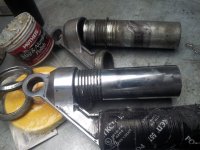
also, as you can see in the photo, the shocks surprisingly polished up very quickly to a mirror finish on the aluminum parts, and the steel main cylinder apparently was zinc plated or something, which also polishes up to almost chrome. I was tempted to use the same black epoxy paint for the main cylinder where the spring bushing rubbed the plating off, consequently leaving a rusted marks and no plating. Unfortunately I think that paint may just rub off again, and black may show the wear much faster, although it the black paint is much tougher epoxy paint and it is a Teflon or nylon bushing that separates the two springs. I am undecided on this, as I cannot get silver paint an epoxy form, only in brake caliper paint or lessers. I am wondering if the black will look good and break up the space a little bit, or if it will look odd painting the main cylinder below the spring perch and clip grooves, leaving the top half with the original finish buffed to a high polish. I knew putting on the clips would scratch the black paint off immediately, so I decided that I would only paint below that, whether it is silver or black.if the original finish was not worn down completely to expose the bare metal and let it rust, I would have just buffed the entire thing & been very happy.

what does everyone think, durable epoxy paint in black below the spring perch on the main cylinder, and polished aluminum sealhead at the bottom of it, or just paint the thing silver and let it blend in, but looking very dull compared to the rest of it being polished plating and aluminum (aside from the black springs).
 

Attachments

  • IMG_20140513_210151.JPG
    IMG_20140513_210151.JPG
    3.2 MB · Views: 221
Re: Vintage Fox Factory Shox

After looking at Carpy's supercharged cb750 "koppa kafe" with chromed springs, polished aluminum, and re-anodized orange reservoirs, even with black springs instead of chrome, I think I may try for the more durable epoxy paint to break up the color monotony a little more and accent the bodies with more black. Hope it ends up looking alright.

69.jpg
 
Re: Vintage Fox Factory Superbike Shox

ON SECOND THOUGHT... Holy smokes, after sanding the rust discolored areas off where the plating was worn completely through, this factory finish AND the bare sanded steel polished up almost like chrome! Wow. I think I may have to clearcoat this area to prevent the bare metal areas from rusting, as I can always go back and epoxy it black with some quick sanding if the clear wears off and starts rusting again. I was hoping for more black to break up the shiny polished aluminum scheme, but the results here were just too much to cover up. You can tell the bare metal areas apart, but they blend in quite well enough.

I am incredibly excited about these. This rebuild I will call 36th birthday gift to myself. Hopefully get to ride them for the first time on a 4 hour cruise through 2.5 hours of twisties and hills and 1/2 & 1 hours flat rural riding before and after on the way to the Williams Vintage Cycles vintage bike show in Xenia, Ohio May 24th, arriving around 1230 or 1pm (show goes until 3pm). That will be quite the reward.
 

Attachments

  • IMG_20140513_232351.jpg
    IMG_20140513_232351.jpg
    3.6 MB · Views: 230
STILL WAITING on the rebuild parts from Thor, and haven't gotten any correspondence from him in a month!!! I think he was waiting for the repro shafts to arrive from the forge and then go to the chrome platers last I spoke to him. Getting very anxious to add these to my bike at the same time as a bunch of other upgrades.

I clear epoxy painted (firearms finish from Brownell's) the main cylinders after polishing and degreasing them A LOT, and had to mock them up to see how the colors will look when assembled. I am VERY VERY PLEASED to say the least. Now if I could only get those darn parts from Evolution (Thor)... Doh!
 

Attachments

  • IMG_20140614_001756.JPG
    IMG_20140614_001756.JPG
    1.8 MB · Views: 217
FINALLY!!!! Thor called me last night & apologized for dropping of the radar. He shattered his leg in an AHMRA(?) race and is just getting back into the machine shop this week, and is getting my parts mailed out today. So relieved that I can throw these things back together for the ride to AMA Vintage Motorcycle Days & our West Virginia mountains week long trip...
 
o1marc said:
Ernie is one of the most cantankerous old farts you'll ever meet. It's rare that you find him when he isn't pissed off about something.

This is the most true statement I've ever read on this board.
 
Back
Top Bottom