XZ in NZ

Never thought of that. I'll look for something less abrasive. Hard to find in NZ so yet another international parcel.

You can see in the pics above I've switched to a classic chrome round headlight (the bucket will be powder coated to match the wheel hubs) but saw this on the net and found myself dribbling - is it too streetfighter do you think?

http://www.ebay.com.au/itm/Universal-Motorbike-7-Matt-Black-LED-Headlight-Fits-Triumph-Speed-Street-Triple-/150979216403?pt=AU_Motorcycle_Parts_Accessories&hash=item2327100413&_uhb=1#ht_5397wt_1188
 

Attachments

  • headlightr LED.jpg
    headlightr LED.jpg
    39.3 KB · Views: 921
Why not nylon braided sleeve? It's cheap and effective. I'd be surprised is someplace there did have some for sale...
 
Tried to place a $20 order at cableorganizer.com. They wanted $90.72 in postage - for something that would fit in a $8 flat rate box. What a bunch of thieves
 
Still waiting for the LED headlight light to arrive, so entertained myself by attacking the frame with an angle grinder.
Getting rid of the unnecessary crappage certainly makes the frame look cleaner.
 

Attachments

  • IMG_0273.jpg
    IMG_0273.jpg
    266.2 KB · Views: 855
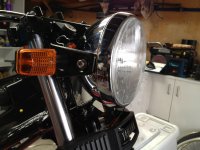
The headlight arrived, but was disappointingly dim. I have seen fireflies brighter than that.
Then I realised my battery has been under the bench so long (over summer) it had evaporated nearly dry.
A charge on my very amazing oxford charger and it seems I've suffered no ill effects.
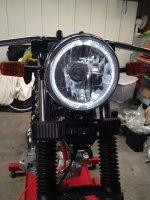
The headlight is NOT the advertised 7" but something rather less (and even narrower at the mounting points) and really flipping annoying because I'm all set up for 7". On closer scrutiny, they do list the mounting size in mm, but all I read was 7". Typical, I need to read more carefully.

It's also not all that bright - but about the same as a stock bulb and will look rather groovy. So I need to organise some new mounting ears, which means more supplies.... OR buy a genuine 7" with more lumens from JW Speaker for $500 plus shipping.. I will dwell on this problem.

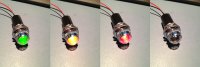
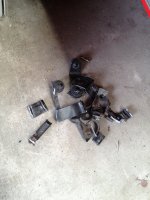
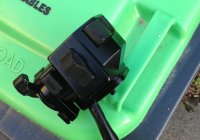
Now that I have electricity, I have to do something... I thought I'd work on my rear light. Ages ago I removed the grab handles on the rear cowl and filled the holes with CRC marine filler. Still the flashers were annoying me. they stick out like a teenage stiffy - even though I'd replaced them with tiny tiny ones. Integrated LEDs - thats what I need.

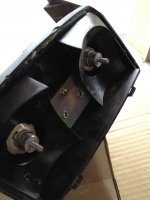
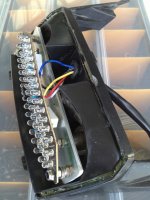
I happen to have a aftermarket R1 LED light in the stash. When the flashers go, the brake/rear light on that half turns off. - Pretty cool. So I smashed it with a big hammer and ripped its guts out. The insides are just a fraction narrower than the XZ lens.

The XZ rear light is glued together so I baked the rear light in my shop oven 80 degrees (Celsius) for about 10 minutes to soften the adhesive, and then pulled the red plastic off. I wanted to be able to return to stock later, so rather than drill mount holes I narrowed a couple of bits of Alu rod, then inserted pins (cut off pieces of blunt drill bit) so its exactly the same as a bulb. That plugs into the bulb holders with a mount screw sticking out. That holds a plate, and then the LED array bolts to that - spaced with a few washers. Tra la la.

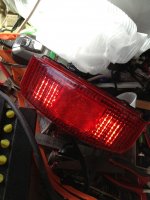
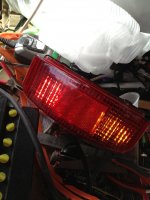
All together and looking rather stock; but not.
 

Attachments

  • IMG_0297.jpg
    IMG_0297.jpg
    146.5 KB · Views: 729
  • IMG_0302.jpg
    IMG_0302.jpg
    214.7 KB · Views: 754
  • IMG_0301.jpg
    IMG_0301.jpg
    205.5 KB · Views: 735
  • IMG_0300.jpg
    IMG_0300.jpg
    206.1 KB · Views: 788
Today I cast my attention to the switch gear. The ones on the bike were painted by me a few years back, but despite limited use, they had not lasted well.

I was going to get quite a few bits powdercoated, but then I saw on Youtube the Eastwood powder gun http://www.eastwood.com/paints/hotcoat-powder-coating.html and thought I'd give it a go

It's unbelievably easy. There's no spray drift, and the part is ready to go as soon as it's cool. If you haven't seen these, they are well worth a look, relatively cheap. I chose the semi-gloss black. It's very close to stock.

The only difficulty is large parts, as my bench-top toaster oven only fits parts up to the size of a chicken
 

Attachments

  • LHSwitch.jpg
    LHSwitch.jpg
    87 KB · Views: 774
More DIY powder...
My toaster oven has the most shitty rack I made out of bits of bronze brazing rod. Even though I could fit an entire chicken in there I end up powdering only a couple of bits at a time. This is 3 days work. Most everything else is too large and will need to be outsourced.

As far as resilience goes, I messed up one part and tried to sandblast it to strip and start again. Using a medium grit and fairly new media it didn't budge it - just took off the shine a bit. I ended up using a high speed die grinder and wire brush - even then it took about 15 seconds to break through to the metal.
 

Attachments

  • More DIYPowder.JPG
    More DIYPowder.JPG
    149.2 KB · Views: 247
Frame done. I had to outsource this as the frame is bigger than a chicken.
A big improvement.
 

Attachments

  • IMG_0359.jpg
    IMG_0359.jpg
    265.6 KB · Views: 681
Wheels back on now, and starting to work on my Big-Arse brake mod.

The Rotor is an R1 rotor. Here it is with the Brembos safety wired in position. I've found the wheel is offset to the left about 3mm. As soon as I figure out why and back in the middle, I'll start fabbing some brackets. I've never done that before. The plan is to use 10mm 6061 which will be filed to about 7mm at the narrowest point yo handle the new caliper offset from the stock mounts. Is 7mm to thin?
 

Attachments

  • IMG_0438s.jpg
    IMG_0438s.jpg
    194.2 KB · Views: 839
I'm watching this with interest as I had one of the first XZ550's in the country, and loved it once Tommy's Yamaha sorted the carbs out.

This looks like it's going to be one nice café when it's done :)
 
Thanks. I bought my first in 86 with only a couple of K on it. Sold it when I had troubles that they couldn't fix. I know better now about what would have caused it. These bikes are pretty good with just a bit of TLC

Those carbs can take a bit of sorting. Mine are pretty much 100%, however I have a cunning plan.
 
A while ago I got a single LED volt meter (Tri-colour)from http://www.sparkbright.co.uk/

Pretty cool but I was not loving the LED look together with my gauges.
Got a clear jeweled bezel off ebay for about $5, drilled out the bulb mounting stuff and it fits right in without any further mods. The unit is already waterproof so it's ready to go.
 

Attachments

  • Bezel.jpg
    Bezel.jpg
    105.8 KB · Views: 269
Still waiting on metal for my Big arse brake mod (how can a metal shop be out of 6061 plate?), so to fill in time, I raised the headlight mounting ears and re-welded them in place. A quick wire brush and a powder coat and it's back together - but no longer touching the plastic emblem below.
 

Attachments

  • IMG_0454.JPG
    IMG_0454.JPG
    186.7 KB · Views: 236
Roro said:
A while ago I got a single LED volt meter (Tri-colour)from http://www.sparkbright.co.uk/

Pretty cool but I was not loving the LED look together with my gauges.
Got a clear jeweled bezel off ebay for about $5, drilled out the bulb mounting stuff and it fits right in without any further mods. The unit is already waterproof so it's ready to go.

Very cool. I would get this for my bike if I weren't colorblind. :|
 
I drilled my headlight for my new Multi-colour LED idiot lights. I figure I can get away with just the 3 - all clear for the RGB LEDs I'm using. Looks a bit like a Darlek, but should be OK one the Speedo and Rev are mounted

LED 1 = Volt meter
LED 2 = Water Temperature
LED 3 = Normal idiot lights - if more than one applies at once then cycle through them.

Thinking about a Macchina Arduino to do the logging, run the displays/LEDs etc. Pricey but the built in EMF suppression, protection and CAN bus may make it cheaper in the long run
 

Attachments

  • IMG_0458.jpg
    IMG_0458.jpg
    178.6 KB · Views: 796
  • macchina2012labels 2.png
    macchina2012labels 2.png
    165 KB · Views: 838
Some more work on my big arse brake mod.

The plate will end up being 7mm at its narrowest point. Will that be strong enough? I've never done this before so Feedback welcome!!!

I got some 10mm 6061 T6 Plate ($40) from my favourite metal place.
I used an acrylic document folder I had lying around and trimmed well enough as a cutting template. It's just rough - till I get the holes right, and then I'll radius the corners with a belt sander.

The template is transferred to the plate which I'll cut out next week on a bandsaw. The plan is to get the templates cut out and then make a transfer punch out of a sharpened 12mm bolt to place marks for the holes. I'll do one at a time so there should be no mistaking where they go.

The caliper is spaced out with a piece of 1.5mm TIG rod duct taped to the rotor

When the whole thing is cut out, I'll mill down the fork leg edge about 3mm to make the caliper align with the rotor - I have some spacing issues I still need to address before I do that.
 

Attachments

  • IMG_0455.jpg
    IMG_0455.jpg
    213.9 KB · Views: 857
  • IMG_0456.JPG
    IMG_0456.JPG
    223 KB · Views: 250
The engine is in an all mounts torqued.
I've cut out the caliper mounts and just need to create a 12mm transfer punch to locate the holes correctly.

I've been obsessing about LEDs since I found the LED headlight a bit too small. But what about ANGEL EYES?
 

Attachments

  • IMG_0542.jpg
    IMG_0542.jpg
    205.7 KB · Views: 861
Back
Top Bottom