XZ in NZ

The spec 2 pipes were just too corroded to look good on the bike. I got them ceramic coated, but that just showed up the pitting even more.

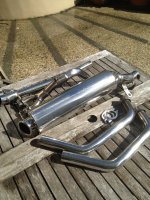
I found a set of used Predator UK pipes in stainless for sale in the USA which arrived yesterday, after an excursion through NZ customs where they charged me tax, import levy, tax on the import levy, biosecurity levy and tax on the biosecurity levy. It's in perfect condition and after a bit of metal polish hard to tell from a new one but at a quarter the price. I have to say it looks miles better than stock, and about half the weight.

They are marked "Competition Use Only" but if they turn out to be too loud, I can get a UK road legal baffle from Predator UK

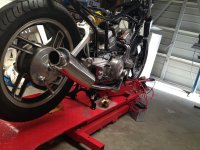
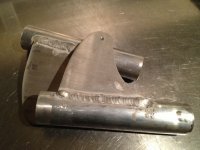
Because it's a 4-2-1, there's no way to properly use an exhaust gas analyser on the Predators so I've ordered a couple of stainless o2 sensor bungs to be welded in before final fitment. Only issue seems to be that it seems it will sit right where the axle needs to come out dropping the exhaust to remove the rear wheel would be an enormous PITA.
 

Attachments

  • IMG_0567.jpg
    IMG_0567.jpg
    359.1 KB · Views: 650
  • IMG_0568.jpg
    IMG_0568.jpg
    239.5 KB · Views: 246
Some more work on the brake adapters, I used a sharpened bolt as a transfer punch to get the hole centres correct. Milled 2.5 mm off to get the alignment right - just a straight line, no fancy squiggles. The remaining 1.5mm will be using shims.

Also did some work on my headlight ears. This is my second time ever on TIG - first on aluminium with a 10 minute practice (I have very limited access to the TIG machine). I think it came out OK considering.
 

Attachments

  • IMG_0572.jpg
    IMG_0572.jpg
    195.3 KB · Views: 754
  • IMG_0579.jpg
    IMG_0579.jpg
    187.2 KB · Views: 244
Thanks Rat Rider. It will be a while yet. Don't hold your breath.

I stripped my spare forks and sent the lowers off for powder
I still have to get some new inners so while I'm waiting thought I'd have a look at the switchgear...

The Motogadget m-unit switches low control voltages to ground - which is the exact opposite of Yamaha stock. Not much to see but here is the LH cluster re-wired to switch to ground. I'm using Motoagadget m-button so I have a single cable heading back to the m-unit in the tail. I managed to fit the m-button inside the switch housing (top left in pic) and add a hazard function. The High/Low button was a SPST so I used two IN4004 Diodes to ground both turn left and right at the same time.

Some of the switches have been re-purposed to enable full m-unit functionality which you only get if you have a push button for lights.
Left Hand
Horn=Horn
Turn=Turn
High/Low beam = Hazard On/Off
Flash to Pass = Flash to Pass / High Low Beam / Lights On & Off
Right Hand
Kill=Kill
Lights Off/Park/On = Angel Eyes On, Eyes & Gauge Lights On
Start=Start

I still have to find places for the dash config and m-unit config buttons.
 

Attachments

  • IMG_0608.jpg
    IMG_0608.jpg
    169.7 KB · Views: 490
So the new inners arrived. I'd ordered inners from MikesXS for a 35mm XS650 + 2" They were half the price of anywhere else.
I'd checked the diam, & length, and that the bottom bolts and bushes were the same. It never occurred to me that they would have a different ID so the XZ inners won't fit inside. Theres $200 down the drain. It's hard to do some of this stuff when it's all via email and on-line catalogs :-(

Let me know if you have an XS and want some +2" inners - going cheap.
 
Roro, I apologize in advance for my ignorance, but when you refer to 'inners' what are you talking about exactly? Fork springs and damper rod bushings perhaps?
I've been looking a some of my spares and have been considering swapping an extra pair of R1 fork cartridges into some 41mm standard forks I have here from a K75. I've only given it a cursory examination but it looks like with minimal machining it could be done in a pretty straightforward manner. Looking at the work you've done thus far I see little reason you couldn't accomplish something similar with the skills and resources at your avail. You'd end up with properly 'original' looking forks with loads of good basic adjustability. Something to consider..
 
I should have said fork tubes, the term inner comes from the Yamaha parts list, but everyone else calls them tubes.
It would be great to have 41mm forks, I don't care about original - I yearn for USD forks, but I can't see a way of doing a fork swap without seriously changing the geometry or my wallet.

The XZ has a trailing axle and it needs that extra offset at the triple for tank clearance, and it needs a massively wide tank because of the double backbone for the downdraft carbs. The airbox sits inside the tank and must be 6 inches wide.

I decided than rather than fight the basic structure of the bike (which I don't have the skills for) I'd add some Racetech gold cartridge emulators (which I've done), fork brace (also done) and use the headlight ears to make them look a bit beefier. If I don't like it, then I can always change it later, but this way I have time to spend on other exciting thinks like building some spoke wheels that will work with the shaft drive. I'm only new to machining and fabrication, but I'll give things a go if I think I have a 50:50 chance of it working. Most things I have to do twice.

The extra tube length is just for the clip-ons. Yamaha's semi clip-ons for the XZ were cool (they bolt into the side of the triple and double as a clamp), but lacked a height adjustment. My other alternative is to manufacture some custom clip-ons, it seemed like too much work, but compared to doing a triple swap, and cartridge inserts maybe not. I've tried normal drag bars on bar mounts but they look like arse.
 
Always open to new suggestions Swagger, and appreciate your interest.
Everytime someone suggests something I reject it out of hand, and then somehow end up starting on it a few days later.
 
The cost of getting another set of fork tubes is just too much. As luck would have it a mate with a XZ400 came round today bringing with him some meat and a pair of clip-ons from a RG250.

These are alloy and well less than half the weight of the stock bars. The clamp is smaller than many clip-ons - only 20mm high, so with 5mm shaved off the bottom of the upper triple, all I lose is 15mm in fork travel which matches almost exactly the drop in the rear from using the R1 shock so I can live with that without getting longer tubes. The risers allow the bars to clear the massively wide tank and I think they look most excellent.

They were very corroded, so I was going to powder coat them but have now decided to give them a bit of a polish instead.
4 hours later and I'm still on the right hand side minus a final polish with autosol. I'll get some larger gauge bolts and dome nuts next week.

It's been a long discovery, but this is by far the easiest fit of a clip-on for an XZ550 that I've seen. Best dozen beer I ever spent.
 

Attachments

  • IMG_0613.jpg
    IMG_0613.jpg
    204.3 KB · Views: 861
Made a start on the rear brake.
The idea is to convert the drum to a disk which I've never done before so do please chip in with any ideas.
I milled the wheel down so that the outside ring is flush with the centre. A lathed rotor mount will sit on this which will space the rotor out from the wheel. That will share 5 bolts to clamp it to the shaft drive spline.
I'll be making my own caliper bracket.
 

Attachments

  • IMG_0646.jpg
    IMG_0646.jpg
    346.1 KB · Views: 645
  • BremboRear.jpg
    BremboRear.jpg
    96.6 KB · Views: 641
It seems ages since I've been in the garage, what with the stupid job, and the sub zero temperatures. A little sunshine today so I took advantage.

My levers were looking pretty grungy, so I skimmed off the powder coat with a wire brush, milled and drilled the ball ends, and gave them a bit of a sand and polish. With my first attempt on a spare lever I did some speed holes in the lever itself, but they snapped in half while polishing. Just shows how weak cast is compared to billet.

They don't look as sporty as some, but they cost nothing but a little time.
 

Attachments

  • IMG_0833.JPG
    IMG_0833.JPG
    274.3 KB · Views: 229
Triple Tree Mods. Gauge cluster mounting tabs shaved, and the steering column offset lowered a few mm

Plus some goodies from DCC
 

Attachments

  • IMG_0632.JPG
    IMG_0632.JPG
    311.1 KB · Views: 238
  • IMG_0631.jpg
    IMG_0631.jpg
    352.9 KB · Views: 342
  • IMG_0629.JPG
    IMG_0629.JPG
    271.8 KB · Views: 238
Back
Top Bottom