1972 CB350 first build

scootr

New Member
Hello everyone,

First off - I love this site. Iam truly amazed and at the same time humbled at the amount of talented builders this site hosts.
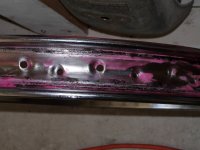
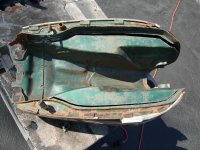
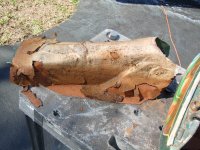
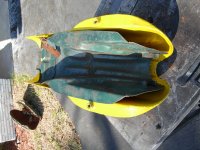
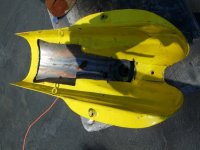
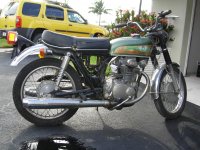
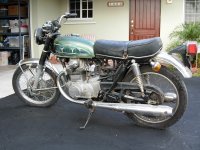
So, a couple of years ago I bought this busted up, but complete CB350 with the idea to turn it into a cafe racer. It cost me all but $200 since it wasn't running and would't move once in gear. With it came a lot of CB 450 parts (for a future project).

I looked for inspiration and boy is there a lot of builds around. I really dig the benjie' cafe look with his long stretched out tanks and just the right amount of black and shine. Also, the DCC racers are very cool and I've already been window shopping on their site way too often.

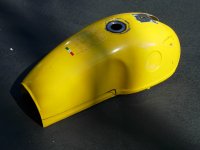
I'm not sure about color, looks, details, what to paint, what to polish, etc - all I know is it's gonna be a kicker, minimalist racer appearance and it's gotta have electronic ignition.
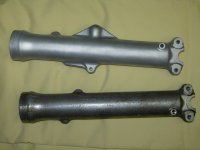
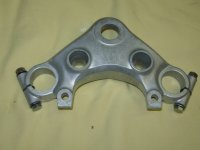
I would like to re-use as many parts as possible, but I can see that idea going down the drain quickly.
 

Attachments

  • DSCN1424.JPG
    DSCN1424.JPG
    1.1 MB · Views: 240
  • DSCN1426.JPG
    DSCN1426.JPG
    1.1 MB · Views: 226
After taking apart the bike, I discovered the following:
1. the engine ended up not being seized, but the starter motor was. Since I wanted to make it a kicker, it doesn't matter much.
2. the frame was broken at the rear strut, right where the rear peg hanger clamps to the frame. I don't have a picture of the broken frame, but the fab shop I gave it to, did a nice job.
3. the top steerer bridge was also broken and needs to be replaced.

Chain and sprockets will need to be replaced, ordered new front fork tubes which will be 2" shorter than the original ones. I also ordered new spokes electric ignition and new fork seals.

Next on the list is to grind away all the useless tabs and other stuff.
 

Attachments

  • DSCN2459.JPG
    DSCN2459.JPG
    997.5 KB · Views: 216
  • DSCN1477.JPG
    DSCN1477.JPG
    1.2 MB · Views: 216
Welcome to the site and on behalf of all the millions of talented builders on the site, thanks for the kind words :) Chances are you're just as talented as any of us.

Looks like a great starting point. I was going to suggest focussing on getting it running before taking it apart, but you've gone and done that already. Save the paint on that tank! Hang it on the wall.

Looking forward to what you've got planned.
 
Tim said:
Save the paint on that tank! Hang it on the wall.

+1000

CB350 tanks are cheap and plentiful (if you want to stay with the stock tank). PLEASE dont ruin that aesome paint. If you dont want to hang it on your wall, send it my way!
 
Wow! I just noticed that the port side has an entirely different paint scheme from the starboard side. Looks like a bad acid trip.
 
Sounds like you have the same aspirations for your build as I do for mine. Mine has been a real slow-goer. I have taken my time putting the motor back together, ordering parts pretty much one at a time. No hurry though! I don't see the real need to get it running before the build, as long as you cross your t's and dot your i's during the rebuild of the motor, it should be good to go when the time comes. I'll be looking forward to seeing your build!
 
It's been slow going for me for a while now, too. After I stripped the bike down to the frame, it came pretty much to a grinding halt. In part due to the missing tools and other ongoing projects that needed finishing first. The one that took the longest was a 1960 NSU scooter I had bought 28 years ago (when I was 20) and shipped overseas after I left the german vaterland. So, last year I finally finished re-building it and ended up showing it at the vintage motorcycle show in Dania Beach. After that I had to re-build and clean a stem machine I built when I was 16 years old. It got damaged in a garage fire and has been sitting for over 15 years collecting rust after the friendly firefighters dowsed it ( and the burning car) with loads of water.
I am trying to pick up the pace a little adn start some serious shopping this weekend.

The hard part about these projects is the budget, I think and sticking to it is even harder. I allowed about 3K for it, but I know it's almost not realistic, unless I scour junkyards or get lucky with a great running donor bike.
I also don't want to drag the build out for too long as my vision seems to blur over time. Any change you make down the line, will add more cost to the project (ask me how I know).

So I started cleaning up some parts with the new blasting cabinet. I had a bit of a rough start, but the result was sure worth it. I also started cleaning the wheels as I am planning to re-use them.
I am planning on painting them black and install the stainless steel spokes unfinished. Does anyone have experience with painting (powdercoating) over a chromed surface? I can't imagine having to strip the chrome off first.
 

Attachments

  • DSCN2237.JPG
    DSCN2237.JPG
    1.1 MB · Views: 220
  • DSCN2233.JPG
    DSCN2233.JPG
    957.1 KB · Views: 208
  • DSCN2247.JPG
    DSCN2247.JPG
    1.3 MB · Views: 202
  • DSCN2248.JPG
    DSCN2248.JPG
    1 MB · Views: 203
Pretty sure you can sandblast the chrome and then powder... I'm not 100% but I'm pretty sure this is what I was told by my powdercoater.
 
Blasting off chrome almost seems like a harsh treatment and it seems too good a surface not to use as "primer". On the other hand, any imperfection iwll show up and I guess if there is any rust under the chrome, it would make it a bad foundation.
 
I guess I could have saved myseld the work of cleaning the rims, since they're going to get sand blasted anyway, duh.

So, here is the dilemma: I bought this old and already chopped up benelli tank from this guy and to make the tank work on the honda frame, I will have to to a lot of cutting and welding. I asked myself shoud I start out with fresh sheet metal and make all new mounting tabs and brackets or shoud I cut up the old tank (green) and use the bottom of it for the benelli tank (yellow). Since I like the hole process of taking things apart, I decided to go for the second option. The other reason is the benelli tank is pretty small and I want to see if I can make the capacity a little larger by fitting the underside closer to the neck of the frame.

I took some pictures of the old tank after I cut it open. Looks nasty - smells nasty.
This is the little Benelli tank


Carefully cutting along the fold of the old tank

It's a boy!!!!

And this is how I thinks they will spend the rest of their lives together
 

Attachments

  • DSCN2455.JPG
    DSCN2455.JPG
    470.6 KB · Views: 213
  • DSCN2442.JPG
    DSCN2442.JPG
    960.8 KB · Views: 207
  • DSCN2444.JPG
    DSCN2444.JPG
    873.5 KB · Views: 212
  • DSCN2452.JPG
    DSCN2452.JPG
    804.4 KB · Views: 219
For the life of me it looks like the Benelli tank has a larger tunnel etc. than the Honda tank and would be relatively easy to mount no? Looks like it just needs the cups from the Honda tank welded on, and then lengthen the posts on the frame that hold the rubber pucks to reach out to the wider Benelli tunnel.

I get the extra capacity and more power to you - I wish I had the skills to weld thin (or any) metal, but does the Benelli tank sit on the frame as-is? Might be valuable info for someone searching for this information 10 years from now ;)
 
but does the Benelli tank sit on the frame as-is?
The tank actually sits on the frame quiet nicely with the cutout that was made by the guy I bought it from. So, with this tank I will have to do some sheet metal welding anyway.

I recall someone else making the Benelli tank fit with the extended mounting studs and it seemed to have worked pretty well, but me thinks, it wasn't just a matter of extending the studs for the rubber pucksand I was told you better be prepared to do some cutting if you go with this tank.

I'm not a good welder, so I'll tack the fitted pieces in place and then have a Pro seal weld the tank and pressure test it.
 

Attachments

  • DSCN2451.JPG
    DSCN2451.JPG
    131.5 KB · Views: 207
Back
Top Bottom