1975 CB750K5 project

ravmoto

New Member
HI all,

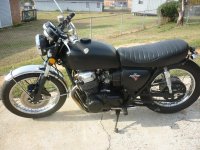
For years I've wanted to take on a project. So I'm taking the plunge with a 1975 CB750 K5. For starter, the original bike. It runs and was on the road just last year. Having never rebuilt an engine, I wanted to avoid this as much as possible. The bike was brought home early May.

img_3810.jpg


img_3811.jpg


img_3812.jpg


img_3813.jpg


The plan is fairly simple (at least in my mind). Clubman handle bars, change the gauges to something more modern. Change the seat to something that sits directly on the frame, change the exhaust to a 4 in 1 and updating various things like bearings, bushings and electrical and the likes.

The first step is to figure out the seat arrangement and whatever needs to be trimmed or welded. Then complete tear down and send the frame for powder coating.

I hope I'm not trying to bite too much at one time ::)
 
The seat.
I want this bike to remain a 2 seater so it can be enjoyed with someone in the back ::). I figure the easiest would be to keep the same shape of the seat but to drop it on the frame and have its overall height cut in half or more. First step was to clear up everything that would come in the way of laying the seat right on the frame.

img_3814.jpg


I chopped up the brace at the back, the hinges for the original seat. The battery box also needs to drop a bit so the mounting bolt heads don’t over extend past the frame. I removed the rubber mounts and will replace with a thin rubber washer. Once this was done, I mocked up the seat pan in cardboard to see how this would look and fit. I quickly found that the back rubber mount of the gas tank would come in the way so that will need to be dealt with.

img_3910.jpg


I then took the original seat which was beat up and the pan rusted and decided to use the foam to prototype the seat. The foam clearly shows it age and I would not reuse it. When all was said and down, I do like the look of it. So I bought a replacement foam and after three trims, I got to a height I was looking for.

img_4210.jpg


I traced the seat over a piece of wood and built up the seat pan.

img_4211.jpg


img_4212.jpg


img_4213.jpg


The edge of the board being sharp I tried to eliminate the risk of cutting through the vinyl by gluing a foam pipe insulator (In retrospect that was a little too thick and if I had to redo it, I would try to find something thinner).

img_4214.jpg


Then, the seat foam was glued on and wrapped in vinyl. This is my first seat and I still need to work on it as I have a few ripples on the rounded backside. I installed 2 braces that will limit the back and forth movement and the seat will be fasten on the frame with hose clamps.

img_4215.jpg


img_4216.jpg
 
how are you going to restrict the suspension travel ?
because the tire is now going to slam into the underside of the seat
 
Why not just remove the fender and keep the stock seat? It looks better, it's more comfortable, more durable, and you don't have to worry about suspension travel.
 
xb33bsa,

Good point. Here how I approached the travel situation. I took out the shocks and dropped the bike until a 1/4in clearance was left and measured the distance between the two mounting points of the shock. it measured 11-1/2. The distance between the same mounting points with the bike at rest is 14-3/8. so I figure the max travel I can have is 3-1/4in. I emailed the guys at Dynoman Performance and their recommendation is to use progressive suspension shocks with 1/2in limiters with heavy duty springs. That should avoid bottoming out against the seat. If this doesn't work, then I'll look to had a positive stop on the swing arm.

Plagrone.
I want to cafe it, so that means thin seat. But what I have left is still comfortable for the hour or two max rides I plan to take with this bike.
 
Read up some of the cafe threads here - you're making the bike less stable and more difficult to ride the way you're going about it. You've cut the part of the rear frame that braces the back of the bike, and replaced it with a seat that is going to deteriorate pretty quickly.

There are a couple guys here and elsewhere that sell weld-on hoops to reinforce the rear frame, and you can still get the look you're going for without sacrificing the geometry of the bike.
 
Rich, I have read thread here and other places, watch shows etc.. and been amazed by what some guys can do for years. But at some point, you have to put down the books and apply what you've read no ?
That said, I have the same concerns as you about cutting into a 40 years old frame. That's why this will be the only frame mod I'm comfortable making and I've machined a replacement piece and had it welded to the frame a couple days ago. It will hold the piece of the fender I've cut earlier where the breaklight will mount on.

img_4311.jpg


Looking into the manual, the swingarm travel is listed a 3.3in. So at 3 with limiters and heavier spring, I should be ok. At the max travel (wheel still free to turn), it would look like that

img_4312.jpg


And I don't think the bike was ever made to go this low as other issues would come up:

img_4313.jpg


But once the new shocks are in this will be an area that I will pay close attention to.
 
Di-assembly is going on pretty well. The only surprise was the poor shape of the tubes of the front fork. :mad:

img_4410.jpg


As of today, the engine is the only piece left to remove so the frame can head to powder coat.

img_4411.jpg


img_4412.jpg
 
all that structure behind the upper shocks mounts is for seat support it has nothing to do with the strength of the part of the frame that takes suspension loads
it is there strictly as seat support and designed for loads with a passenger
you get a passenger sitting back on the rar of the eat and the side loads can be significant
that said with a passenger you should have very good seat support structure
that said you still have reduced vertical clearance too much unless you run some short travel and or restricted travel shocks
the wheel indeed is designed to go up that high and more at full bump
 
I love lowered CB's.... when done right.
Not sure how they will handle and what comfort will be :eek:

Foto-NYDGBRLR-D.jpg
 
Tetter,

We'll have to try it and ride it to find out. Thanks for the picture as I've been looking for a green for the bike and this one looks really good.

The engine is out. I used the laying it on the side technique. No too difficult but very much like one of those Chinese puzzles or those twisted nails things. So frustrating that the hardest part is fighting the feeling to shake the s..t out of it to get it loose. On top of it, the filter bolt was on really tight and the head was so damaged that I had no success with the wrench. I tried to reshape the flats, grinding a cross to use a large screw driver, drilling and bolt remover, nothing worked to get it loose. Finally, I had to grind the head off. It took me a couple hours total to get it off. Most going slow to 1) avoid a fire with too much sparks around all this oil and gas and 2) generate too much heat to deform the filter cover or something else. One thing for sure, that filter MUST be out to get the engine out. So with many many deep breathes the frame came off.

img_4413.jpg


img_4414.jpg


img_4415.jpg


img_4416.jpg


img_4417.jpg


img_4418.jpg


Next step is powder coating for the frame and swing arm and a deep deep clean of the engine.
 
It's been a few weeks and things have progressed slowly. The main difficulty was to remove the bushings (both main and where the shocks mount) from the swing arm before powder coat. I was under the impression that this bike had never been touched but I'm not so sure. Reading through forums, I though the bushings would be made of plastic. But Impossible to pull them out. I had to use an hydraulic press for both sets to get them out and I was surprised to see that the bushings were actually metal. Once out, the frame, swing arm, the tree top and bottom, rear fender, 2 engine brackets and the handle bar clamp went to powder coat. I used JTS Coating & Cycles in Lakemoor IL. For all these pieces media blasted, taped and powder coated black the price was $275. Everything was back in 3 days.

The engine went through 3 cleaning sessions. Here are the before and after:
img_4419.jpg


img_4420.jpg


img_4421.jpg


img_4610.jpg


img_4611.jpg


img_4612.jpg


img_4613.jpg


It turned out better than I thought and will stay as is rather than going through a costly rebuild and paint (since it is running). I may do a little more polyshing on the aluminum parts without paint but not now.

Next up, putting this thing back in the frame. I when through all the mounting hardware and will need to get a couple bolts but thankfully they are the shorter ones. I'll protect the frame (my biggest fear is to scratch it :-[ )

img_4614.jpg
 
that engine looks great ! painting cases is way over rated if you are actually going to ride the bike better to just leave them.they are impossible to keep clean
that bar you welded across the rear frame will likely contact the tire before the shocks bottom out ,best check that issue with the shocks that you will be using,before you go all in ;)
 
Suspension has been figured out. Now gotta put everything back together to make sure it's been figured out right :eek:

The engine went back into the frame much easier than out. 10 mns top of fiddling and voila. Only 3 minor scratches to the frame that were touched up right away.

img_4615.jpg


img_4616.jpg


Next up, front and rear wheel areas and center stand so I can get if off the stand.
 
Nice looking so far.........does sound like a tune up is needed........but who am I to talk....mine too.

I like the 750's lowered too.......can't you tell.
 

Attachments

  • P1020500 2.JPG
    P1020500 2.JPG
    166.3 KB · Views: 216
I will stay tuned to see where it goes. now I just need some popcorn. I am really digging on them being lowered.
 
For sure it needs a tune up. That will be done when it is finished. The electrical needs to be finished (headlight and tail light, turn signals, odd and ends), the front brake with the shortened front fender and shortening the clutch cable a must with the clubman handle bars. But it runs and starts even with the kick start.

Budlite282. Your CB looks really nice 8)

http://youtu.be/wOSKCpkR_Kg
 
Madcap Att said:
I will stay tuned to see where it goes. now I just need some popcorn. I am really digging on them being lowered.
lowering a mc is very rarely a good thing :eek: most motorcycles need more cornering clearance and can use at least all of the original suspension travel not less
 
Back
Top Bottom