Follow along with the video below to see how to install our site as a web app on your home screen.
Note: This feature currently requires accessing the site using the built-in Safari browser.
We noticed you are blocking ads. DO THE TON only works with community supporters. Most are active members of the site with small businesses. Please consider disabling your ad blocking tool and checking out the businesses that help keep our site up and free.
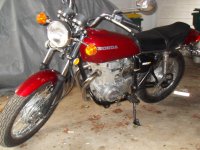
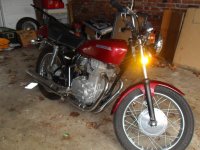
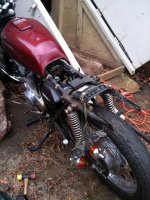
I'll start like everyone else does. Yes, I've been "lurking in the closet" for entirely too long and yes, this is my very first moto build. The lovely CJ360t pictured below was a gift from a friend for helping to recovery a rather expensive stolen mountain bike and monies pitched in from other friends as a nice Christmas gift (I'm a lucky guy). I've owned her for a years or so and finally have enough free time for a very lean budget cafe build to share with you fine folks. I've had a lot of experience tooling around on German air-cooled engines (3 1960's Beetles over the years) which has helped me a bit so far. I've learned a lot through the handy dotheton.com search engine but hope to pick some brains as I progress through this build. It won't be a very ambitious cafe build but she will be just right for tooling around the surface streets in Atlanta.
Welcome. I just got one of these the other day. Pretty rough shape though. Your's looks pretty good already! I like how the stock seat isn't as ugly as the cb 350/360's too. Almost goos enough to keep stock. Only thing I don't like is the plastic fender/seat. Can't powder coat them.
I almost bought a house in Atlanta. Couldn't believe the prices down there right now. I was going to use my tax return to buy a 2 story house for $4000! nuts.
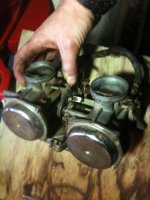
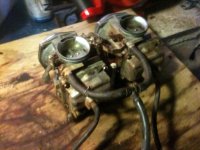
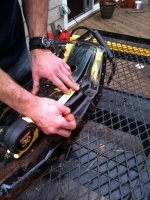
Since the left carb leaked more gas from the float bowl than it mixed for the combustion chamber, I thought pulling them off for a gasket replacement might be a good start to getting her road worthy. The float needle was completely stuck and the bowl gasket was failing miserably. A relatively quick fix after purchasing a rebuild kit online. I did this about four months ago and didn't photo document as well as i should have (gas and grease on the fingers makes iphone photography difficulty).
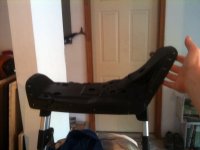
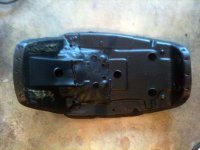
Thanks. I really like the seat and cowl section but it is just soooo long. I've cut about 6 or so inches out of the middle of the seat and am now fabing it too look much the same as it does stock, just much shorter. I've seen a few other CJ builds on here where the likeness of the rear cowl is used. I'm planning to keep the stock cowl but move it forward above the rear shocks.
And yes legendary_rider, housing prices are still down in most neighborhoods unless you are looking for a place in one of the"intown" neighborhoods where everyone and the brother wants to live (Va highlands, Decatur, Candler Park etc). Prices there have remained flat or actually increased depending on what street you're on.
Im glad your here. Your machine looks like a pretty nice starter project.
I too have a slightly modified 360 and I love her.
I am glad to hear you are doing "something" w that seat/fender.
If you have a question I might be able to help.
Thanks guys. She did sort of run when gifted to me and all the parts are there so definitely a good starter project. I've been working on it off and on for the past few months and have more "in-process" photos to add. Now that the daily temperature isn't flirting with triple digits anymore, I'm really eager to get her on the road. Hopefully I'll have a blitz of posts in the near future.
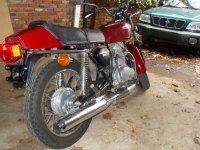
I've purchased and installed clubman bars, new grips and a nearly stock length muffler (not sure it will make the cut) to help with the aesthetics. New turns signals, a rear brake light and headlight mounts have been purchase and are patiently waiting on the shelf for install. All the cables look to be in good shape and brakes have worked well enough when loading and unloading into a pick-up truck. Electrical is mostly good Only the low beam and the right turn signal are inop. I'll fix that when I lower the headlight.
It will be a mildly customized build with the bulk of the changes to the seat and rear fender/cowl section. I want her on the road in a few weeks. Maybe even in time for Barber.
Cool to see another person from the ATL area in here. I'm in Marietta. If your on Facebook, check out Georgia Moto Rider, a Facebook group for like minded persons in the ATL area.
Yeah you're right. It runs and looks great. Not sure if it's a good starter project though. You won't learn enough. Pretty starters are for pussies. lol. You should dump salt water/lye mixture all over it, throw in some pigeon poop and bang on it with a hammer for half a day. THEN you'll have a good starter project. At least that's the way it seems like I always start off. lol. Oh I forgot that you should hire some kids to pull off a few random parts and sell them for you.
Yeah you're right. It runs and looks great. Not sure if it's a good starter project though. You won't learn enough. Pretty starters are for pussies. lol. You should dump salt water/lye mixture all over it, throw in some pigeon poop and bang on it with a hammer for half a day. THEN you'll have a good starter project. At least that's the way it seems like I always start off. lol. Oh I forgot that you should hire some kids to pull off a few random parts and sell them for you.
thats awesome...but, dont forget to fill the carbs w a mix of molasses, two part epoxy, tar....and silicone adhesive. Then unplug a few random wire connections under the tank and inside the headlight then give it to a blind monkey to sort and plug em back together as quickly as he can.
Oh don't forget the family of rats living in there over the winter. Chewing on hoses, wires, seat foam and anything else they can make nests out of.
Blind monkey? lol. That's just cruel.
Hey we should set up a business and charge people to make proper starter projects for them. Bring us a "nice" running bike and we'll fix it for you. Dude, you can bring the blind monkey.
I swear the PO of my bike must have employed a blind monkey to "screw up"...oops I mean "wire up" my machine. he even had the blue and yellow wires crossed to the coils, points and condnser...I mean...they are all right there...close...together...blue...and yellow. I am really, REALLY color blind...and I spotted it right off...without the schematics. I am color blind enough, my 9 yo nephew sat in the garage w me and identified every wire on the bike so I could write em down and mark w # tags. those were the first mistake we found and fixed...there were more.
My PO is deceased now but his sister told me a story about how he could never get his bike running. His dad didn't want him to ride it fearful that he'd get hurt. So every time the guy put a part on the bike, his dad would take a different one off and hide it. lol Maybe your PO had the same problem. Especially if that obvious and possibly done intentionally.
I'm beginning feel cheated out of the experience. Maybe I should put this build on hold a few month while I let the bike season in a water tight sandbox, disassembled, soaking in all the ingredients listed above. Hmmm, what to do what to do....
I guess I'll just continue to whittle seat foam until I decide...
lol. There ya go! Also make sure to buy lots of expensive parts for different types of bikes hoping they'll fit but not research first. Another experience is to try to half ass stuff without asking questions on DTT cause you might feel dumb. It's better to screw things up and lose lots of money for the learning experienc. lol.
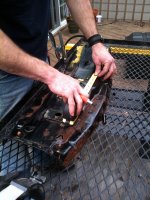
Seat and rear fender off. I've provided photographic proof that I did indeed "measure twice, cut once". The seat pan is now about a solo and a half so the wife can still hop on the back.
This site uses cookies to help personalise content, tailor your experience and to keep you logged in if you register.
By continuing to use this site, you are consenting to our use of cookies.