1977 Suzuki GS750: classic, minimal, with a hint of modernization

I believe it was $310. But the RFID added about $75 IIRC.

Update:

Seat build continues, going ok so far. Going to need some sanding and filling for sure.


_MG_3303.jpg by macbethpoe1, on Flickr

_MG_3302.jpg by macbethpoe1, on Flickr
Temporary weld job.


_MG_3305.jpg by macbethpoe1, on Flickr

_MG_3306.jpg by macbethpoe1, on Flickr

_MG_3307.jpg by macbethpoe1, on Flickr

_MG_3308.jpg by macbethpoe1, on Flickr

_MG_3309.jpg by macbethpoe1, on Flickr
Getting ready to glass, word of advice, do not use "Siran Wrap" to protect your foam.


_MG_3311.jpg by macbethpoe1, on Flickr

_MG_3312.jpg by macbethpoe1, on Flickr

_MG_3313.jpg by macbethpoe1, on Flickr
That's where it stands now, going to add some more glass for strength and rigididy, then start the sanding process and making it pretty.
 
Well all my parts except my wiring harness (thank god!) were stolen out of my vehicle last night... So that will delay things a bit. Such an awful feeling, I worked a lot of 16 hours days to save up for that stuff. Nothing worse than a thief.
 
Yeah it's not cool. I filed a police report, have a "reward - no questions asked" ad on craigslist, and took a picture of the parts to all pawn shops and motorcycle shops in town. Still, my hopes aren't too high.
 
Sorry to hear about your parts getting stolen. Hopefully it won't take long to get replace them. The bike is coming together really nice. I really dig the 4-2 exhaust. Do you have any plans for rearsets?

Thanks for posting those PDF's Brodie! I'm building a 78 GS750E and was having trouble locating that info.
 
Dude that sucks about your parts. Please tell me you still have the seat.

Kowa, no problem with the pdfs. I have 2 workshop manuals I can take photos of if you need info.
 
Thanks for the moral support guys.

Anyway, sorry for the down time, have been moving. I have a GARAGE now! After a year in an apartment it is so nice to have my own space to work on the bike.

So a little stroke of luck, my work had to cash everyone out on vacation time, so I got some extra money and was able to purchase all my parts and then some. Made me sick buying it all again, but oh well...

Here is the progress I have made lately, mostly some more dismantle, and getting everything cleaned up and ready to go back together. Oh and to answer the question above, yes I am for sure getting rearsets, going to try the Tarrozi's. They are a bit pricey but come with everything you need and are a direct bolt on. Worth it IMO.

_MG_3600.jpg by macbethpoe1, on Flickr
_MG_3592.jpg by macbethpoe1, on Flickr
Possibly the best purchase I have ever made. $50 for the Compressor on craigslist! Impact is a cheapo from Harbor Freight but made for a VERY easy job of this:

_MG_3602.jpg by macbethpoe1, on Flickr
_MG_3610.jpg by macbethpoe1, on Flickr
_MG_3607.jpg by macbethpoe1, on Flickr

_MG_3612.jpg by macbethpoe1, on Flickr
New stator waiting to curl up in its new home. There was ONE screw that gave me hell, one of the bracket screws that hold the stator wires in place.

_MG_3626.jpg by macbethpoe1, on Flickr
One of the piles of parts I have taken off this thing.
 
I will try and get some pictures up of where I'm at with the seat, and some of the other parts I got for it tomorrow. And my Cognito Moto triple clamp should be here anyday!
 
Yep, that one screw gives everyone hell. Was a pita for me to remove as well.

Check out Raask rearsets as well, they are a cheaper option than the Tarrozzi, I am still unsure which I will get.

Good to see you are back on your feet workshop wise.
 
Did you have any trouble finding a replacement screw?

And yeah I haven't left my garage since we have moved in haha. Just need a tool chest and real tools.
 
Nahh I live in a metric country. I didn't mess mine up to bad and was able to reuse it.
 
So a little update, gave the engine a nice cleaning, used the Harbor Freight engine cleaner, worked pretty well. And also just about done on the seat, just trying to get everything nice and smooth and even now. I will post some pictures of the upholstery when I finish wrapping it.

I also started the electrical. I got held up though, the male/female connectors I got from ACE Hardware suck so bad, so I have to find some decent ones before I can go any further with that. Anyway, enjoy the pics!

You cant really tell, but these are all before the engine was cleaned.
_MG_3790.jpg by macbethpoe1, on Flickr
_MG_3793.jpg by macbethpoe1, on Flickr
_MG_3788.jpg by macbethpoe1, on Flickr

And clean pictures next, I really cant wait to paint it though, a lot of the enamel is coming off, I could only get it looking so good.
_MG_3796.jpg by macbethpoe1, on Flickr
_MG_3797.jpg by macbethpoe1, on Flickr
_MG_3805.jpg by macbethpoe1, on Flickr
_MG_3803.jpg by macbethpoe1, on Flickr
_MG_3801.jpg by macbethpoe1, on Flickr

Starting the wiring only to stop soon after.
_MG_3809.jpg by macbethpoe1, on Flickr
_MG_3807.jpg by macbethpoe1, on Flickr
_MG_3802.jpg by macbethpoe1, on Flickr

And her is where the seat stands, as you can see I suck at fiberglass, and had to use plenty of bondo. Oh well, should work just fine.
_MG_3813.jpg by macbethpoe1, on Flickr
_MG_3812.jpg by macbethpoe1, on Flickr
_MG_3811.jpg by macbethpoe1, on Flickr
 
Hey its been a while sorry, havent got much time to work on the bike let alone take pictures.

I shoot with a Canon 40D, great semi pro body, from 2007 I believe. Glass = Sigma 30mm F1.4, awesome lens!

Will be trying to start the bike tonight, got it all wired. And my triple clamp came in so I will post pictures soon.
 
Re: 1977 Suzuki GS750, first bike, first post, no name yet.

Did you ever pull the intake boots and replace the large o-rings between them and the cylinder head?

Macbethpoe said:
It led me to the headlight bucket, pulled the light out and found this.

image by macbethpoe1
Obviously that's not how that's supposed to look.
So this, coupled with knowing the GS models are notorious for poor electrical has prompted me to make this my priority upgrade.
A similar thing happened to my wife's bike, luckily 300 feet from home, but that same connector
was brittle and cracked, leaving a bare terminal to eventually short out to ground and blow a fuse.

It's not fair to say that GS's are notorious for poor electrical, but rather they are known for a terrible regulator-rectifier design that can be remedied better than anything by a $50 used late model Polaris RZR 800 Shindengen SH-775BA series r-r. Once you do that, you can abandon the strange extra third stator output wire detour that basically disconnected the third leg of AC inuput power from the regulator rectifier when the headlight switch was not in the on position. Aside from that, you add an inline fuse to the regulator rectifier output wire where it branches of before the battery to the ignition switch. Then from there, you have an electrical system that is better than any stock vintage bike, once you have done the mandatory cleaning of all connections with deoxit or similar and silicone dielectrode grease, making sure to check all connectors for proper crimp and proper pressure on the male and female parts.
 
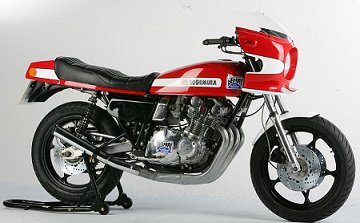
A good set of Shinko 230/SR741, Pirelli Sport Demon, or Avon AM26 RoadRider tires will make the GS handle awesome, considering it already has the best handling frame of any Japanese bike built prior to 1979-1980. Wider rims on the spoked wheels will help more with powering through corners at serious lean angles, as a 110 or even 120 is not quite sufficient to keep from doing some drifting burnouts while on the throttle harder mid-turn (these engines make GOBS of horsepower from 5,000-11,000 rpm especially with K&N or Uni filters, a 4-1, and rejetted carbs - look to theGSResources.com or me for GS750 rejetting advice).
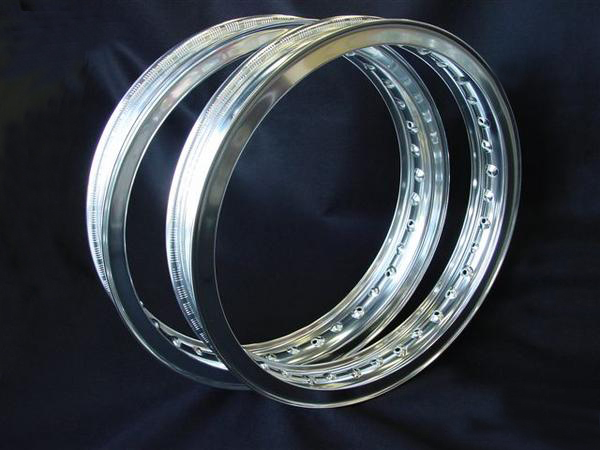
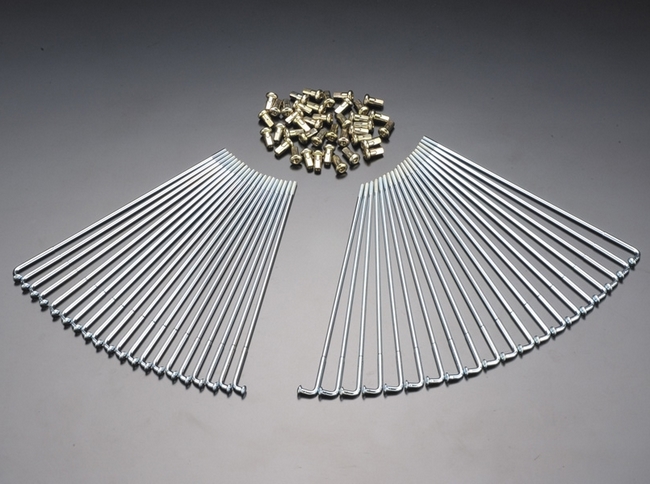
You can get really nice RK/Excel H-section polished aluminum rims in one size up from stock in 18" front and rear (2.50 rear/2.15 front) drilled for the proper spoke angles for our hubs (GS400 spec), from Japan.Webike.net for $530 with a set of stainless GS400 spec spokes that I "think" will still work with those H-section rims, $530 shipped from Japan! That's a good $250 cheaper than even Woody's Wheel Works would want for Excel Takasago's in a larger rear rim and stainless spokes. Buchanan's would be nearly a grand for that.
1602.jpg
unichrome_lim_image-1.jpg

http://japan.webike.net/products/21724568.html
http://japan.webike.net/products/1522879.html (stock GS400 spoke length, I am guessing this would work with the 18" GS400 H-section rims above)

To get rear positioned rearsets, you pretty much have to cut and weld on the frame, or else make a big aluminum plate style mounting bracket to move them more rearwards.

You can get all sorts of great shocks with the clevis mount on the bottom for these bikes. the $200 progressives and Hagon's are the cheap go-to shock for a decent ride. The Hagon 2810 is adjustable dampening for $300. The Ikon 7610 is a rebuildable adjustable version similar to the Hagon 2810. My recent favorites are YSSUSA.com's E-302 (standard alloy rebuildable shock ($349), C-302 Piggyback version ($449), fully adjustable dampening Z362 ($499), and the G-302TRL piggyback with adjustable rebound dampening ($599), or the G-302TRCL piggyback with fully adjustable compression and rebound dampening ($699). Good stuff that a few builders on GS Resources have picked for their racer projects.
Also, Fox has just started making some of their new twin shocks tailored for our vintage bikes, and the adjustable non-piggyback version is around $600 and is top top notch quality up there with Works, Ohlins, etc but slightly better price than the high high end stuff. See the vendors forum section on this website from Cognito Moto I think it is, they worked with Fox to make a shock more tailored for our bikes.
YSS Piggyback's:
sScooter_shock.gif


In the front, MikesXS.com cartridge emulators and Sonic Springs work awesome to modify the old forks, and Tarozzi makes a great fork brace for these for $99.
27-1086.jpg

Fork_Brace_Template.jpg


Also 93/94 GSXR1100 or 1000 (?) forks are a great swap in (correct height), and even better are 98-00 Honda SuperHawk (Firestorm outside the USA) VTR1000F forks, which run the same size rotors that guys upgrade the GS's to (296mm CBR900RR etc rotors) and therefore would be more easily adaptable to the stock GS hubs since the CBR rotors are nearly a bolt on mod.
GS1000BW.jpg

On the GS forums, see salty_monk's thread "twinpot upgrade on the 78 skunk" for the Kawasaki Ninja and Honda CBR/etc dual front disc upgrade mod. The VTR forks are better for retaining the original wheels like I said (minor custom fitting may be needed with axle/spacers), and have adjustable dampening. I am running the stock 35mm forks still and my bike is handling quite well with these other mods and the brace. a 37mm GS1000 fork may have been a wiser choice for me when I was upgrading to dual disc, but I have zero qualms with the 650/750 forks that I have in 35mm, and I ride this thing very hard deep into the Appalachian twisties in the hills of southeast Ohio. Below is the brake mod that many GS Resources Forums members run thanks to Dan aka salty_monk researching what rotors and calipers work best. Mine is customized, normally the lower bolt hole requires a bracket that salty/dan sells, as well as most of the Honda donor rotors requiring a spacer behind them. The "599" or "Hornet" depending on the export country has rotors that need no spacer at all, because they have a 22.5mm offset already. Most of the Honda rotors that are useable have a 17mm offset that requires about 5mm of spacing behind them. Haven';t ever seen a used Hornet set yet, but many of the 17mm offset rotors sell for very cheap used.
attachment.php


You can also get excellent braking sticking with the single disc fork legs with a higher caliper mount by running one of those above pictured Ninja/GS500 left side calipers (the Ninja 250 and late model GS500 may use only a single right, can't remember) and salty's bracket or a custom modded bracket like mine in the photo (bottom bolt is now a direct bolt in also), and run a CBR900RR Fireblade or CBR1100XX Blackbird 310mm rotor and have a much lighter and much more massive floating rotor with a sliding two piston caliper and longer pads than stock. This is really plenty of sufficient stopping power, but if you race it (running full speed into corners nonstop and braking hard) or run in the mountains all the time where there are tons of twisties and switchbacks on long downhills, a 310mm single rotor may get a bit hot and warp. This is only under extreme use, mind you. It's plenty of braking power for most.

Seems like you have made some progress on tackling this build already, but most of your photos are not displaying for me! What's up with that? mobile and desktop viewing. Beautifully clean well preserved example of a GS750, I must say as well as all the others.

If you want to put that exhaust in a museum or sell it to an envious owner looking for a nice stock set, check out Marving's flat collector upswept road race pipe 4-1 for our bikes. They are Italian, but they can ship to the US and I think they have one USA authorized dealer. It's AWESOME, better than a MAC or Vance and Hines or a used or NOS Jardine or other pipes that used to be available for our bikes. It's on my dream list of parts I am having trouble justifying upgrading (I have both a MAC and V&H currently).
10026762.jpg

gs1000_vsmall.jpg


If that is a 1977, the rear brake is overly sensitive and could stand downsizing to a smaller rotor from a 78-early 80's GS750/1000/1100, and matching caliper hanger bracket. way too much rear rotor for a Japanese inline four chassis. I went with a 90-ish Katana 1100 front floating rotor for mine, as did a fella on here with an awesome 673cc GS550 cafe build http://www.thegsresources.com/_forum/showthread.php?193507-GS-550E-1980-cafe-build/page7.
p2l1wp3.jpg


Best of luck, keep this project looking great!
 
Re: 1977 Suzuki GS750, first bike, first post, no name yet.

LovingtheCLE said:
Be sure to check the grounding on all those wires. That has been the only thing that has completely killed the power on my GS. the only thing to ever kill everything on my GS has been issues with the grounding. I nearly replaced all the wiring, and I did buy a new R/R (which I never used). But the only issue to cause total power loss was a bad ground. That was easily fixed with some sand paper and a little dielectric grease.

Jim aka posplayr on the GS Forums is a major electrical guru, and stresses that a single point ground for the battery, regulator rectifier, and the wiring harness ground wires in that vicinity for the starter motor etc all go back to a single point on the frame close to the battery box. And as LovingtheCLE mentioned, that area must be bare metal on the connectors and bolt, and needs to be coated with silicone dielectrode grease to prevent corrosion.

The charging system on my wife's old VW Rabbit diesel pickup truck stopped working on her, and it turned out that she lost the ground strap between the engine and the chassis/battery. Putting a jumper cable between the alternator housing bare metal and the negative battery terminal, it instantly was charging at 14 volts again. on the old standard shunt style regulator rectifier, this could be really really harsh on the stator and reg-rectifier. the CompuFire regulator-rectifier and the Shindengen SH775BA are the only ones widely available for the 3 phase charging systems like what our bikes have, and instead of relying on the shunt style using the ground connection to rapidly short off excess voltage to ground at 80 cycles per second, the series style uses advanced circuitry to simply just disconnect the stator legs when all that power is not needed, and it does the same at a high frequency switching rate like the shunt style does. So with the shunt style that most bikes use, the stator is pretty much running at full output at anything above idle, and at higher speeds with low electrical useage, it is shorting all the extra voltage directly through the ground connection, which keeps the stator VERY HOT the whole time. On wet stators, the engine oil cools the stator a bit, but this can actually raise the engine oil temperature a noticeable amount on many many bikes... The CompuFire and SH-775BA r-r units are really really amazing additions to the GS or any old bike with a 3 phase stator. Then you can start running things like LED lighting to cut down further on your bike's power consumption, so that you can keep the stator load cooler, and always have plenty of vintage even at low rpm's to keep the ignition coils firing the fullest spark then can. (On a good clean electrical system, that shouldn't be any problem anyway, but resistance and voltage loss across some wiring connectors can cause a drop, hence some people adding standard Bosch automotive relays for power to the headlight and separately the ignition coils

Macbethpoe said:
I will be getting slightly bigger wheels for slightly wider tires, especially in rear, will have to figure out something with the disk brake hub stay tube.

Possibly the biggest thing I need to do is check valve clearances and re-shim, as I feel a lot of the little problems I was having will be fixed by this.

On the slightly bigger wheels for wider tires, I was able to heat my brake stay up with an oxy-acetylene torch and use a 2x4 and 5lb sledge hammer to flatten an indent into the inside to make a Shinko SR741 140/70-18 fit nicely. If trying to run an even larger tire than that (150 is the max this bike needs, 160-180 causes chain clearance problems and makes the bike lean in to corners more sluggishly due to greater tire profile circumference), or you want a bolt on, certain years of Bandit 1200 brake stays are a direct bolt on and have an offset kink in them, and will bolt directly on.

You were correct in reading that the factory valve clearances were .03-.08mm, or approximately .001"-.003". On aftermarket cams with higher lift, you will see the recommended clearances get bigger, but these dual overhead cam clearances are a totally different animal vs rocker arm valvetrains. As BigRich says, you generally want the valves a little on the looser side of the .02-.08mm, but much over .08mm and your valvetrain will sound like an amplified sewing machine with all the clickety-clacking at speed. This wears your cam lobes a bit. Too tight of a clearance and your valves won't seal tightly to the seats, and you will potentially be slightly short on compression psi due to that, and also risk burning a valve.

On the GS Resources forum, a guy named Ray (GhostGS1 or something like that) runs the GS shim club, where you can trade your old shims in for the sizes you need (must measure & do math very carefully and get it right the first shot). I can't remember how it works, maybe you just pay for shipping both ways and you trade in your old shims. Since the clearances generally get tighter and tighter on bikes that have not yet had a proper machine shop valve seat reconditioning job (where they shorten the ends of the valve stems slightly to keep the old shims and correct clearances), the shim club typically ends up with a surplus of larger shims that most people can't use anymore on their well worn in valves and seats, so Ray actually runs the shims through a milling machine and cuts the large amounts of thicker shims down to thinner, more in-demand sizes. Pretty slick.

Myself, I have just been trying to buy them from the local junkyard as much as possible, so that I can have a good stock on them here for my several bikes, and the increasing number of friends who have been swayed into getting a GS as their first bike, or who have been frustrated with other bikes' charging system downfalls (DOHC Honda's 79-82, 2 friends abandoned them and switched to GS's!).
 
Back
Top Bottom