
We noticed you are blocking ads. DO THE TON only works with community supporters. Most are active members of the site with small businesses. Please consider disabling your ad blocking tool and checking out the businesses that help keep our site up and free.
You are using an out of date browser. It may not display this or other websites correctly.
You should upgrade or use an alternative browser.
You should upgrade or use an alternative browser.
1979 CB650 Cafe Redo - update march 31
- Thread starter jay_kent
- Start date
tWistedWheelz
BUILT NOT BOUGHT!
Re: 1979 CB650 Cafe Redo - update June 25, Something for ya Staffy
well it would be an upgrade.... ;D
jay_kent said:Thanks Brandon
Hope the ladies don't take the 1/4" cup on the switch cover as a measure of my manhood
well it would be an upgrade.... ;D
CresentSon
Over 1,000 Posts
Re: 1979 CB650 Cafe Redo - update June 25, Something for ya Staffy
Great to see this guy making some progress. Switch cover is a gem, I was thinking it was gonna be a led blinker housing.
Great to see this guy making some progress. Switch cover is a gem, I was thinking it was gonna be a led blinker housing.
Staffy
It's not yours 'til you cut it up.
Re: 1979 CB650 Cafe Redo - update June 25, Something for ya Staffy
Mate that is some ingenuity right there. I seem to remember someone had challenged me also a while back, can't remember who but i think like yourself, i'll have to abide and make up some hard bags.
Mate that is some ingenuity right there. I seem to remember someone had challenged me also a while back, can't remember who but i think like yourself, i'll have to abide and make up some hard bags.
jay_kent
1979 cb650
Re: 1979 CB650 Cafe Redo -newish, no pics (sad face)
Finally the fabrication stuff is over. I do have pics of the things I've built, just haven't had the time to edit, upload, reload here. Only things left to do is prep, prime, and paint. Re-assemble engine, Re-assemble everything.
On top of that the certified RV my dad bought isn't so some more work, time and money, not to mention some legal action has crept in to my life. The RV is something major as there are 14 of us doing a North American Tour.
We'll be as far west as Nevada, and as south as Arizona. Any cool things along the way from our fellow DTT'ers is most certainly welcome.
Any ways I've fabbed up the brackets that hold the new shaker gauges and am quite pleased how they turned out.
My problem is ,I'm running with the airboxes, because I ride in all weather, and I don't want to really use the old plastic side covers over the airbox and battery. I've cut some sheet steel out to shape and wonder how I could mount them. Pictures of what I've done would explain better but if anyone has any ideas It'd be greatly appreciated. PS I've removed the original tabs.
Jay
jay_kent
1979 cb650
Re: 1979 CB650 Cafe Redo - new stuff with pics
Been a week or so since I've posted, I've been busy so I'll let the pictures do the talking.
Start of the holder for my gauges. Originally it held the headlight ears and gauges. Ears were cut off and tabs were welded in. I know that it's rough but it'll all come together soon. The bottom sits in the original rubber bushings and the top of the holder will use the bolts that the top tree mounts to the forks with.

Mounting plate underneath. I'll be using the hardware that goes into the actual mechanisms to hold the gauges in place. Everything will have some rubber mounts.


I've welded on some nuts that to the unit and bent a strap that will go around both gauges to hold it tight to the triple tree. Once again a thin strip of rubber to help with slippage and vibration. Carrying on with the theme, The strap is held in place with a 6mm socket head bolt.

Tire Hugger Mount system
So here's how I mounted the tire hugger. For the rear hoop I'm using an existing bolt location that holds the chain guard by the axle so I drilled and tapped a matching on the other side. The rear hoop will mounts using 6mm socket head bolts. These bolts pass through fiberglass pan and into a metal plate which has bolts welded onto it. The metal plate is formed around the shape of the hugger and the bolts are recessed inside the pan. I also layered in a metal strip when I built up the hugger so that the forces from bolting isn't strictly only on the fiberglass. Take a look at how it came together.
I started out with nutserts but after wrenching on them to hard I realized that they won't do. AT ALL. There goes 10 bucks. Should have just thrown in the street for all of the good. The might have been strong enough but I needed to use the the opposite way so the they would sit flush along the strip and not protrude into the tire.


How the strips fit in the pan.

Lower mount. This will be drilled and fastened to the swing arm. The tabs were left long so I could center the hugger on the wheel and mark location.

Sorry, no pic on the bike. Dead batteries but how it is all assembled.

My revised holding units.

Much better IMO
hold on for part 2. should just do vids like staffy but I've got a face that belongs on Radio.
Been a week or so since I've posted, I've been busy so I'll let the pictures do the talking.
Start of the holder for my gauges. Originally it held the headlight ears and gauges. Ears were cut off and tabs were welded in. I know that it's rough but it'll all come together soon. The bottom sits in the original rubber bushings and the top of the holder will use the bolts that the top tree mounts to the forks with.
Mounting plate underneath. I'll be using the hardware that goes into the actual mechanisms to hold the gauges in place. Everything will have some rubber mounts.
I've welded on some nuts that to the unit and bent a strap that will go around both gauges to hold it tight to the triple tree. Once again a thin strip of rubber to help with slippage and vibration. Carrying on with the theme, The strap is held in place with a 6mm socket head bolt.
Tire Hugger Mount system
So here's how I mounted the tire hugger. For the rear hoop I'm using an existing bolt location that holds the chain guard by the axle so I drilled and tapped a matching on the other side. The rear hoop will mounts using 6mm socket head bolts. These bolts pass through fiberglass pan and into a metal plate which has bolts welded onto it. The metal plate is formed around the shape of the hugger and the bolts are recessed inside the pan. I also layered in a metal strip when I built up the hugger so that the forces from bolting isn't strictly only on the fiberglass. Take a look at how it came together.
I started out with nutserts but after wrenching on them to hard I realized that they won't do. AT ALL. There goes 10 bucks. Should have just thrown in the street for all of the good. The might have been strong enough but I needed to use the the opposite way so the they would sit flush along the strip and not protrude into the tire.
How the strips fit in the pan.
Lower mount. This will be drilled and fastened to the swing arm. The tabs were left long so I could center the hugger on the wheel and mark location.
Sorry, no pic on the bike. Dead batteries but how it is all assembled.
My revised holding units.
Much better IMO
hold on for part 2. should just do vids like staffy but I've got a face that belongs on Radio.
jay_kent
1979 cb650
Re: 1979 CB650 Cafe Redo - new stuff with pics
part 2
Wanted some clean lines on the frame but still needed to mount stuff, so I welded the bolts that are supposed to be there, in there for good.
Airbox bolt

Battery holder bolt

Ground Smooth

Modified airbox. Original had mud guard molded to it. Cut that off because I've got the tire hugger now.

source of steel

Side covers started. Once I cut these I realized that it won't work the way I want it to. I'd still like to use them in the build. Any suggestions on how to mount them would be greatly appreciated.

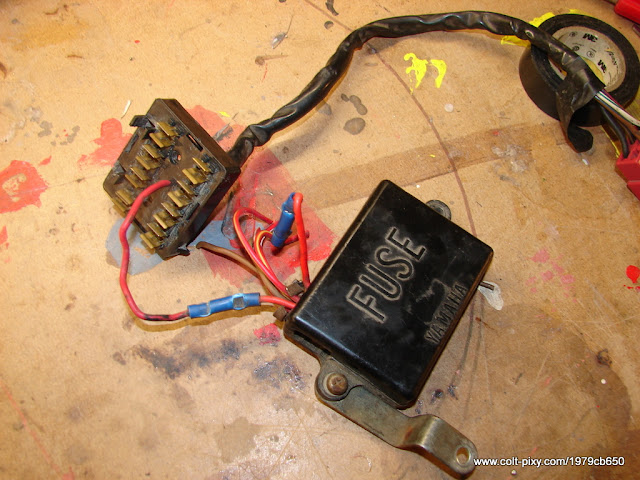
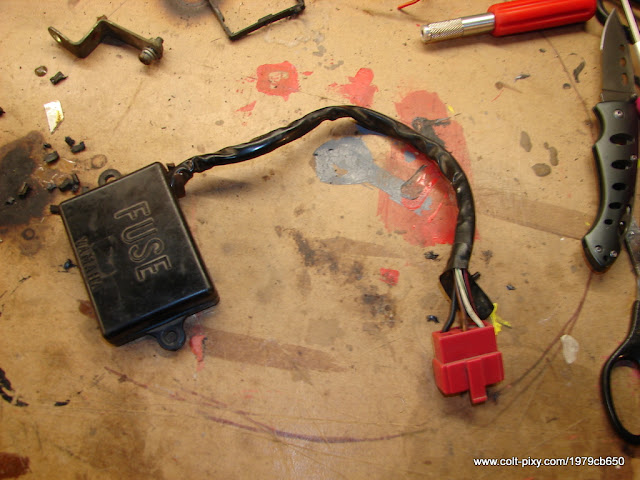
Moved my fuse box from triple tree to underseat. while rooting through my parts I came across this. Rather than spend time wiring up the yamaha fuse box to match mine. I just cut out what I didn't need and the cb650s fuse panel fit right inside.
cb650 at the top
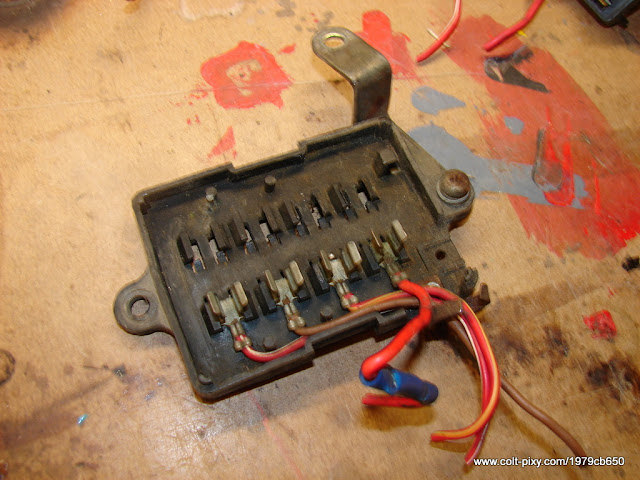
test fit on mine into donors
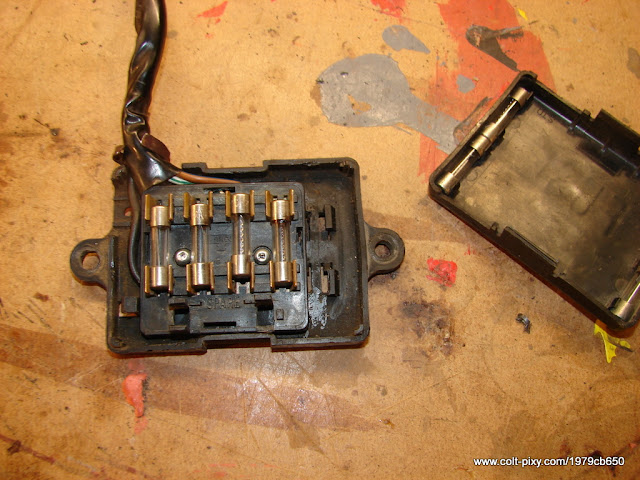
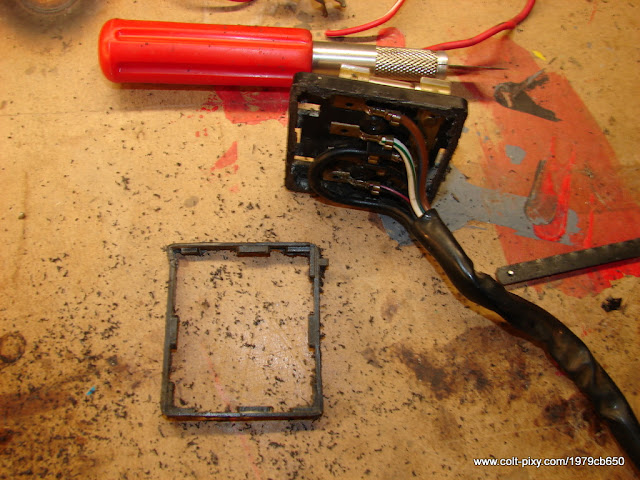
Looks stock and gives some protection from the elements
I'll be posting my schematics for wiring a Yamaha 3 wire ignition switch onto a Honda 5 wire later. Now it's back to work.
part 2
Wanted some clean lines on the frame but still needed to mount stuff, so I welded the bolts that are supposed to be there, in there for good.
Airbox bolt
Battery holder bolt
Ground Smooth
Modified airbox. Original had mud guard molded to it. Cut that off because I've got the tire hugger now.
source of steel
Side covers started. Once I cut these I realized that it won't work the way I want it to. I'd still like to use them in the build. Any suggestions on how to mount them would be greatly appreciated.
Moved my fuse box from triple tree to underseat. while rooting through my parts I came across this. Rather than spend time wiring up the yamaha fuse box to match mine. I just cut out what I didn't need and the cb650s fuse panel fit right inside.
cb650 at the top
test fit on mine into donors
Looks stock and gives some protection from the elements
I'll be posting my schematics for wiring a Yamaha 3 wire ignition switch onto a Honda 5 wire later. Now it's back to work.
Staffy
It's not yours 'til you cut it up.
Re: 1979 CB650 Cafe Redo - new stuff with a shiteload of pics
Great work Jay. You could weld some pins onto the back of that side cover, cross drill 'em and put a split pin in to hold it in place. Of course you'd need round sleeves on the frame for the pins to protrude through.
Great work Jay. You could weld some pins onto the back of that side cover, cross drill 'em and put a split pin in to hold it in place. Of course you'd need round sleeves on the frame for the pins to protrude through.
CresentSon
Over 1,000 Posts
Re: 1979 CB650 Cafe Redo - new stuff with a shiteload of pics
Somebody has been awfully busy. I love how clean the gauges look. that front end is gonna be smooth as hell. Are you going to mount the headlight ears back on the original brackets? Man this thing is taking off.
Somebody has been awfully busy. I love how clean the gauges look. that front end is gonna be smooth as hell. Are you going to mount the headlight ears back on the original brackets? Man this thing is taking off.
jay_kent
1979 cb650
Re: 1979 CB650 Cafe Redo - new stuff with a shiteload of pics
That's a pretty good option Staffy. I guess I was premature cutting off the tabs for the original covers but I wanted something custom. : You've got me thinking on a similar route though so thanks for the idea starter.
Thanks Von, appreciate the props. I hope it turns out as well as I hope. Going to but it back together for a trial fit before I paint. So pics of that will be up soon.
Seems like it's taking a lot longer than it should be, with only a few hours a couple of nights a week what can you do? As for the headlight ears I actually followed Brandon's lead and made mine out of aluminum. I didn't use channel like he did but it was 2 bucks for a strip at Metal Supermarkets. These will clip on directly to the forks.
Staffy said:Great work Jay. You could weld some pins onto the back of that side cover, cross drill 'em and put a split pin in to hold it in place. Of course you'd need round sleeves on the frame for the pins to protrude through.
That's a pretty good option Staffy. I guess I was premature cutting off the tabs for the original covers but I wanted something custom. :
You've got me thinking on a similar route though so thanks for the idea starter.VonYinzer said:Great work Jay! This is going to be a sharp ride for sure.
Thanks Von, appreciate the props. I hope it turns out as well as I hope. Going to but it back together for a trial fit before I paint. So pics of that will be up soon.
CresentSon said:Somebody has been awfully busy. I love how clean the gauges look. that front end is gonna be smooth as hell. Are you going to mount the headlight ears back on the original brackets? Man this thing is taking off.
Seems like it's taking a lot longer than it should be, with only a few hours a couple of nights a week what can you do? As for the headlight ears I actually followed Brandon's lead and made mine out of aluminum. I didn't use channel like he did but it was 2 bucks for a strip at Metal Supermarkets. These will clip on directly to the forks.
tWistedWheelz
BUILT NOT BOUGHT!
Re: 1979 CB650 Cafe Redo - new stuff with a shiteload of pics
if you use pins as mounting devices, make sure you use rubber gromets around the anchor hole or it rattles like a babies toy and will piss you off in about two miles of riding!!!!
if you use pins as mounting devices, make sure you use rubber gromets around the anchor hole or it rattles like a babies toy and will piss you off in about two miles of riding!!!!
jay_kent
1979 cb650
Re: 1979 CB650 Cafe Redo - quick update
some pics to check how it looks before tear down. No engine inside.
my brother picked up an oven that runs off 110 volts so now I can bake my enamel on now. Wahoo.
Before I fixed my instrument bracket, The headlight didn't fit so some material was removed.

Crotch Shot

Side shot. It looks tall in the front right now without the headers and fender. If it looks like this after I'll lower the front.

Love this look

Revised instrument bracket.


Hopefully this will get paint this weekend.
some pics to check how it looks before tear down. No engine inside.
my brother picked up an oven that runs off 110 volts so now I can bake my enamel on now. Wahoo.
Before I fixed my instrument bracket, The headlight didn't fit so some material was removed.
Crotch Shot
Side shot. It looks tall in the front right now without the headers and fender. If it looks like this after I'll lower the front.
Love this look
Revised instrument bracket.
Hopefully this will get paint this weekend.
tWistedWheelz
BUILT NOT BOUGHT!
Re: 1979 CB650 Cafe Redo - quick update
Man, I love all the home made components this bike has...a true statement of your ingenuity!
Man, I love all the home made components this bike has...a true statement of your ingenuity!
CresentSon
Over 1,000 Posts
Re: 1979 CB650 Cafe Redo - quick update
Jay, that stance really fits the look IMO. I'd list everything I like about what you've got going on here, but I'm sure you would rather be makig cool shit rather than reading all day. Too cool brother.
Jay, that stance really fits the look IMO. I'd list everything I like about what you've got going on here, but I'm sure you would rather be makig cool shit rather than reading all day. Too cool brother.
rjz5400
grummble grumble
Re: 1979 CB650 Cafe Redo - quick update
just something i noticed,
If the bike is on the center-stand and both tires are touching the ground, then the ground probably slopes strongly to the back right??
meaning once it is on level ground it will look less like it is about to launch
just something i noticed,
If the bike is on the center-stand and both tires are touching the ground, then the ground probably slopes strongly to the back right??
meaning once it is on level ground it will look less like it is about to launch
jay_kent
1979 cb650
Re: 1979 CB650 Cafe Redo - quick update
Thanks a lot guys really appreciate the comments
Your right about that but it still is a little high, but I figure with the weight of the engine in there it'll help lower the stance a bit
Thanks a lot brother, I've been trying to make too much stuff lately, the bike and this POS RV that we bought. Supposed to good mechanical order, safetied. No dice. So we're fixing it up proper. Used to be a provincial police Command center. Doesn't have the cherry's but it does have the siren and the floods along the sides so that's cool. However it's given me the opportunity to practice welding on different thicknesses of metal and practice is always welcome.
So I had a bit of a major setback last night. I put in some engine parts to bake in an oven my brother procured for me. Baked the heads, oil filter and oil pan for the alloted time but couldn't really tell how hot it was. Pulled the parts out and the paint rubs off. Frack. I can handle that but the real kick to the nuts is the sleeves slid out of the head part way. 2 are out about a sixteenth and 2 are out over an eighth. I thought that might happen so I put the head in upside down so everything was nice and flush on the grill. I guess it got too hot.
Now I'd be throwing everything into the fcuking bin right about now but luckily I have a 2nd head that I can use. Only a matter of cleaning, and sandblasting. I've also decided not to paint the head but to leave it blasted as the rest of the engine is gloss black with blasted covers. I think it will stand out a bit more.
Anyone have any suggestions on getting the sleeves back in on the first head?
My better half made a comment when I told her about engine and I was kicking myself that made me feel a bit better. Kinda went like this and it applies to the majority of us that Build Not Buy. and this isn't to take away from those that are masters and journeymen in their fields.
"People take apprenticeships to learn how to weld, people take apprenticeships to learn how to do body work / paint, people take apprenticeships to become a mechanic, people take apprenticeships to learn how to machine metal, and you expect to do it right the first time every time."
It's true, we're going to make a mess of it the first time. Just rather not but the learning curve is steep and I'm not so sure I'm saving anymore money not taking the proper courses. But to be honest, I think I'm learning more by these errors than I would have if they were taught to me in class.
Sorry about the long winded text but I really appreciate your feedback and accolades.
Thanks a lot guys really appreciate the comments
rjz5400 said:just something i noticed,
If the bike is on the center-stand and both tires are touching the ground, then the ground probably slopes strongly to the back right??
meaning once it is on level ground it will look less like it is about to launch
Your right about that but it still is a little high, but I figure with the weight of the engine in there it'll help lower the stance a bit
CresentSon said:Jay, that stance really fits the look IMO. I'd list everything I like about what you've got going on here, but I'm sure you would rather be makig cool shit rather than reading all day. Too cool brother.
Thanks a lot brother, I've been trying to make too much stuff lately, the bike and this POS RV that we bought. Supposed to good mechanical order, safetied. No dice. So we're fixing it up proper. Used to be a provincial police Command center. Doesn't have the cherry's but it does have the siren and the floods along the sides so that's cool. However it's given me the opportunity to practice welding on different thicknesses of metal and practice is always welcome.
So I had a bit of a major setback last night. I put in some engine parts to bake in an oven my brother procured for me. Baked the heads, oil filter and oil pan for the alloted time but couldn't really tell how hot it was. Pulled the parts out and the paint rubs off. Frack. I can handle that but the real kick to the nuts is the sleeves slid out of the head part way. 2 are out about a sixteenth and 2 are out over an eighth. I thought that might happen so I put the head in upside down so everything was nice and flush on the grill. I guess it got too hot.
Now I'd be throwing everything into the fcuking bin right about now but luckily I have a 2nd head that I can use. Only a matter of cleaning, and sandblasting. I've also decided not to paint the head but to leave it blasted as the rest of the engine is gloss black with blasted covers. I think it will stand out a bit more.
Anyone have any suggestions on getting the sleeves back in on the first head?
My better half made a comment when I told her about engine and I was kicking myself that made me feel a bit better. Kinda went like this and it applies to the majority of us that Build Not Buy. and this isn't to take away from those that are masters and journeymen in their fields.
"People take apprenticeships to learn how to weld, people take apprenticeships to learn how to do body work / paint, people take apprenticeships to become a mechanic, people take apprenticeships to learn how to machine metal, and you expect to do it right the first time every time."
It's true, we're going to make a mess of it the first time. Just rather not but the learning curve is steep and I'm not so sure I'm saving anymore money not taking the proper courses. But to be honest, I think I'm learning more by these errors than I would have if they were taught to me in class.
Sorry about the long winded text but I really appreciate your feedback and accolades.


