1981 Yamaha SR250 Cafe Racer

Sorry if you mentioned it, but this threads been around so long I"m not sure I can remember everything ;D What'd you use to paint the wheels? Also, any good close ups of the finished product?
 
Maybe if you check the Perth Street Bike website its on there as well and a bit further along.
http://www.perthstreetbikes.com/forum/f61/yamaha-sr250-cafe-racer-78221/
 
midlifecafe said:
Maybe if you check the Perth Street Bike website its on there as well and a bit further along.
http://www.perthstreetbikes.com/forum/f61/yamaha-sr250-cafe-racer-78221/

Beautiful build
 
lunar_c said:
Hey all,
Here's some more pics of todays progress .. I've been working on detailing the engine, while I'm waiting for the parts to finish off the forks. Basically getting it ready to put back together with a new piston, new rings and seals.

After about an hour of scrubbing and cleaning with D-10 degreaser (an Australian product, very good on aluminium!) I had the engine clean enough to paint. I then masked it off, as I haven't split the cases on this rebuild - just done the top end.

n704951495_1312739_6290.jpg


And here it is with a shot of black. I've used Dupicolor black gloss enamel hi temp engine paint on all engine parts .

n704951495_1312740_6852.jpg


Here's the barrel after painting, the bore is in good shape so only requires a hone.

n704951495_1312737_5195.jpg


Here's the cam cover .. I've sanded the paint off of the ends of the fins and polished them for contrast. It breaks up the black, as will the polished side covers, and valve inspection plates. Lots of extra work, but it looks sweet though!

n704951495_1312738_5742.jpg


And finally I threw everything together quickly just to see what it looked like (I decided to polish the fins after seeing all the black parts needed breaking up)

n704951495_1312741_7406.jpg


Looks good to me so far.. has anyone noticed my side cover had a small chunk missing over the gear shift spline? I smoothed it out with a grinder today so it's less visible! It's all in the details ;)

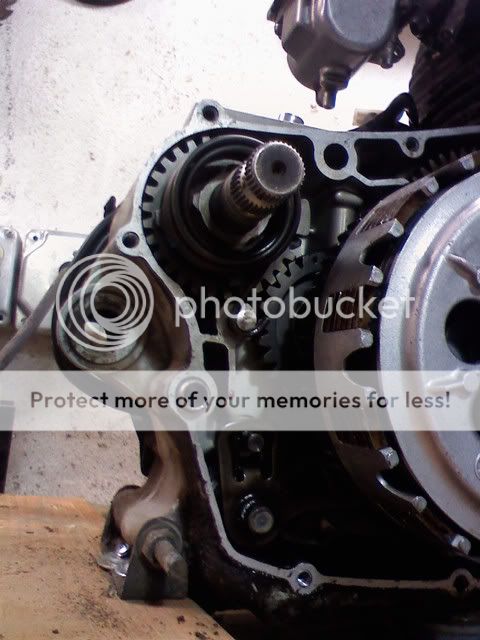
I started polishing the other side of the motor today - I've also filed off all of the raised lettering (oil capacity is written on the side of the crankcase, oil filter cover is labeled etc) and smoothed it out for a cleaner look.

More pics soon!

Regards,
Ben
lunar_c said:
The old box I used for the electronics wasn't big enough so I bent up a box to the right dimensions (using all available room under the seat area) out of 2mm aluminium plate and test fitted it this evening. Everything fits comfortably this time! I'll mount it tomorrow.

5191_100434231495_704951495_2465322_1548911_n.jpg


Going to do a lot more work on the bike tomorrow and wednesday as I have them off work!

Ben,

I have 3 sr 250's in the shed in seperate states of disrepair just finished an sr400 cafe project and now going to focus on the 250's am curious to see your seat I think it will be the biggest challenge in my build.

KCH
 
Hey all,

A lot has happened, but it's about time I update. Sorry! I prepared and painted another frame (kept the pillion loops this time for the side stand mount and pillion pegs) and have added a few other things to the build .. like I'll be running TLS front and rear brakes from an IT250 (magnesium TLS drums.. very nice.. the rear fits but you need to convert it to rod actuation from cable, and the front you need to relace an 18" rim to the IT hub and run the IT external speedo drive, or a digital one) and anyway, I chose to strip the bike down again and re think a few things, and now it's being built back up on the new frame.

I've been incredibly busy with bands and work, so I usually only update my thread on my local forum PerthStreetBikes. But finally, here's an update!

On Saturday morning I made up a little bracket to relocate the original ignition barrel just behind the petcock under the seat.

10861_194389156495_704951495_3493888_5935506_n.jpg


Here's a shot of the ignition barrel in situ.. you can also sort of see the 1/2" hose running up to the breather filter under the seat.

10861_194391846495_704951495_3493909_562403_n.jpg


Here's a close up of the ignition barrel and the crankcase breather tucked away under the tank. The breather filter is stuffed with steel wool to prevent vapour / smoke coming out. A one way valve is a good idea too .. the inline PCV filter from a VP? commodore works nicely.

10861_194393966495_704951495_3493926_2299792_n.jpg


Shiny engine.. I put the regulator back in the standard spot for now. It looks pretty neat after sandblasting. The reflectors are history once it passes rego..

10861_194393076495_704951495_3493925_3352863_n.jpg


One last shot of the key .. it hides away nicely under the tank. I'm happy.

10861_194394806495_704951495_3493927_51181_n.jpg


I love these bars..

10861_194395256495_704951495_3493928_6252707_n.jpg


Here's a better shot of the seat/tank from behind .. I am really liking it.

10861_194395656495_704951495_3493934_2754698_n.jpg


And from the side .. note the gap between seat/tank .. I'm extending the seat portion this week.

10861_194395956495_704951495_3493935_455087_n.jpg


Now onto some serious matters .. It's going to need a rear guard to pass rego.. Heavily reworking the rear or cutting up the front may work.. This is a little experiment with the rear (hence it is held on with cable ties). It's not bad but needs to be a little bit shorter. Definitely grinder time. I love my 5" grinder, it's my favourite tool!

10861_194397436495_704951495_3493950_2080578_n.jpg


This is my favourite pic at the moment .. it's looking SWEET! and it fimally feels like it's coming together. My IT250 hub is on it's way so I can work out the spoke sizes and lace it up so I can run my TLS front brake, and I'm going to find an 80's drum brake XT250 rear wheel this week and take some measurements so I can work out if it will fit as they're an 18" rim with a very similar looking hub to the SR 250.

10861_194397996495_704951495_3493955_6420628_n.jpg


Hope you all like it ..

Regards,
Ben
 
So with all those XT250 and IT250 parts going on did you ever find all the parts to convert it to a kick start like I did with my old SR250?
 
Noah,
Not yet .. but I'm keen to do so, would you be able to let me know what you had to do to install it?
Regards,
Ben
 
Here's a parts diagram for the kick start assembly for a TT250 which will fit the SR250
KickStartDiagram.jpg


I bought the main assembly off Ebay and then tracked down the idler gear elsewhere which is the other main part. Here's a pic of the assembly installed.
kickstartinners.jpg


Here's an assembly on Ebay http://cgi.ebay.com/Yamaha-XT-XT250-TT250-Used-Kickstart-Shaft-1981_W0QQitemZ300366455742QQcmdZViewItemQQptZMotorcycles_Parts_Accessories?hash=item45ef3c63be

And the idle gear also on Ebay although in the UK http://cgi.ebay.com/Yamaha-XT250-TT250-SR250-gear-kick-idle-3Y1-15651-00_W0QQitemZ200414518546QQcmdZViewItemQQptZUK_Motorcycle_Parts?hash=item2ea9a2dd12

The other parts I had to track down were the oil seal which is #16 in the diagram, the spring stopper which is #15, the spring clips and washers for the idler gear and parts #11-14. I was able to get all of them from www.powersportspro.com which is where I got the diagram and the part numbers.

Hope that helps. If you have any other questions I'll see if I can remember any more details.
 
Hey Lunar,

Your bike looks absolutely stunning. This is a trivial question, but how do you remove the ignition from the top clamp of the triple trees? Is it a rivet that you need to drill out?

I'm trying to do virtually the same ignition relocation, but I havent't decided if it should be left hand side or RHS. See, if it were the left you could start your bike and stand next to it while it warms up. But then when you get off the bike, you can't hold on to the clutch and turn the ignition off with your left hand... But if it were on the right, you could clutch in, hand brake in, hand brake out, right hand reaches for kill switch and then remove key. ;) What do you reckon?

Good luck with the rest of the build and Merry Christmas.

Cheers,
Damo
 
My bikes are early 80's SR250's .. but there appears to be very little difference over the years, mainly cosmetics and the front disc etc. Remove the speedo .. and then you can get at the ignition key barrel.There are two bolts underneath the top triple clamp, either side of the barrel. You may need to pull the head light off to get at them.
Good luck!

Regards,
Ben
 
Decided to mount the muffler today, so I bolted on the header, and attached the muffler and let it sit on the header while I figured out how to mount it.

10861_202722641495_704951495_3531558_3690778_n.jpg


Here's a top down view of the area above the muffler. After looking at the available options, I decided the least obtrusive way of mounting it to the frame would be to make a pinch clamp to mount it to the pillion peg loop directly above it.

10861_202724931495_704951495_3531567_5309797_n.jpg


Starting off with a piece of aluminium flat bar (20mm x 2mm) I found an axle that was the same diameter as the frame tubing I wanted this to clamp to, then roughly bent the flat bar around it (leaving plenty of length either side of the bend) and pinched it over the axle, slipping it a little further down into the jaws of the vice each time.

10861_202728801495_704951495_3531589_4704490_n.jpg


A little heat helps at this stage, then a couple of blows to the loop on the end to get it more rounded with a dead blow hammer. Note safety footwear. Oops.

10861_202730736495_704951495_3531595_998880_n.jpg


Then I trimmed the edges to length and rounded them, and drilled the holes. The top is spread apart to sit over the frame tube, an m6 x 25mm inserted and tightened til it pinches up on it, while the tab at the end bolts to the muffler.

10861_202733596495_704951495_3531632_369672_n.jpg


Then I filed the rough edges down, and sanded all the file marks and scratches down, going from 120 grit up to 400, trying to keep in the same direction, then polished. That's better.

10861_202735551495_704951495_3531636_7261049_n.jpg


A little stick on foam inside prevents the clamp from scuffing up the paint on the frame. Rubber would be better but this is all I had.

10861_202736666495_704951495_3531639_304153_n.jpg


Installed on the bike ..

10861_202738461495_704951495_3531656_3331945_n.jpg


From behind. Hope this helps someone with idea's for a classic bike. Very simple and clean ans It can be made with nothing more than a vice, a drill, hacksaw and some files.

10861_202740071495_704951495_3531657_4658033_n.jpg


This is the final version of the battery tray. Revision #3 I think. I know it's ugly, I'll get one welded up later.. No facilities to weld aluminium at home. It works!

10861_202742246495_704951495_3531665_6074061_n.jpg


Top view of where the battery is now mounted, hidden under the seat hump.

10861_202743376495_704951495_3531668_3368150_n.jpg


Underneath. The battery itself is strapped in with a locking nylon luggage strap.

10861_202745031495_704951495_3531671_7478690_n.jpg


Under the hump, where I've chosen to hide all of the electrics / breather.

10861_202746156495_704951495_3531673_5463793_n.jpg
 
Looking very good, especially that muffler and its custom mount - way to think laterally! Only thing I'd watch out for it the electronic box getting water spray from the rear tyre on it.

Reckon you'll get this sucker on the road in time to enjoy the summer?

- boingk
 
Now christmas is over I had a bit of time today to get some work done on the SR.

This is my rear inner fender. It's the front half of an SR front fender, cut down and shaped to fit in front of the rear wheel. Recycling!

20076_222756716495_704951495_3612990_3105735_n.jpg


Here's a top down view of the fender on the bike. It's straight, my photography however .. is not. Too much time holding the grinder.

20076_222757961495_704951495_3612996_4458824_n.jpg


And again from the side.

20076_222761211495_704951495_3613002_2110079_n.jpg


Oh yeah, I finished cutting down the front fender and radiusing the edges. It looks okay, I'll be putting a nitroheads front fender on later and probably running no rear guard and just the inner fender on the rear, though. Hence why I made it in two halves.

20076_222762466495_704951495_3613003_6818546_n.jpg


As you know, to fit the SR frame I needed to extend the front of the seat base I bought by 100mm to meet the tank. The best way I could think of was to make something to simply mould the fiberglass over, make the front extension as a seperate piece then join them together.

I traced the seat out onto a sheet of cardboard full scale, drew in the extension then with that to take measurements from, I built a male mould to do this out of a piece of old skirting board (the bevel on the edges matched that of the seat perfectly) and a bit of flat mdf. Doesn't need to be pretty, so this one sure isn't!

19976_222771331495_704951495_3613055_4048706_n.jpg


And the piece glassed up. I didn't quite get enough resin on the last offcut I threw on there to get rid of it. I'll sand that off, the rest is good.. I was just being ambitious.

20076_222772251495_704951495_3613061_4506341_n.jpg


More updates soon ..
 
lunar_c said:
My bikes are early 80's SR250's .. but there appears to be very little difference over the years, mainly cosmetics and the front disc etc. Remove the speedo .. and then you can get at the ignition key barrel.There are two bolts underneath the top triple clamp, either side of the barrel. You may need to pull the head light off to get at them.
Good luck!

Regards,
Ben

Cheers champ, I'll give it a go! From what I know, there's 4 tiny screws on the ignition barrel and two bolt like objects like you said. So you reckon the bolts are what holds the barrel on?
 
Hummingbird said:
Cheers champ, I'll give it a go! From what I know, there's 4 tiny screws on the ignition barrel and two bolt like objects like you said. So you reckon the bolts are what holds the barrel on?

Yes - the bolts are probably ones with snap off heads (anti-theft). You will need to drill the heads off to get the barrel off. Take off the entire top triple and drill them out. They are common M6 thread, so you can replace them with allen bolts later on (if you decide to put the barrel back on the triple clamp).
 
Got the seat mounted today!

For the seat mounts I wanted something with a bit of give to cope with the vibration etc, so I copied a vibration mount from a car part I remembered and used various diameters of rubber hose and steel tube to make it. A bit like a Norton cotton reel?

20076_244497696495_704951495_3733484_2664402_n.jpg


The seat mounts to the base of the tank up front, the piece of flatbar via the rubber mounts in the centre and the loop of flatbar at the back. I'll also be adding rubber blocks along the frame rail to support the weight also, a la how Norton mounted their tanks.

20076_244502181495_704951495_3733485_6954844_n.jpg


Now to glass up a seat pan (with captive bolts glassed in bolt it to theh seat) to sit on top of this, then add and shape seat foam and upholster it.

20076_244503831495_704951495_3733518_59169_n.jpg


This is how it looks from the side. I am happy with it. It'll look great with the fenders back on. This also reminds me that I have to make a chain guard too!

20076_244507131495_704951495_3733520_3609779_n.jpg
 
Hey,
Tonight I bolted the guards back up, and the seat on and took a pic.

20076_248072751495_704951495_3750195_5036481_n.jpg


Under the seat at the middle mounts I added a piece of flat bar to support the weight of the rider across the seat and not around the holes in the fiberglass, to avoid cracking.

20076_248069211495_704951495_3750138_1169967_n.jpg


Also wherever I've drilled through the seat I am using panel washers to spread the load around the hole, again to avoid cracking.

20076_248071101495_704951495_3750139_7966071_n.jpg


This is the front guard I cut down and reshaped. I'll replace it with an aluminium nitroheads front fender on it later but this is okay for now.

20076_248086781495_704951495_3750212_2160124_n.jpg
 
I bid on a set of rear sets from a 1987 Honda CBR 600 I found cheap on eBay. They look about right for what I need. On the brake side, I will remove the master cylinder, and weld a brake arm to the brake lever pivot to operate the rear drum.
The gear side will need some tweaking but I can cut the linkage rod down and cut the thread back on the end to accept the rose joint no problem.
Saves a lot of work and expense!

!BjEDDu!!2k~$(KGrHqEH-D8Escw50UTTBLR92+)4cw~~_3.JPG


!BjEChJ!BWk~$(KGrHqMH-CcEs9h0MVrbBLR90bsbWg~~_3.JPG
 
Back
Top Bottom