There just aren't enough British bikes represented on this forum...so I thought I would share this.
The build is about 3/4 of the way through, but this will get the story started.
About 12 years ago I was asked to rebuild a 650 Lightning engine for the son of a good friend of mine. He said he was going to give him enough bits to put together his own BSA... and having the rebuilt engine at the ready would light a fire under his son's arse and get the project started. Well...that didn't work. The lovely rebuilt engine just sat on his workbench and the rest of the bits and pieces sat in a storage locker until last fall, when the owner Scott called me and asked if I would take on the task of putting a roadworthy machine together. He had a budget in mind, but it was more than a little low. We discussed expanding the budget and eventually settled on the possibility of getting a 'rolling runner' together before Christmas and the probability of continuing the work in the new year when things had settled down financially.
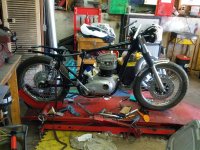
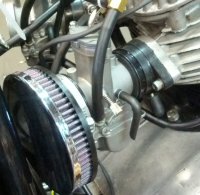
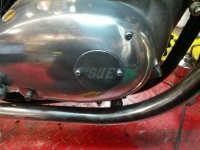
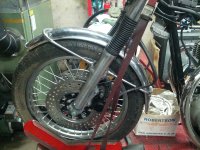
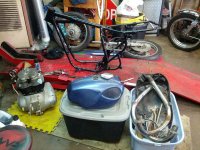
So, with that discussion out of the way, he arrived at the shop one afternoon with a truckload of parts. We plopped everything on the floor and discussed the way ahead. With a Suzuki GT750 front end to be grafted onto the BSA frame and a good handful of non-BSA equipment, I told him he was going to have a genuine Johnny Cash Special...that's when he started calling it "Sue". Anyhow, the picture will give you an idea of what I had to start with.
The build is about 3/4 of the way through, but this will get the story started.
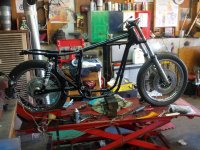
About 12 years ago I was asked to rebuild a 650 Lightning engine for the son of a good friend of mine. He said he was going to give him enough bits to put together his own BSA... and having the rebuilt engine at the ready would light a fire under his son's arse and get the project started. Well...that didn't work. The lovely rebuilt engine just sat on his workbench and the rest of the bits and pieces sat in a storage locker until last fall, when the owner Scott called me and asked if I would take on the task of putting a roadworthy machine together. He had a budget in mind, but it was more than a little low. We discussed expanding the budget and eventually settled on the possibility of getting a 'rolling runner' together before Christmas and the probability of continuing the work in the new year when things had settled down financially.
So, with that discussion out of the way, he arrived at the shop one afternoon with a truckload of parts. We plopped everything on the floor and discussed the way ahead. With a Suzuki GT750 front end to be grafted onto the BSA frame and a good handful of non-BSA equipment, I told him he was going to have a genuine Johnny Cash Special...that's when he started calling it "Sue". Anyhow, the picture will give you an idea of what I had to start with.
")