Follow along with the video below to see how to install our site as a web app on your home screen.
Note: This feature currently requires accessing the site using the built-in Safari browser.
We noticed you are blocking ads. DO THE TON only works with community supporters. Most are active members of the site with small businesses. Please consider disabling your ad blocking tool and checking out the businesses that help keep our site up and free.
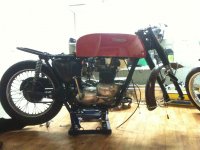
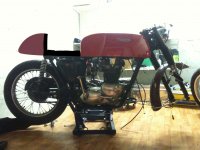
I just started a new build. I've had my TR6R for about three years, and it's been ridden daily. Running ok, but I felt an update was long overdue. Attached a photo of how it was (with some eye candy).
My plan was to do a slick desert racer, but when a friend donated a huge Dunstall tank I couldn't resist the café urge (photo attached). So today I tore down most of the bike, and I'll get the frame off for coating as soon as possible.
The inspiration is vintage racing. I love a full fairing, but due to different reasons I'll go naked. The Dunstall Norton Drainpipe has a beautiful bump, something I might go for.
Right now the parts list looks something like this (and are bound to be longer. Strikethrough means bought.):
Belt drive (already fitted)
Dunstall 6(?) gallons racing tank
Pazon electronic ignition
RFID ignition lock
clip ons
rear sets
custom seat pan/bump
high pipes each side
stock oil tank and side panel (don't want the "empty" triangle)
new rear shocks (open for suggestions)
new front springs (open for suggestions)
alu front fender
custom wiring
tapered bearings front fork
Sparx 210w 3-phase stator and rotor
Sparx regulator/rectifier
All comments and suggestions are very welcome! I just bought the Barnett's BikeCraft Magazine and have some great ideas already. But I need more. What would you say are essential upgrades / updates?
Thanks! Yeah, it's my first real build. Not experienced at all, but I learn something new every day. Love it!
It does look like a Seeley frame, but as far as I know it's a Dunstall. Then again I don't really know more than that it's a very rare bike.
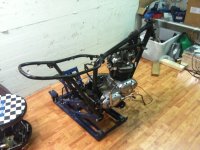
Yesterday I spent a couple of hours making an engine stand. I'll make a photo later on. Removing the engine from the frame today.
I was thinking of just getting the frame powder coated straight away as I want to keep the frame original. But I know I should really plan the bike out before I do...
Got the engine out of the frame and started cleaning it. And there's so much to clean!
And finally! Santa came by today!
Also halfway decided on a Wassell 200w stator. Any point upgrading the rotor as well? I'm struggeling with bad charging, so a little more output will be nice.
New day. New tasks. Got the engine relatively clean and mounted in the stand. Got the head off and to no surprise there were leaks in abundance. The pistons were pitch black from soot. Now, what to do about it? New pistons? Have to take a closer look at the cylinder as well.
Removed the points cover and the points didn't look to good either. Good thing I bought the Pazon.
The head needs a good cleaning. Any good methods to get it clean between all the fins? Wouldn't mind if the answer wasn't "elbow grease"...
Went by the workshop today with some new parts and some ideas.
I've decided to strip the cylinder and clean the pistons, and leaving the rest of the engine as it is. It's in fairly good shape and looks like it haven't gone that far since the last rebuild.
Tried out the new RDIF ignition lock and it looks promising. Thinking of mounting the sensor in the headlight, underneath a fake ammeter. Then wiring the box to the brake light, so you will have to press either brake while turning the ignition on.
Got to do a bit more today. Bought some vinyl polishing paper and started cleaning those pistons. Hell of a job, but it had to be done. Huge difference at least!
Also got started on the RFID sensor mount in the headlight. Stripped the ammeter and it looks like it's going to work. Just need some glue and a Dremel to trim the casing.
Still have to clean most of the parts and the cylinder. Going to have it painted, but don't know what paint to use. Any suggestions?
Also, wondering about the cowl. Round or "upswept" like the TZ750?
And colours. I was going to just go with black frame and red tank and cowl, but now I'm considering other colours. But there are so many! Any nice classic combinations?
Soak simple green.. Or a engine degreaser of your choice, for a few days.. Scrub with a old tooth brush... Or your exwifes.. Lol
Spray and soak some more... Then haul off to your local car wash. And preasure wash it all.. Then get home and attack every thing with a heat gun. Gets 80-90% clean. Its a good start at least..
Still have to clean most of the parts and the cylinder. Going to have it painted, but don't know what paint to use. Any suggestions?
And colours. I was going to just go with black frame and red tank and cowl, but now I'm considering other colours. But there are so many! Any nice classic combinations?
At Choppahead we paint all our cylinders with a product called VHT something or other. This is when we get them back from the machine shop so they've been blasted and bored and are raw metal. You can spray it on real thick and it never seems to run (and it absorbs into the pores of the metal) I actually just painted a set a few hours ago!
In regard to colors, I'm a big fan of the original triumph palate - you should see some bikes in person before deciding - some of them have an amazing metallic. Otherwise, try looking at new cars - they paint new cars everything under the sun in terms of color, and are a great deal easier to match as the codes are readily available where as you need to do a lot of digging and phone call making for some of the Triumph colors.
if you hate the environment, generic brake cleaner in a spray can simply melts away grime and leaves you with showroom fresh aluminum if you spray enough.
Some of the guys at my garage decided to get a degreasing bath and a acid bath (is that the correct english term?) and I decided to join. What a cool thing! I've only tried the degreaser yet, but it worked really well. The carb came out like (almost) new. Disassembled it and left it to dry. Looks ok as it is, so I think I'm going to stay with the Amal for now.
Also got started on the hump. Mocked up something quick with cardboard and masking tape, but I do quite like it. Might have to modify the angle on the seat to match the tank angle... Any thoughts? Relocating the electrics back there, and leaving space under the seat for a lock. Still trying to figure out the best way for the seat to be able to open easily to access the lock...
And I just came across this picture. Gorgeous bike and quite similar to what I had in mind, minus the fairing. Even looks like almost the same tank.
This site uses cookies to help personalise content, tailor your experience and to keep you logged in if you register.
By continuing to use this site, you are consenting to our use of cookies.


")


