'74 CB200 My Old Flame

Itazura

New Member
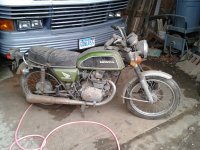
So here is the story. I bought this bike when I was 18. It was my first love. I rode it everywhere. I rode it to work. I rode it at school. I rode it just to ride it. I loved this bike. When I got married we even took it with us to California. When we moved back it went into storage in my father's pole barn... and never left.

That was 14 years ago (yes, I'm officially 'old'). Last summer I started to get the itch to ride again and even considered buying a newer bike, something bigger since I'm bigger as well as older now too. I would browse Craigslist and see what was out there, but money being what it is I couldn't afford to do much more than look. Then I saw it... a '74 CB200 just like mine, even the same color... that 70's green that was all the rage. So I started searching specifically for CB200's out of curiosity and saw all the custom cafe racers people we making out of them and I fell in love all over again. So there was only one thing left to do.

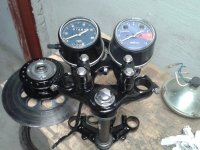
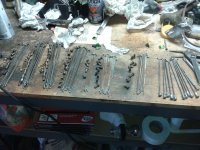
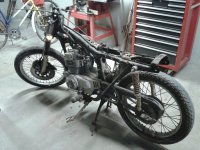
Last week I pulled her from the barn and brought her home. I now have her taken apart almost to the frame with full intention of making her the gorgeous machine on the outside that she always has been to me on the inside.

The plan...

Clean all the rust from the frame and repaint it. This is a rebuild on a budget so powdercoating isn't an option.

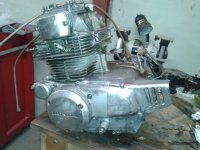
Clean up the motor but not going to rebuild it. She ran strong back in the day so I know it's in good shape. Just needs some cosmetic TLC. And I know my limitations. I have a healthy respect for "The thing that goes 'SPROING'" (TTTGS) Every motor has a TTTGS. It's put there for someone who is tearing apart an engine who rightfully has no business doing so. At some point it goes SPROING (hence the name) and they are never able to put it back in good working order again. So, going to leave that as it is.

Rearsets... Definitely want rearsets. I might try making my own or finding something off the shelf.

Seat... Again, might try making my own or finding something off the shelf.

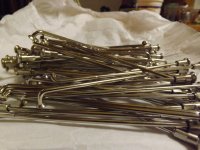
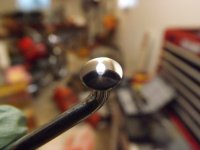
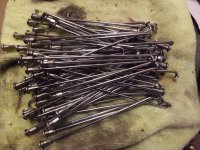
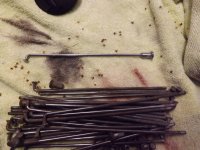
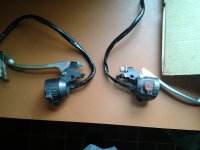
Color... Most of the chrome bits are fairly well rusted and pitted to at least some degree. So the final bike won't have a lot (if any). It will have to be painted. What I'm imagining is gloss black frame and wheels. Black engine with bright yellow trim pieces (the bits that are usually chrome. Tank bright yellow with black accents. Pipes in black tape. Seat yellow with black stripes... rounded like a bee's abdomen. Finally, a single bullet style taillight for a "stinger".

This is a build on a budget. The budget is if I can't afford something it puts a hold on the project until I can. So the less I have to spend the better. I'm also not looking for perfection, just looking to get my baby back.
 

Attachments

  • 2013-03-31 09.38.25.jpg
    2013-03-31 09.38.25.jpg
    816.1 KB · Views: 236
  • 2013-04-01 21.15.51.jpg
    2013-04-01 21.15.51.jpg
    672.3 KB · Views: 224
Good luck with the build man. Glad to see you brought the old girl back out. Welcome back to the CB200 Family.. hit me if you need anything
 
Re: Re: '74 CB200 My Old Flame

Luugo86 said:
Good luck with the build man. Glad to see you brought the old girl back out. Welcome back to the CB200 Family.. hit me if you need anything
Same here. There have been quite a few cb200 builds here, plenty of help available!
 
Well, I've got it down to the frame and I'm about halfway through cleaning 20 years of crud from the engine. I had to drill out all the screws to take the side covers off but everything was looking really nice inside. No issues there. I wanted to replace the screws with socket head cap screws anyhow. I also found my repair manual, which is coming in really handy. I took a wire wheel to the shocks and they turned out decent enough I don't think I'll need to replace them, at least not right away. Here are a couple of shots of the engine still in the frame before cleaning and later on my bench lookin kinda purdy.
 

Attachments

  • 2013-04-01 21.16.25.jpg
    2013-04-01 21.16.25.jpg
    553.3 KB · Views: 222
  • 2013-04-07 15.01.47.jpg
    2013-04-07 15.01.47.jpg
    605 KB · Views: 250
Anyone have an idea where I can find gaskets for the left and right covers? The one on the right (clutch side) is intact and I could cut my own using it as a template, but the one on the left (alternator side) fell to pieces when I took it off.
 
Itazura said:
Anyone have an idea where I can find gaskets for the left and right covers? The one on the right (clutch side) is intact and I could cut my own using it as a template, but the one on the left (alternator side) fell to pieces when I took it off.

http://www.ebay.com/sch/sis.html?_nkw=GENUINE+HONDA+1974+76+CB200+GASKET+KIT+B+06111+354+000+&_itemId=230852597334

Best I could find for you bro
 
Luugo86 said:
http://www.ebay.com/sch/sis.html?_nkw=GENUINE+HONDA+1974+76+CB200+GASKET+KIT+B+06111+354+000+&_itemId=230852597334

Best I could find for you bro

Thanks, man. I appreciate it.
 
The good news:

I think I may have someone who can powdercoat the wheels and frame for me for next to nothing. We have a painter we use at work who does powercoating for us and we have a batch of parts going out there in about a week. If he's game he might let me throw in the wheels and he can paint them on the line when he runs our parts. I have to take what color I get, but it's a nice yellow so it's a go in my book.

The bad news:

I started cleaning up the wheels and found my front wheel has a major flat spot in it. It probably happened when I rearended that pick up truck 20 years ago. ;D

The other good news: I think I might have found a parts bike. The guy says the motor is seized and seat is shot, but I don't need those and he says he'll take $80 for the complete bike. Here's hoping the front wheel is true. It would also be nice to have a bunch of extra parts on hand for other bits.
 
Good luck with it mate, she looks pretty weathered! About the same as mine when i got it, maybe mine had a little less rust though haha

Itazura said:
Anyone have an idea where I can find gaskets for the left and right covers? The one on the right (clutch side) is intact and I could cut my own using it as a template, but the one on the left (alternator side) fell to pieces when I took it off.

Have a look at David silver spares in the UK, they have a complete gasket kit for 19 pound. About $28, or close to that. I'm not sure about the postage, you will have to check to see it that's a deal breaker.
 
Itazura said:
The good news:

I think I may have someone who can powdercoat the wheels and frame for me for next to nothing. We have a painter we use at work who does powercoating for us and we have a batch of parts going out there in about a week. If he's game he might let me throw in the wheels and he can paint them on the line when he runs our parts. I have to take what color I get, but it's a nice yellow so it's a go in my book.

The bad news:

I started cleaning up the wheels and found my front wheel has a major flat spot in it. It probably happened when I rearended that pick up truck 20 years ago. ;D

The other good news: I think I might have found a parts bike. The guy says the motor is seized and seat is shot, but I don't need those and he says he'll take $80 for the complete bike. Here's hoping the front wheel is true. It would also be nice to have a bunch of extra parts on hand for other bits.

LOL @ the 20yr old crash damage :eek: That would be awsome to have a solid parts bike tho man.. always on the hunt for one myself.
 
Luugo86 said:
LOL @ the 20yr old crash damage :eek: That would be awsome to have a solid parts bike tho man.. always on the hunt for one myself.

Unfortunately that didn't pan out. Totally wrong year. :p I did get manage to get the front wheel true though.
 
Looking for some advice. After really seeing how rusted the rims and spokes were I decided to disassemble the wheels and see if I can just have the rims powdercoated and I'll paint the hubs and spokes myself. How aggressive do I need to be on getting the rims down to the bare metal if they are going to be powdercoated?
 
If they're being powdered, most guys who do the coating will sand blast 'em and dip them before hand. Just bring them "as is" and let the pros handle it.

Refurbing spokes is something I do on the side, if you're interested.
 
Sonreir said:
If they're being powdered, most guys who do the coating will sand blast 'em and dip them before hand. Just bring them "as is" and let the pros handle it.

Refurbing spokes is something I do on the side, if you're interested.

It's sort of a special case. It'd be a deal where I tack them onto a order of parts where I work when we send them out for powdercoating. Our painter would basically just run them with the rest of the order and do them the same color for free, but the prep work would be pretty much all on me.

Any hints or advice on how to do the spokes would be appreciated as well.
 
The spokes aren't terribly difficult, but it is very time consuming. Takes me around 5 hours to do a set.

The tool I use is just a bench grinder with a variety of wheels and then some sand paper of varying grits.

Start off by cleaning all of the spokes off with a wire wheel. This removes all of the rust and dirt. Any bent spokes can be straightened with a small hammer and anvil.

Use 220 grit paper to sand out any big scratches and follow up with another spin on the grinder, but with a fine wire wheel (brass is a good choice).

Wash with soap and water and immediately dry to prevent flash rusting.

Switch over to a spiral wheel with black emory and do some cutting. Wipe down with denatured alcohol and then switch over to a sisal wheel and brown tripoli. Finish up with a final wipe down of denatured alcohol on a microfiber cloth.

Though not entirely necessary, I highly recommend nickel plating the finished product (make sure the method is electroless to avoid hydrogen embrittlement).

Attached are a few pics from one of the sets I refurbed.
 

Attachments

  • DSCF2559.JPG
    DSCF2559.JPG
    414.5 KB · Views: 243
  • DSCF2548.JPG
    DSCF2548.JPG
    332.8 KB · Views: 239
  • DSCF2545.JPG
    DSCF2545.JPG
    529.1 KB · Views: 226
  • One cleaned and polished.JPG
    One cleaned and polished.JPG
    453.7 KB · Views: 256
Excellent! It obviously does a nice job. If I'm painting them (black) would I need to do much beyond the brass wheel and wash/rinse/dry stage though?
 
Depends on how good of a finish you want. I've heard of some guys going as far as putting a thin layer of filler onto their spokes to cover any imperfections, but I wouldn't think it would hold up too well.

If/when you do paint them, try to use a two-part paint. It will cure a lot harder than plain ol' rattle can stuff.
 
It's been a busy week, but I'm slowly getting there. The UPS and USPS have been at my door a few times with some nice presents:

- A set of Michelin M62 Gazelles
- The stator gasket I needed
- A used (but still in very nice condition) tachometer
- Controls from a CM400E

Still waiting on:

-Clubman bars and headlight mounting brackets

I've been busy going through the spokes to clean them and get them ready for finishing. I should have the rims back from powdercoating sometime the middle of next week. The frame is about halfway stripped and should be ready for paint soon. I needed the encouragement of seeing at least SOMEthing shiny so I started painting a few bits I had cleaned and ready (we have some nice industrial wire wheels at work so I grab a few parts each day and use them on my break to knock off the old paint and corrosion). So far I've done the triple tree, swing arm, engine brackets, headers, forks, and various other bits and pieces.

Here is the triple tree and gauge cluster. In the background is the front hub painted and ready for spokes and the main gear also painted. I'm about halfway through the spokes themselves. The CM400 controls are in really nice shape and should work just fine. Sure, I would have liked to have them match the bike, but for only $60 for the set I'll settle for having them at least match each other, if not the bike itself.
 

Attachments

  • 2013-04-16 16.31.54.jpg
    2013-04-16 16.31.54.jpg
    615.1 KB · Views: 273
  • 2013-04-16 16.34.59.jpg
    2013-04-16 16.34.59.jpg
    699.7 KB · Views: 249
  • 2013-04-19 16.47.39.jpg
    2013-04-19 16.47.39.jpg
    512.7 KB · Views: 241
Back
Top Bottom