Follow along with the video below to see how to install our site as a web app on your home screen.
Note: This feature currently requires accessing the site using the built-in Safari browser.
We noticed you are blocking ads. DO THE TON only works with community supporters. Most are active members of the site with small businesses. Please consider disabling your ad blocking tool and checking out the businesses that help keep our site up and free.
I'm two weekends into my first build and things (I hope) are going well. Obviously, I started out with stripping down the bike to the frame and taking everything apart. Most everything went well. I did encounter a lot of metal dust when I removed the front sprocket cover and I'm still trying to figure out the reasons. At this point, I'm leaning toward my poor chain maintenance (haven't lubed it in a while).
I also had a bit of trouble getting the oil plug out. I ended up rounding off the corners and had to use a set of vice grips to finally get the damn thing out. So now I'm in the market for a new 17mm bolt.
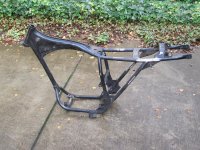
This last weekend, I finally got the front wheel and forks off. I also removed the swingarm and started grinding with my angle grinder. All non-essentials have to go.
So far, I've removed the helmet hooks, center stand mounts (mostly), and two of the three battery box mounts. Still up on the chopping block are the rear footpeg mounts, airbox mounts, and seat mounts.
From the swingarm, I've removed the chain guard guide and the zerk fitting (PO welded the damn thing shut so I just removed it).
OK.. more work done over the weekend. I've ground more stuff off of the frame. Gone now are all of the air box mounts, both seat mounts, and the rear fender guides. Still to go is the front battery box mount and possibly the entire part of the frame with the rear footpeg mounts. I'm a bit nervous about that last section though as I can't remember what (if anything) else gets attached to that part of the frame except the rear footpegs. There's some hols there but I can't remember if they're just for the exhaust or for something actually important. Anyone have some pics of the rear right side of their 360 they can post?
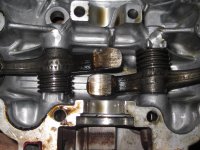
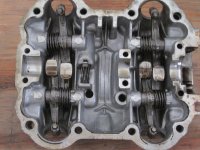
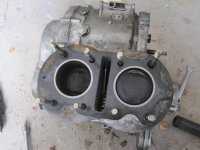
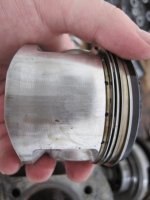
Anyway... I cracked open the engine and the head is now removed. Most everything looks good, but I haven't specced any of it. The rocker arms on the left side look they're quite worn, but the ones on the right seem just fine. Oil starvation? Also, the inside of the cylinders seem OK, but I won't know for sure until I get everything fully dismantled. The valves are different colors between the two clyinders. Was one side running rich or was the other lean?
Finally, the rest of the engine teardown is on hold until I can locate a tool to remove the nut that holds the oil filter in place. I'm looking at ebay right now to get one.
Got a good deal of work done this weekend. Just about finished with all the grinding on the frame. Only the front battery box mount is left. I'm worried about being able to fit the angle grinder in that tight space as I don't want to screw up the gas tank mount (which appears to be two different parts of the same chunk of metal). I may wait and see if I get a Dremel tool for my birthday. Am I going to need to smooth all these grinds out before they go to the powder coaters or can they lay it on thick enough to where it won't be noticeable?
Also, the engine is almost completely disassembled and I'm pretty certain I found the cause of the top-end noise I was getting. Only things left to remove are the kick starter and the valves + springs. Is there a special tool needed for the valves? A spring compressor or something? Because I can't see a way to do this without losing a finger.
I've also started polishing some of the engine components up, but I think I've made a bit of a rookie mistake... I started with sanding wheel attached to my drill and I think it's taken off too much metal. I've spent about 45 minutes now using 150 grit by hand and I think I'm still hours away from removing the initial tool marks from the drill. Would I be OK dropping down to a coarser grit? 60 or 80 or something like that?
Well.. a little more progress made. I spent most of my work time this weekend getting the stator cover polished. As I'd mentioned earlier, I put some pretty nasty scratches into the cover this last weekend by starting with power tools. Nothing three hours of hand-sanding couldn't cure though. I finished my last sanding with 1500 grit paper and I'm ready for the buffer (once I get one).
I also did a bit of research into new cams and rockers and have some info to report. I found a place in California (MegacycleCams) that will regrind my core and increase the duration to 251°. They recommend that I use modified pistons and springs though, so I'm following up with them to see exactly what that means. I was also able to find OEM rocker arms for about $40 a piece (my Mom's husband works in the business and was able to get a good deal), but I'm going to hold out for now to see if I can get something with a bit more lift...
My Dad was kind enough to give me my Grandfather's old Craftsman bench grinder and I spent about 30 minutes buffing the cover with tripoli compound. Looking a lot better now. Debating whether or not to use jeweler's rouge. Any opinions on the matter?
I called up the cam place and got additional info.
According to their specs, stock lift is .341" and their cam will raise it to .382". Likewise, stock duration gets increased from 221° to 251°. Not too bad, methinks. Downside is that the increased lift will require both new springs and new pistons. After spending a couple of hours on the phone with several different suppliers I found someone who will do the springs and another guy who will do the pistons.
The cam manufacturer recommends going up to at least 10:1 compression and 10.5 if I can gaurantee I'l allways be using premium gas. They actually asked if I was building a race motor, because they said I could get away with 11.5:1 if using 110 octane? Crazy...
Anyway... so the piston guy can do me some 69mm or 70mm pistons with deeper valve pockets and a compression ratio of 10.5:1 for $400 for the pair (including rings).
The gent who can handle the springs actually has several complete kits for the 360 including a full titanium valve, guide, and spring replacement for built racing engines. How cool is that? Anyway... he's able to do a kit that offers stiffer springs and upgraded retainers for about $250.
I'm counting on around $100 to get the cylinders bored and honed, so it looks like it's gonna be a little over a grand to get the engine built and we're not even starting on rejets or any other carb changes.
My Dad was kind enough to give me my Grandfather's old Craftsman bench grinder and I spent about 30 minutes buffing the cover with tripoli compound. Looking a lot better now. Debating whether or not to use jeweler's rouge. Any opinions on the matter?
This site uses cookies to help personalise content, tailor your experience and to keep you logged in if you register.
By continuing to use this site, you are consenting to our use of cookies.

")