Part 1 - Inspiration & Research
First, if you not new to building bikes, I recommend scanning through the research section for possible new vendors or resources, then skipping to Part 2. If you are new or looking for information, below is a set of references that were invaluable to me over the majority of the build thus far. I will continue to add to this as I come across useful links.
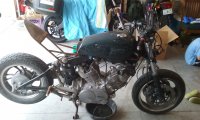
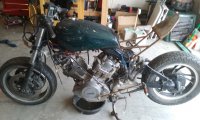
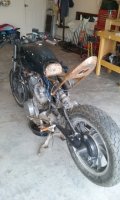
The point of inspiration for this build comes squarely from my obsession for motorcycle racing and wrench turning. Special attention in the layout of the bike focus around the engine, front suspension geometry, and a front fairing. The tank and rear seat cowl paint scheme will come last once the bike is on the road and reliable. For now, a black and cream two-tone paint scheme with silver pinstripe and Kanji writing vertically following the spine of the tank is the vision. No chrome, only matte aluminum or steel. For the moment, the bike is named “Raijin” after the Japanese God of Thunder and Lightning, which is also represented by avatar picture. Here are a few pics that are both inspiring and worth paying homage to:
- My first introduction to the XV750 – Greg Hageman’s Homepage (http://www.hagemanmc.com)
Dime City Cycle's amazing original build - Four Hundred
(http://www.dimecitycycles.com/custom-motorcycle-builds/dcc-builds/four-hundred.html )
Another masterpiece from DTT’s own T.Stanley – Stanley Tang. (http://www.dotheton.com/forum/index.php?topic=45553.30)
And major thanks to The Bostrom Brothers, Eric and Ben, and those at Café Racer TV. Great reference material and entertainment. (http://caferacertv.com/history/ )
Reference List – Here is a list of outstanding links to specs, parts, and information, in no particular order:
1 – Café Racer Inc. - Motorcycle Repair and Diagnostics KS City, MO. (http://www.caferacerinc.com/ )
2 – Doc’s Chop Shop (Greg Hageman) XV750 Bolt-on Sub-frames – (http://www.ebay.com/usr/docschopsllc?_trksid=p2047675.l2559 )
3 – Yamaha Virago Help - Specs (https://viragohelp.com/virago-specifications/ )
4 – Yamaha Virago Help - Starter Problems and Fixes https://viragohelp.com/81-83-virago-starter-systems/
5 – DB Electrical – Replacement 4 Brush Starter – (https://www.dbelectrical.com/products/yamaha-virago-starter-xv700-xv750-xv920-gold-2-year-warranty-smu0072.html?CAWELAID=130000240000000455&CAGPSPN=pla&CAAGID=24419247056&CATCI=aud-274228793904

la-81495320936&gclid=CJ7ps9L2n9ECFca4wAodtL8EfA )
6 – Youtube – DIY Manometer Carb Sync tool (https://www.youtube.com/watch?v=0HfrHLmpHCY )
7 – Youtube – Revival Cycles Tech Talk – How to Wire Your Motorcycle (https://www.youtube.com/watch?v=-m5aUoAK_DM )
8 – Youtube – XV750 Hitachi Carb Breakdown and Cleaning (https://www.youtube.com/watch?v=bj8XfETYEu0 )
9 – Yamaha Parts-N-More for NOS parts – (http://www.partsnmore.com/parts/?q=xv750 )
10 – KJS Motorcycle Works for single carb conversion (http://www.kjsmotorcycleworks.com/ )
11 – Yamaha Parts House – Babbits Online (http://www.yamahapartshouse.com/oemparts/l/yam/50042439f8700209bc787d36/1983-virago-750-xv750k-parts )
12 – Dime City Cycles for rear sets, plugs, wires, parts etc (http://www.dimecitycycles.com )
13 – Cognito Moto – CNC Complete Triple Clamp & Parts (https://cognitomoto.com )
14 – EBay, Dennis Kirk, Amazon… Parts, Parts, Parts!!!
15 - Official Yamaha Publications Site (http://www.yamahapubs.com)
16 - Haynes Shop Manual - Virago (http://www.themotorbookstore.com/yamaha-virago-xv535-700-920-1000-1100-repair-manual.html?cmp=googleproducts&kw=yamaha-virago-xv535-700-920-1000-1100-repair-manual&gclid=CNyGnoSivtECFUKewAodNGMBXA)
17 - RB Racing Website - Rake, Trail and other Calculators (https://www.rbracing-rsr.com/rakeandtrail.html)
Research –
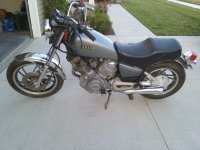
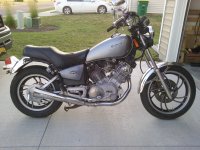
Right off the bat, you should know what you are getting into when you buy an XV750. The first bit of advice I received from the owner of the Café Racer Inc. motorcycle shop in KS City was to not buy a virago, or at least get the XV920 and not the 750. Well, a 920 wasn’t available for a reasonable price, and honestly both bikes have their problems. Here are the known major problems and solutions I used during the teardown and inspection.
1 – Stock Junk - If the bike has the following original stock parts on the bike, just spend the money and replace them right off the bat:
a) Starter Motor – replace with the DB Electrical 4 brush motor (Reference #5)
b) Starter friction clips in the motor (YamahaPartsHouse.com)
c) Replace the stock steering head bearings for All Balls tapered roller bearing
d) Replace the stock vacuum activated petcocks with standard petcocks, you’ll have less issues down the road.
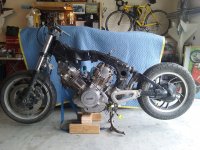
2 – Front Suspension – I have to say the front stock suspension on the viragos is simple, but garbage. When I drained the stock set, it was like draining swamp water out and the top fork bolts were a beast to remove because of the all the rust and pitting. Most people are going with inverted modern forks, but they present ground clearance problems. The stock fork length is around 32.5 inches, and most inverted forks are around 27 to 28 inches. I decided to use standard forks from a 96’ ZX11 which are 30.15 inches long, and look like they fit the period of the bike. Start looking now for the forks that match your needs, here is a good reference chart for different lengths from custom fighters. (http://www.customfighters.com/forums/showthread.php?t=53934 )
3 – Wheels – If you are going to go with mag wheels, you are saving yourself a lot of money and time. If you are going to go with wire spoke, good luck. There is a rear wheel that is a direct bolt on that is already wire spoke laced, but requires new hoops to re-align the wheel back to center. See T.Stanley’s posting as he matches up a 1986 XV700SS rear hub and a XS650 front to his XV750 (http://www.dotheton.com/forum/index.php?topic=45553.0 ). I decided to stick with the aluminum mag wheels because of the money, but think the wire wheels look better. Maybe down the road I’ll get wheels swapped.
4 – Gas Tank & Rear Seat – Once your decisions are complete regarding the chassis, suspension and wheels, you can then start to determine the type of tank and rear cowling you want. This decision will affect the rest of the look of the bike. Decide early if you want to use the stock tank or fabricate/purchase one. Keep in mind that the favored Benelli Mojave tank requires modification to adapt to the wide frame of the XV. Either way, I highly recommend replacing the petcocks and getting Caswell Epoxy Sealer for the tank.
5 – Subframe – Once you decide on the style and flow of the tank and seat, you will need to build or pay someone to build the supporting structure for your rear subframe. This bike fortunately does not require direct welding to the frame. I went with Greg Hageman’s subframe because it works with the stock tank, comes with a battery box, and support for a Motolanna seat. There is still some required adjustments and fabrication required to mount a license place, turn signals, electrics etc. But depending on your build requirements, the sky is the limit.
6 – Electrical work – I’ll write this at the end once I have the bike assembled and ready for re-wiring. Important subtopics: Relay types & diagrams, recommended bypasses, fuse block alternatives, spark plug replacements.
(to be continued…)