Follow along with the video below to see how to install our site as a web app on your home screen.
Note: This feature currently requires accessing the site using the built-in Safari browser.
We noticed you are blocking ads. DO THE TON only works with community supporters. Most are active members of the site with small businesses. Please consider disabling your ad blocking tool and checking out the businesses that help keep our site up and free.
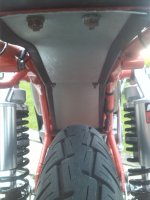
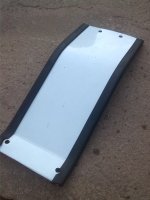
Well I've been in the garage again. This time it was to make a under tray so I could do away with the shaped plastic mud guard in front of rear wheel. The tray is made out of thin ali sheeting, I do have to remove it to paint airbox side. While it's off I'll do some measuring and post it with a drawing should anyone else want to make one.
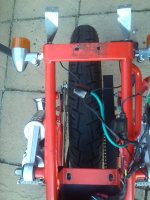
It is bolted by two 6mm bolts on the frame under the seat (holes in frame are already there) and two 6mm bolts at the bottom where the rubber mountings for plastic guard are. I left rubbers in and used nylock nuts. I also used some rubber beading to cover up sharp edge.
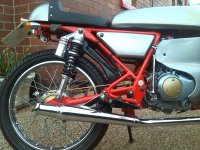
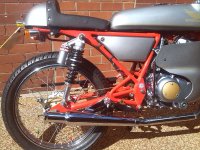
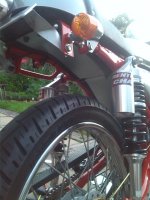
1st photo shows before and others show after.
8)
Would def be interested in the template dimensions
Removed tool box and plastic section of rear guard a while ago and
Glad to say I have finally replaced indicators with chrome bullet type n replaced rear guard and lights with twin light n smaller reg plate
But a little ashamed to say used little plastic lunch box to house CDI n rear lighting connectors
So would be glad to see a more robust solution
Excellent. I'd be keen to get a template too. Running with nothing in there at the moment, kind of happy with that because it is a fine weather bike for me. But would like to protect the electrics from the weather when I do get caught out.
I fitted the twin rear light version of the unit you have , pics below.
But with very limited tools and a rusty old vice , had to use good old "wilko's" store , and so have 'modified' two gate hinges and some small galvanised metal repair plates to make the rear bracket.
Want to replace footpegs nxt , also remove the 'grab hand rails' from both sides at rear, but not sure if that's a good idea !
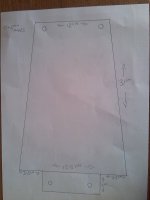
I have now had the under tray off to paint it, and while it was off I measured it. After refitting it I realised that it's a little snug at the top mounting, so if your making one please DO NOT use 12cm width like picture but make it 11cm instead.
Where the bottom flap on tray is you will need to put a little bend in before fitting. The holes on the drawing are to give you some idea where they will be. You will have to mark them with a pen/pencil through mounting holes.
The best thing to do is to make one out of a cereal card board box first. I do advise getting hold of some rubber trim to tidy cut edge.
Let me know how you get on,
Cheers, Tad.
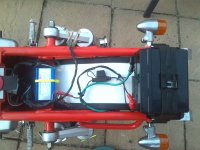
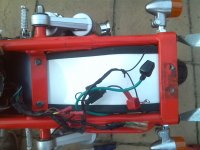
Here are a few photos of fitting rear under tray. I have realised that you will have to drill two holes in the rear cross member, if you haven't already done so when you re-located battery.
The width at the front is 11cm which then tappers out a bit to the rear. I didn't measure this as it's easy to line it up to where it goes, as is the length when using cardboard as a template. The tray does need a little bend in it at front mounting just to lift it up out of sight and follow line of the wheel. Again a rubber trim tidies any rough edges you may have.
The material I used is off a coach roof and is around 1mm thick.
What is going on under the battery, I guess it is not sitting directly on top of the bolts that hold the new aluminium under tray!? Does it sit in it's own custom made tray? And what does the rubber battery band hook on to? Sorry if you have posted details elsewhere, couldn't spot them.
This site uses cookies to help personalise content, tailor your experience and to keep you logged in if you register.
By continuing to use this site, you are consenting to our use of cookies.