Another crack at making a DOHC "cool"

ArBrnSnpr

Been Around the Block
Let me start by saying I've never had a build thread. Not because I've never built anything, but because I hate taking pictures of things, downloading them, and documenting what I'm doing. I don't mind sharing the process with others, I just hate the time it takes and when I'm motivated to get work done on a project I'm usually short on time.
That said I've always noticed how much great advice comes from build threads and god knows, I can use it. I'm hoping I didn't get myself in over my head here so I'm also hoping that this thread will give me something to look back at to stay organized and on track with my build as well as provide a place to compile all the answers to questions that come up.

With all that out of the way - the build will be a cafe styled 1981 CB750f Super Sport with 40k miles. It was a CL find and the price seemed right (seemed less and less right as I tear into the bike).
Yes, I know, I should have gotten a SOHC.

Positives:

37mm forks
dual front discs with dual piston calipers
rear disc
4-1 exhaust that I like
factory front fender has a pretty sturdy fork brace I can salvage

Negatives:

Hideous paint job
Carbs leaking fuel
Header leaking exhaust from #3, #4
Oil leaking onto header
fuel tank leaking (not at a seam or corner but on a flat area - ughhh)
Fork seals blown
missing 1 bolt from front engine mount
wont hold idle
battery is dead
turn signals wont flash
bald tires
cam chain noise at idle
needs rear shocks
filthy!

So with what seems to be a slightly unbalanced list I went to town taking it apart in an attempt to fix it all and then some.

For reasons mentioned above, I didn't think to take a picture of the bike until I had it home and was already getting started taking it apart. I did however snap this -


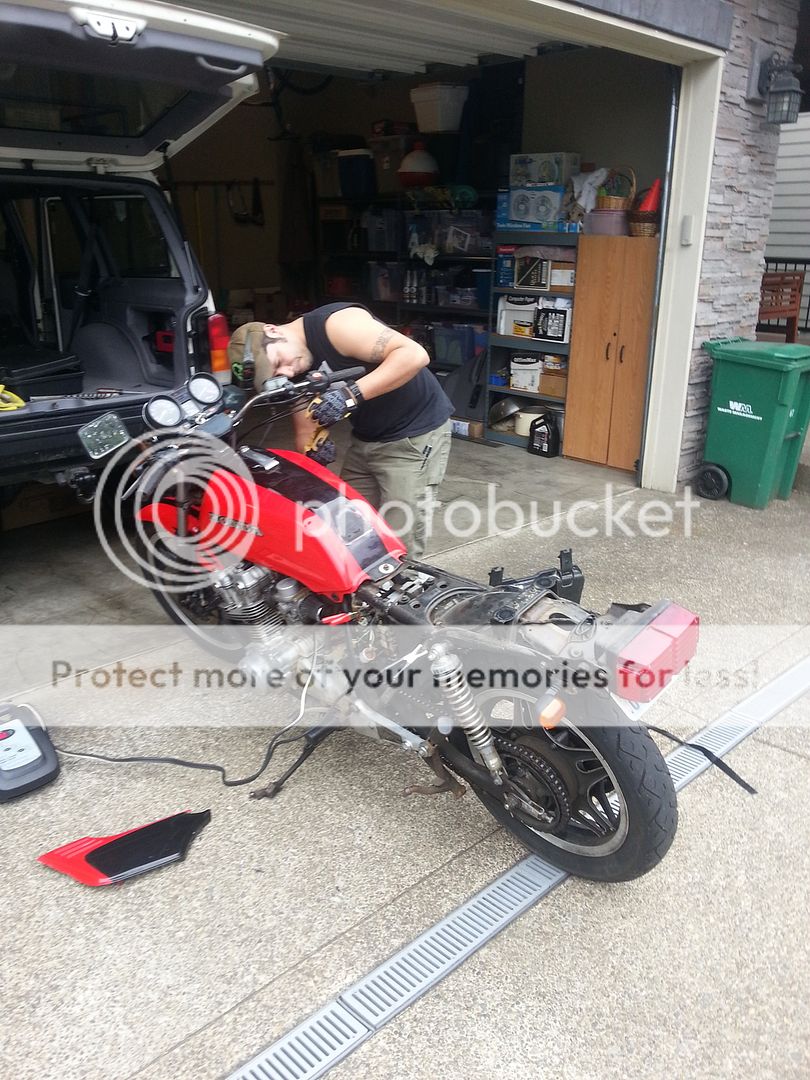
A closer look at the paint shows that there are purple skulls "ghosted" into the black paint!

More to come.
 
Project # 1

Carb rebuild

After watching hours of youtube video, I ordered some carb kits and tore into the carbs.

I followed the carb bible as close as I could and took a slow and steady 3 days to break down the banks, clean, and re assemble the carbs.

I put all parts in separate Tupperware containers, labeled everything and got started soaking the pieces in Pinesol original.

I was very impressed with the results!


Picture shows carbs post Pinesol soak and pre ultrasonic bathing.


After the Pinesol soak I ran the parts through an ultrasonic parts cleaner and then the a series of water baths to remove the cleaning solution.

After a few rinses, into the dishwasher all the parts went. (DOES NOT MAKE A HAPPY SPOUSE)


Two cycles with water only and no detergent and they were ready for compressed air for a thorough drying.

I wasn't able to determine what was leaking, but I installed all new gaskets and seals so hopefully I solved it.

I wish I could say that reassembly was easy, but that just wasn't the case.

While trying to bench sync the carbs I just for the life of me could not get it right. It seemed every time I got close the number 2 carb would be out of sync.

After hours and hours of poking prodding and head scratching I discovered that the roll pin was not in place that permanently sets the #2 banks setting. Looked back through my pre-cleaning pictures and sure enough, it wasn't there before either. Hopefully that explains part of the shitty idle the bike had.

To solve this I went to Ace Hardware and bought a few roll pins. I found one that seemed to be the best fit and started the awful task of trying to seat it. I immediately got concerned that all the tapping was going to bend the shaft so I decided to try constant pressure instead. I ended up using a C-clamp to seat the pin and it went right in.

After that, the carbs sync'd right up and went back together.

I wrapped the bank in butcher paper and set them on the shelf for later.
 
Project #2

Addressing the leaking fuel tank.

I had hoped to be able to sand the tank to bare metal and apply clear coat and run it as is. Unfortunately I discovered that it had a few pin hole leaks in some areas where some previous body work had been done.

So I pulled out the old welder and decided to seal them up. Well, apparently my welder doesn't have a setting for welding paper thin metal so after burning a hole about the diameter of a pencil in it I shut off the welder and drank a beer and pondered my options.
I settled on having it professionally welded which turned out to be a huge mistake. After paying close to $100 to get the tank all sealed up, I took it home and started to rinse the tank of the slag and start my de-rusting project only to discover there were about 20 pin holes in the weld job. After arguing with the guy and getting half my money back I went back to the drawing board.

I decided to try silver solder after hearing a lot of recommendations for it. I ordered some 56% silver rods and got after it. Much to my surprise the tank would now hold 20 psi of compressed air. That seemed like more than it would ever need to hold from gas fumes so I was happy.

I really wanted knee scallops on my tank and didn't like the rear drop slopping lines of the F tank so I got out the mallet, wood clamps, and other various tools and set off to fix it.

Here's how the tank sat after being roughed out:


Here's what gave me the courage to try it:


Unfortunately I wasn't able to stick to my plans of a raw steel tank due to the body work so it started getting a filler treatment.


I'm not done with it yet, more to come...
 
Project #3

Stripping down the bike

My idea of getting the bike up and running after some minor changes lasted no time at all. After the first strike of a mallet against the tank I decided I might as well go all in.

After removing a handful of parts and clearing out the headers, carbs, battery, electric components, swing arm and suspension I was pleasantly surprised that no bolts had given me any problems. I expected seized and stripped bolts at every turn but luckily none came up.

With all that stuff cleared out I got started on removing the DOHC hump in the rear sub frame.

My plan was to cut along the length of the frame tubing to provide support to the new top section of the frame.


During this I realized how little support was coming from those legs so I measured down and cut them off. After taking some more measurements I got some DOM to use as slugs for my tube extensions.

To prep the frame for the extensions I ran a round file around the inside, beveled the exterior end that was to be welded and drilled a series of holes at 3/4" down the tube and 1 3/4" down the tube on 4 sides.

For my extensions I didn't want to use straight DOM with a "fish mouth" joint to the top tube so I bent the tube to 90* then made lengthwise cuts with a cut off wheel to act as a shelf for the top tube. I know it's a similar theory to what I started with, but it would turn out slightly different.

(joint pictured is just the pipe resting there - it was squared and clamped before being welded)


I used a flap disc for a rough shape then used a hand file for the final fit.


The new frame pieces are 1" DOM .120 wall thickness. Thicker than factory so it should be good enough.

With the top tubing in a rough outline


I had really wanted on continuous piece of DOM for the top tube and there was no way to fit it in the bender to give the shape I wanted so it was shaped using a bender for the rear 180* then a series of relief cuts that where material was removed, the tube bent then welded back together. I like how it turned out and I've built components this way for other car projects that have stood up to thousands of miles of abuse much greater than anything I bike will ever see so I'm confident in their strength and it gave me the look I was after.

I lined everything up an tacked it into place.


Sorry for the shitty picture but it gives an idea of what I'm talking about

I decided to slope the rear of the frame up because I want an end product my wife can ride on with me. That eliminates traditional cafe seats and I'm not a huge fan of flat pan brat style seats this will at least give some form of a back stop while allowing two-up riding.

Next up is welding in the factory tank mount / cross brace and removing the factory gussets and installing my own and some rear cross braces. Then the lovely chore of smoothing it all which will be done with a hand file after being roughed out with a flap disc. (hand file will provide a straight rather than wavy line).

I haven't decided on a battery location yet, though it will be laying with other electronics components in a ventilated box - I just haven'ted decided how far up the frame I want it and how to integrate it.

Also, I'm tossing around a few ideas for the shock mounts.

Any suggestions are welcomed for either step!
 
Project #4:

Stripping, cleaning, painting, powder coating

As with most bikes this age that haven't been babied and looked after, there is a lot of oxidization on aluminum parts, peeling paint, and the occasional surface rust. Mix that with 30+ years of dirt and grime and things get ugly.

I took off the drive sprocket cover to count teeth on the sprocket and found so much dirt packed in there that it had packed above the level of the sprocket and filed every recess in the casing.

I've been using either Simple Green undiluted or Oil Eater diluted to a 50/50 mix and a nylon bristle brush to clean around the engine. I really wanted to just say f-it and power wash it but I know if I do something will get messed up and it will cause more headaches so I'm sticking with the slow method.


The gunk in the drain pan is actually run-off from the engine and not drained oil. I didn't take a before picture but this is after about 7 repetitions of saturating the dirt/grease, brushing it then rinsing. I figure about 7 more and I'll be ready to repaint the engine.

As far as the wheels go - they will be getting painted satin black. I decided on paint instead of powder coat because I really dislike the Comstars and plan to swap to spokes down the road but can't take that on at the moment so I'd rather not sink money into temporary rollers. Besides, paint done correctly is pretty damn durable and can be repaired if need be.
So I broke down the wheels and ran them through a DIY soda blasting then hit them with mild steel wool, then 320 grip sandpaper. This removed most all the factory coating and gave me a textured enough surface that primer/paint will easily adhere to.

The fork seals were blown so the forks were removed, broken down and received the same treatment.


Once painted and cleared, the forks will receive new progressive springs, seals, dust caps, hardware and the factory air valve caps are being swapped for 37mm preload adjustable caps.

For anyone else interested in getting rid of the unsightly factory air shock caps be advised - Honda CR250 37mm fork caps are a different thread pitch then the CB750 or GL1000 37mm forks.

I'm giving the wheels time to dry so I'll throw up pics of the wheels and forks assembled this weekend.

The plan from here for this step:

Get the frame off and all welds cleaned up. I already removed all the unnecessary brackets but now I need to fab and add some for my rear sets and some for removable passenger rear sets I plan to use.

Blast and send off the swing arm for powder

Decide on polish, paint, or powder for the engine covers

Once those items are tackled, that should wrap up this step.
 
canyoncarver said:
Well that was quick. Nice subframe.

Thanks! The subframe on the DOHC bikes is my biggest gripe about them. If I could retro fit a kick start the DOHC would be perfect.

Solving 1 out of 2 issues isn't bad though.
 
I like this, so far the best looking frame mod I have seen on a DOHC(a side from the full revamp designs switching to mono shock), makes it a lot cleaner.
 
Freb_mc said:
I like this, so far the best looking frame mod I have seen on a DOHC(a side from the full revamp designs switching to mono shock), makes it a lot cleaner.

I agree.
 
Cleaning up the triple:

I decided to lose the riser mounts since I'm going to be running a set of Vortex clip-ons.


I know the triple has more then enough strength to hold up if I just left the holes that are created by cutting off the mounts, but I wanted it to look cleaner and not like a halfway finished project.


I removed the pieces, packed "JB Weld Steel" into the holes in the bottom of the top piece. While that was drying I started soaking the bottom piece in vinegar to get rid of the surface rust that had formed.


Once the filler had dried overnight I started cutting the risers off.


Did both sides and lucked out with no air bubbled. I then started the daunting task of smoothing it with a flap disc and then a final hand sanding.

Once I got it close, I shot them with etching primer.


While I was doing all this I also cut off the factory head light mounting tabs (first cuts visible in first picture) and smoothed those with a hand file and sand paper.

I'll be painting these tomorrow once the primer has had time to thoroughly dry.
 
Trying not to do a shitty job at updating this but I'm not doing too good.

So here's where I'm at currently.

Finished the body work on the tank and shot it with a base coat. In the pic I had just done a first pass of prepping the surface for paint. That was done with 3M bbrasive compound and a red scratch pad.


Did an "in the garage" rattle can job - figured it would go along well with the spirit of this project.

Still needs to be cut/buffed.


Started working on mounts for rear suspension.

In the profile picture of the tank above you can see where the factory tabs/mounts have been removed and brackets installed. That's where I'll be mounting my CBR rear sets and rear master cylinder.

For the rear shocks I took some advice I got in the suspension section and decided that rather than over complicating a rear mount I would modify the original mount.

So I got out the angle grinder and cut away the unwanted material around the factory mount.

I didn't want to use the acorn nut because I feel like there's no need for the threaded shank sticking off the end when there's more there's more than enough meat on the stud to drill and tap.


Ran out of cutting oil so there's my PB Blaster "cutting oil"

I decided to go with an M6x1.0 because the majority of the force on the stud is in the same plane of motion as the shock travels in. There is some lateral force but nothing a grade 8 stainless bolt can't handle.

I cut out my mount bases out of 1/8" steel - total shit job without milling tools!


The edges above are beveled to prep for welding.

Got a side all welded on and the mounting hole measured and drilled. Now I just need to weld on the other side, make some finite adjustments before welding both studs and I'll be ready to paint the frame. (After cleaning up all the shitty welds done by Honda and me).


The stud isn't welded in yet. It's just sitting there to give an idea of how it will look.

This angle shows the gussets that replaced the factory ones, the rear set mount height and the rear shock placement.

 
Nothing major but I also got the forks back together with new seals, progressive springs and dust caps.


You can see the Vortex clip-ons I'm going to be using. 37mm with a 7 degree slope.
 
Definitely going to follow this thread. Awesome work. Did you wet sand and buff the tank? I did a rattle can job on my previous bike, and I realized clearcoat is the key. Rattle can jobs can turn out really nice.
 
Got some work done over the last two weekends so I figured I'd update this.

After many hours and lots of scrubbing I finally got the engine to the point where I was ready to prime and paint it. I used an enamel hi-temp engine specific primer and paint.


Scalloped the driver gear cover just a bit. Reason I did this was because the cover had a piece cracked off of it and rather than get a new one, I figured I'd give reshaping the old one a try.


I also decided to swap my 750f oil cooler for the 900f/1100f version. Mainly because the old one was a bit rough and I found a good deal on a replacement locally on Craigslist.


This was pretty straight forward but required the oil hoses to be modified. The CB750 came with an adapter that ran lines from the oil filter housing while the CB900 ran the oil lines to the oil pan for a secondary oil pump to help circulate the oil. On the 900, the oil lines have flanges as opposed to just having hoses with clamps like the 750 had.

I decided to keep my hoses running to my oil filter housing rather than drilling my oil pan or swapping the oil pan from a 900. This meant the filter side of the hose had to have the flange removed so it could slip over the barbed connectors.

I pulled back the coiled spring, zip tied the clothe sheathing in pace and cut the hoses and protective cover with a rope cutting gun. This melted the ends of the clothe protector so it wouldn't fray later.


Now this can be clamped onto the housing I'm running and I can mount the new cooler up.
 
Made an electronics box out of sheet metal. This will mount under my seat, just behind where the tank mount sits. My battery will not be in here though - that is mounted under the tank, between the frame rails just in front of the tank mount.

I made a template out of cardboard. Marked out my lines and cut the shape out with a cut-off wheel. Then I used my vise and some clamps to bend along the lines and welded the edges.


Picked up an Earth-X ETX18B from Sparckmoto.com and made a tray to hold it tucked under my tank between my frame rails.


The cables will route straight down from the terminals then under the battery and into my electronics box where I plan to mount the starter solenoid.

In other big news my engine had enough time to dry so I installed a new valve cover gasket and tossed it back in the frame.


I was really concerned my key relocation bracket was going to hit the motor but it didn't.

 
With the engine back in the frame I can now start bolting some parts back on.

This is a rough first draft - the bars are adjustable for width so once I get my grips and levers on I'll tuck them in a bit and I'll probably lower the light bracket a bit based on how the head light and gauge flow with the tank lines.


I'm waiting on a shipment to come in with some new parts to include wheel bearings but in the mean time here's a pic of the wheels back from powder coating.


There's no amount of powder coating in the world that will make them not be Comstars but I'm just going to have to live with them for a while longer. Hopefully the new finish will help them not look so dull.
 
Got bit more done today.

Mounted the CB900F oil cooler with the modified lines.


Also test fit the cover I scalloped to see if I was happy with how much I originally cut away. Tried out the rearset positioning too.


I will probably need to shorten the shift linkage a bit but they seem pretty close. I also picked up some knurled pegs for the rearsets that I'll be installing too.
 
Back
Top Bottom