Follow along with the video below to see how to install our site as a web app on your home screen.
Note: This feature currently requires accessing the site using the built-in Safari browser.
We noticed you are blocking ads. DO THE TON only works with community supporters. Most are active members of the site with small businesses. Please consider disabling your ad blocking tool and checking out the businesses that help keep our site up and free.
So I'm about to dive into my carbs again. I want to make sure that after I rebuild them with new gaskets and what not, that no stone is left unturned and that my carbs won't leak. I want to take my time and do it right. What are the most common causes of leaks, and how can I make sure I don't end up with fuel on my bike? I know there are resources on HOW to rebuild the carbs, but nothing that says "hey, when you put the float bowl gaskets on, make sure you do xyz to prevent abc".
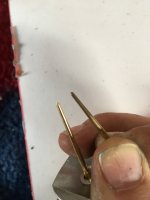
the main reason carbs leak is from worn float needles. inspect the float needle tip carefully and if the appears to be worn, or the internal spring isn't "springy", you need to replace it. ideally replace the brass seat and gasket as well but sometimes those needle/seat assemblies are really expensive. Polishing the inside of the seat and outside of the needle can help it from binding as well but isnt nessecary most of the time. another thing to check is to make sure your floats are not cracked and are airtight, if any fuel gets in the float it will overflow the bowl. Then make sure the float levels are set correctly and you should be good to go.
Floats will float in pretty much any liquid. If you're cleaning with an ultrasonic cleaner or other bath, you'll know whether or not they leak when you clean them
I always take the fresh rebuilt outside and use an auxiliary tank to fill the bowls trough the gas hoses with gasoline to check if they don´t overflow.
A very often overlooked thing on carbs is the tiny brass tang that touches on the springe tip of the needle.After the years there is often a "hole" from needle wear which can cause the needle to stock and overflow the carb.
I take a small piece of sanding paper (400 grit then 600 grit) and sand it carefully down to be sure.
IMPORTANT:
brass parts like jets dont wear out, they just need a good cleaning.
when you replace parts use GENUINE quality parts or you might end up tearing back into them over and over again due to bad fitting quality.
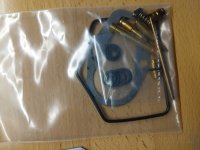
Good advice so far guys! Just got my rebuild kit in, with the specially shaped o ring. Note, last time I replaced the o ring, it was with the kit from DCC that comes with the circular o ring, which I suspect is the problem since it's leaking from that spot.
Unless those are all Keihin factory parts, they are likely junk and will cause more issues than solve. Its pretty widely understood that there is no reason to replace brass unless broken, and to only do so with OEM parts. Gaskets may not make as much of a difference but often are made from cheaper grades of rubber and will swell or dry out quickly.
Ive used the unshaped o-rings. They work fine, use some hondabond to keep them in the channel for installation. The formed ones are obviously easier to install but they both do the same thing. The round o-ring is just easier to pop out of the groove during installation and get pinched.
Other than that, as stated make sure the floats are sealed and your needle and seat seals properly.
I like to hook up my aux gas tank to the carb with the bowl off, hold the carb as it would be installed on the bike over a container, turn the gas on until it flows out of the needle seat and then manually press the float up and make sure it shuts off the fuel completely.
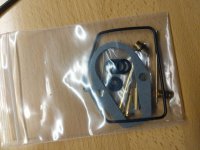
+1 on using genuine parts. I recently got a rebuild kit from 4into1 and the jets and needles are way different (different/missing holes and different taper on needles). I ended up tearing back into my carbs to replace the pieces that are different after playing the trying to sync the carbs.
Also, make sure all of the gunk has been thoroughly cleaned out of the drain screw hole area and there is a tight seal there after you make sure to tighten it well to avoid it leaking. Also make sure all of the hoses are slipped on as far as they go.
When comparing jets and needles, confirm the numbers on them are the same as well. Your old parts may have been changed at some point to modify the fuel delivery, or the rebuild kit might be for a slightly different specification.
The carbs on a 40+ year old bike are not always original either, and they changed from year to year in some cases.
+1 on using genuine parts. I recently got a rebuild kit from 4into1 and the jets and needles are way different (different/missing holes and different taper on needles). I ended up tearing back into my carbs to replace the pieces that are different after playing the trying to sync the carbs.
Also, make sure all of the gunk has been thoroughly cleaned out of the drain screw hole area and there is a tight seal there after you make sure to tighten it well to avoid it leaking. Also make sure all of the hoses are slipped on as far as they go.
I always replace o-rings and gaskets, and clean up and re-use all the factory brass. You should really never need to replace brass unless it is obviously worn or damaged (from a PO cleaning incorrectly, usually).
I've cleaned near 30 carbs and never had to replace any brass (jets, needles, slides, etc) except for a couple needle/seats.
This site uses cookies to help personalise content, tailor your experience and to keep you logged in if you register.
By continuing to use this site, you are consenting to our use of cookies.