BigSherm's '03 Z1000 cafe!

BigSherm

Been Around the Block
Hi again everyone.

I've been away from Do The Ton for a few years.

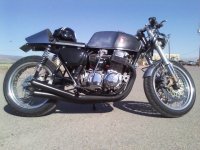
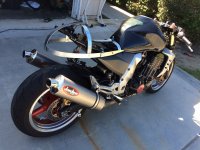
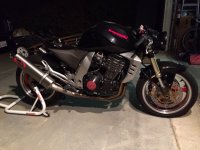
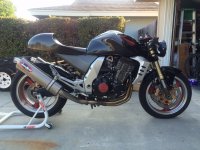
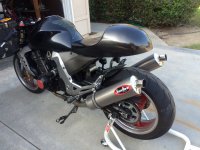
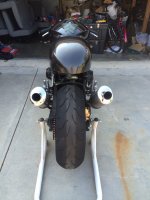
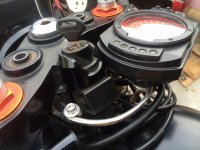
I built a '78 CB750 into a cafe/CR750 a few years ago that turned out pretty well.

Heres a link to that build-
http://forums.sohc4.net/index.php?topic=60806.0;nowap

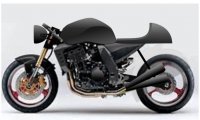
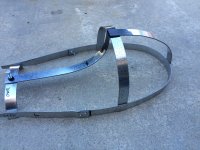
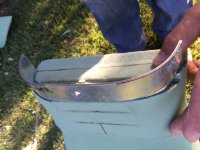
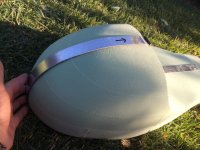
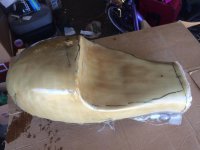
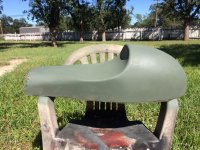
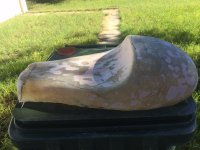
For that build, I made a pretty exact drawing of the CB750 frame with PowerPoint, and also made many drawings of different wheels, tanks, forks, tail sections, exhausts, fairings, etc., etc., so I could easily paste the different components on the frame and decide which I liked. It worked very well!
 

Attachments

  • image.jpg
    image.jpg
    150.2 KB · Views: 357
  • image.jpg
    image.jpg
    272.4 KB · Views: 372
I loved the bike and got compliments every time it took it out, but after retiring from the army, I started commuting to work on it. In my new home of California, where lane-splitting is allowed, I began to depend on how much faster I got to work on the bike. Depending on it to get to work meant I needed something more reliable, and that's where the Z1000 came in!

I bought it with less than 20,000 miles, and in beautiful condition. I did a common air box mod, and installed some low, M-shaped handlebars.
 

Attachments

  • image.jpg
    image.jpg
    595.8 KB · Views: 355
I liked the Z1000 ever since it was new in 2003, and in the back of my mind when I bought it, I knew it had a steel frame that could be made into a sweet cafe racer.

I always said my CB750 murdered the traffic, but with the brute power of the big Z, it more like maniacally laughs as it slays traffic and plays hysterically in its blood!

I'm not changing the geometry of the Z1000 like I did with my Honda, so I don't need such exact drawings of the frame and suspension for planning this build, so I just used simple pictures of the Z1000 in PowerPoint to paste tail sections, exhausts, and remove the fairing.

After considering many tails, seats, fairings, and headlights, I've decided to strip the front of the bike and use a 7 & 1\2" headlight and clip on handlebars, keep the stock tank, build a new tail section, and potentially black out my Jardine mufflers or replace them with 2 or 4 megaphones.

Planning with Microsoft PowerPoint again, here's my plan:
 

Attachments

  • image.jpg
    image.jpg
    80.5 KB · Views: 359
So, I started on the bike.

I removed my fairing, headlight, and installed these $70 eBay clip ons:

http://www.ebay.com/itm/CNC-Clip-On-Handle-bars-50mm-For-Suzuki-GSXR1000-GSXR-1000-2009-2014-Black-/281275601349?_trksid=p2054897.l4275

They arrived in just a couple days, and are pretty nice quality for $70! Very nice looking. 20 years ago clip ons were way more expensive than that!

And got this:
 

Attachments

  • image.jpg
    image.jpg
    1.1 MB · Views: 359
  • image.jpg
    image.jpg
    26.5 KB · Views: 933
Those clip ons are zero-rise. I spend a lot of time on a race-style road bicycle with very low bars, and these are less severe than that. My new seat will be slightly lower than stock, but we'll see if I switch those clip ons to something higher.

Then I started on the tail section.

I was going to order the road racer cafe tail from Sean at Roc City, but he said he'd didn't have one in stock, and would have to make one. His stuff is very nice, but not the exact dimensions I needed, so I decided to make my own. Here we go down that road!

Since my subframe slopes up into the air, I can't simply lay the foam on top of the subframe and cut away. I had to carefully measure the dimensions of the subframe and transfer it to the foam.

I tried 1" white foam that was too flimsy, so I switched to the 2" green floral stuff.
 

Attachments

  • image.jpg
    image.jpg
    984 KB · Views: 337
As I started building up the green foam, it became clear that because my tail section will be around the subframe instead of sitting on it, trying to build the foam shape while it was on the bike wasn't going to work.

Time for plan B!

I'm using metal strap to create an exoskeleton of the tail section shape on the bike to get the dimensions right. Then I'll transfer that shape to the foam and build the tail section off the bike.
 
Welcome back Sir!! 8)

I'll be watchin'. ;D
 
I built the frame to represent the outside dimensions of what I wanted.

I thought about just making the tail section based on my PowerPoint drawing, but I really wanted to see the dimensions of the thing on the bike.

It's a good thing I did. Looking at the whole bike and tail section shape together, I made the tail a little shorter, both horizontally and vertically, than my drawing.
 

Attachments

  • image.jpg
    image.jpg
    1 MB · Views: 314
  • image.jpg
    image.jpg
    1.2 MB · Views: 309
Then, back to the craft store for more floral foam. The stuff I got at Michael's is called Floracraft dry foam, I got it in 18" x 12" x 2" slabs for $13 a piece.

I've watched Herm's (Dime City) cafe seat build video, I think he uses some other similar green foam, and in bricks.

The stuff I used isn't as cheap as in Herm's video, but I'm trying to make up for a total lack of experience, skill, and talent by being very methodical and using the best materials I can find for building this tail, so I figured fewer pieces of foam to glue together means less seams, and better chance for success.

I glued the stuff together with 3M spray adhesive, and used the pieces from my steel outer frame creation as a guide to very slowly and carefully trim with a hacksaw blade, shape with a Surform 15" flat mill file, and sand with 100 grit.

Check it out!
 

Attachments

  • image.jpg
    image.jpg
    888.6 KB · Views: 285
  • image.jpg
    image.jpg
    1.1 MB · Views: 296
  • image.jpg
    image.jpg
    1.4 MB · Views: 287
  • image.jpg
    image.jpg
    1.6 MB · Views: 319
It wasn't that hard to get a really nice shape if I just went very slowly and methodically, making sure I didn't make any stupid mistakes and creeping toward the shapes from my homemade metal shape guides.

Of course, shaping this foam makes an enormous mess, so I did it on the lawn in the shade during a spectacular Ventura, California day, in a few hours.

I left the nose of the tail section a few inches too long so I could trim it to fit the rear of the gas tank when it was about ready to go on the bike.

I curved the edges of the seat near the front to make putting a foot down more comfortable, and made the rest of the seat completely flat, side-to-side.

Then I covered it in masking tape and sprayed on some car shine spray since all the stores were closed and I had no real car wax. I tried blue painter's tape, but it wouldn't stick to the foam.
 

Attachments

  • image.jpg
    image.jpg
    1.4 MB · Views: 284
  • image.jpg
    image.jpg
    667.7 KB · Views: 292
Then I stuck three screwdrivers in the bottom of the foam to keep it off the work surface a little, and stated fiberglassing.

Herm used fiberglass mat in his video, but I used woven fiberglass. I thought it might make a slightly smoother product.

I initially tried laying pieces that covered the whole thing at once, but this was a mistake. It's easier, of course, to lay smaller pieces on.

I also apparently didn't use enough hardener in my first resin mix, and it took forever to dry.

I was much more careful with subsequent mixes, and I really started doing well when I used the 3M spray adhesive to stick the weave pieces to the project before I started brushing on the resin mix!

Sticking the fabric on first with the adhesive spray is my number one tip! I read that long ago in a different forum.

At the top of the seat and hump junction, I had an area in my first layer where the fiberglass fabric wouldn't adhere to the shape, leaving a big air pocket, because I was trying to lay on pieces that were too big. In the morning, it was easy to cut that section out with a cutting wheel on a hand held grinder and redo it. Using the spray adhesive to hold the fabric in place while I applied the resin fixed that problem, easy.
 

Attachments

  • image.jpg
    image.jpg
    277.9 KB · Views: 254
You can see I drew guides on some of the fiberglass sheets with a marker before I laid them on. Because the fiberglass layers dry transparent, I also transferred the forward mounting hole location from the foam to the dried fiberglass to make mounting drilling that hole easier when I get to that point.

I laid on two packs of 8 sq feet of fiberglass fabric and one can of resin, then ripped the foam interior out in pieces.

The spray shine stuff I used for mold release instead of real car wax worked ok. At the top of the hump the tape stuck inside the fiberglass some. Some time with a garden hose, Simple Green, and a scrub brush got that out.

Then, I laid an 8 sq foot pack of fiberglass mat INSIDE the piece to give it some strength. That seems to have worked well!

My plan was, while I was home this week, to get this tail section far enough along to take to work with me the coming week. I work out of state, one week on, one week off as an air ambulance pilot, and we spend a lot of time sitting idle waiting for a call like firemen. My plan is to occupy my downtime at work with lots of sanding!

I'll post how that goes!

I did briefly lay the tail section on my bike. It looks like it's going to work!

I also installed the shell of the SWEET headlight and mounting brackets that arrived. Sorry the picture is so dark, but im staying up late to get on schedule for the coming week of night shifts.

If you read this far, thanks! ...But you must be bored!
 

Attachments

  • image.jpg
    image.jpg
    709.8 KB · Views: 280
Holy cow, this is a lot of work!

I've sanded the piece, given it a (too thick) first coat of bondo, and sanded almost all that away.

I've repeated that process several times, getting low spots and pin holes filled.

I gave it several coats of primer, wet sanded that, and bondoed some final (I hope) pin holes.

Tomorrow is more primer and wet sanding.
 

Attachments

  • image.jpg
    image.jpg
    1.2 MB · Views: 291
  • image.jpg
    image.jpg
    871 KB · Views: 266
That's a LOT of work alright!! Good on ya!! 8)
 
Gettin there!

The seat is just sitting there right now, so I still need to mount it, make a tail light and license plate mount, add seat foam, and final paint.
 

Attachments

  • image.jpg
    image.jpg
    995.3 KB · Views: 258
  • image.jpg
    image.jpg
    902.1 KB · Views: 250
  • image.jpg
    image.jpg
    886.6 KB · Views: 245
So I got to work on mounting the stock speedo/tach on the triple clamp. One simple, short bracket goes to the rear mount under the gauge, and I grunted and sweated and strained to bend a metal rod into a curved bracket with ends that wrap tightly around the bolts at each end. Here's a shot of it before I painted it.
 

Attachments

  • image.jpg
    image.jpg
    844.9 KB · Views: 247
Back
Top Bottom