
We noticed you are blocking ads. DO THE TON only works with community supporters. Most are active members of the site with small businesses. Please consider disabling your ad blocking tool and checking out the businesses that help keep our site up and free.
You are using an out of date browser. It may not display this or other websites correctly.
You should upgrade or use an alternative browser.
You should upgrade or use an alternative browser.
Building the P38 Racer
- Thread starter Hannibal Smith
- Start date
absolutely beautiful!!!
totally stealing your hub design; maybe ill throw in some more holes to make it look semi-original")
im in love with those tripple trees...
if only i had a cnc i would be one happy guy.
EDIT:
Forgot to ask; are the holes for the forks raked at all or are they square with the rest of the triple tree (in other words, is the hole drilled at an angle at all)
totally stealing your hub design; maybe ill throw in some more holes to make it look semi-original
im in love with those tripple trees...
if only i had a cnc i would be one happy guy.
EDIT:
Forgot to ask; are the holes for the forks raked at all or are they square with the rest of the triple tree (in other words, is the hole drilled at an angle at all)
Hannibal Smith
Active Member
mysta2 said:As a budding machinist I'd love to see what that 5degree fixture looks like... I'm dealing with that issue myself (I was planning for 10degrees though)
I will take some pics of a mockup jig, but from your posts, I am sure you will get this.
Calculate the width of the clamp (in this case 1.4") and using geometry determine the centerline of the bars at the desired angle. You will have a "thinner" wall at one side and this is what you shoot for on the mill (or vise versa) and you run the fixture at the angle using your XY to get you there. This applies to a perpindicular head (tool) to a fixtured clip-on.
If you use a Bridgeport etc. you can actually angle the head (used to do it this way) but the Z becomes absolutely critical, and must be repeated and dead on for a clip-on set. It is better to run the head (Z) perpindicular and merely fixture the clip-ons. I did this stuff manually with great results for many years, so a CNC is not required at all, believe me.
Let me shoot some pics, and you will understand instantly-
Hannibal Smith
Active Member
Rocan said:absolutely beautiful!!!
totally stealing your hub design; maybe ill throw in some more holes to make it look semi-original
im in love with those tripple trees...
if only i had a cnc i would be one happy guy.
EDIT:
Forgot to ask; are the holes for the forks raked at all or are they square with the rest of the triple tree (in other words, is the hole drilled at an angle at all)
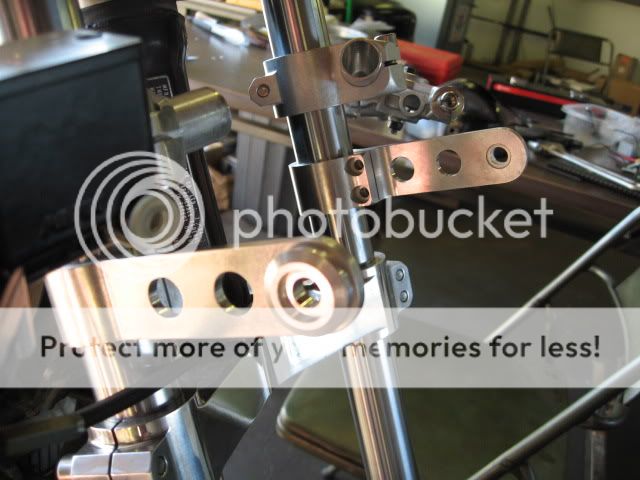
Just a parallel setup, no angles on this build.
You can change the rake by boring the tube allocations on the trees at a different angle, but the triple clamp "span" must be exactly accounted for, and CANNOT be changed.
When I alter rake, I have to ensure that my distances are perfect so that I do not "tweak" the fork tubes or steerer. If you have enough meat in the headstock, you can engineer an eccentric system that works just fine too.
sounds good to me.
I'm going to drop some money on a nice little mill one of these days and attempt to make a triple tree. ill post a thread on how it goes when that day comes.
in the mean time... id kill for that sweet ass compression bolt you made for those triple trees!
how did you work out the spacing for bearings? did you just machine everything to stock heights etc?
Im guessing you turned the steerer-tube on a lathe and then pressed it into the bottom tree?
Hannibal Smith
Active Member
Rocan said:sounds good to me.
I'm going to drop some money on a nice little mill one of these days and attempt to make a triple tree. ill post a thread on how it goes when that day comes.
in the mean time... id kill for that sweet ass compression bolt you made for those triple trees!
how did you work out the spacing for bearings? did you just machine everything to stock heights etc?
Im guessing you turned the steerer-tube on a lathe and then pressed it into the bottom tree?
If you run parallel, then spacing isn't an issue- the steerer was turned from stainless stock and instead of pressing, I threaded the lower clamp and then made a second nut for a bombproof install- I used to do a lot of press fit steerers (no more than .002"- usually .0007") but just went threaded on this build. If you go press fit, It doesn't take much to secure it rock solid, .007 to .0015 is plenty.
As for spacing- I purchased the tapered bearing set first, then measured the stack heights- I calculated how much space I want top/bottom, and what diameter I wanted things, then just turned the steerer to my sketch.
I made the steerer nut 26mm just like the rear axle nut for tool commonality, and the entire front end can be adjusted/dismantled with the same allen key, just like a racebike-
Hannibal Smith
Active Member
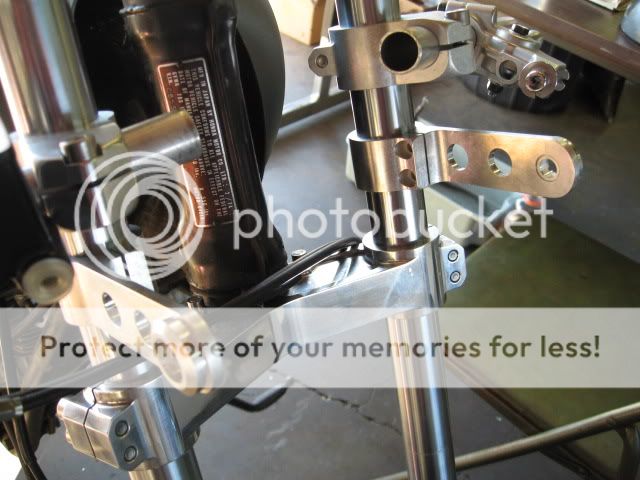
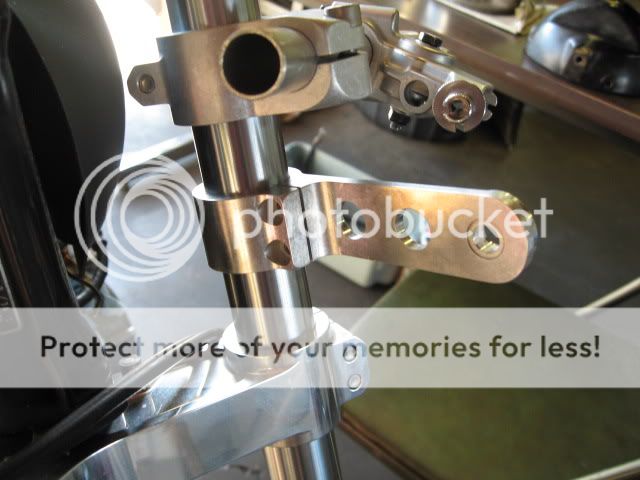
Doing the headlight assembly right now. The clip-ons are still at mockup length, and will be trimmed etc. I am running a new clutch and brake assembly, it is NOS from a Triumph.
baconpocket
eating bacon
WOW. certainly different than most builds i like to follow. im watching on the edge of my seat. keep up the good work.
-bacon
-bacon
Hannibal Smith
Active Member
Thanks-
My next hurdle is the gauge setup, I was going to just run a tach, but the trip counter is nice for a roadgoing machine (fill ups) but the stock gauges are pretty large. I am trying to design a system to retain the stock gauges, but not look too big or bulky.
My next hurdle is the gauge setup, I was going to just run a tach, but the trip counter is nice for a roadgoing machine (fill ups) but the stock gauges are pretty large. I am trying to design a system to retain the stock gauges, but not look too big or bulky.
crazypj
Split personality, I fake being smart
Hannibal Smith said:Here are the clip-ons (not polished yet!) and I machined them at 5 degrees, I usually machine them at 7-9, but 5 degrees is easier on the wrists for road trips IMO.
If you want an easy way to have adjustable bars, get some alloy thick wall MX low rise.
I got pair of Renthal for 2002 RM 250,
Usually has 20~45 degree bend (depending on manufacturer)
Cut them off before second bend and you have multi adjustable bars.
probably way stronger than needed but I tend to overbuild things (I know what I do to lightweight stuff ;D)
I'm setting mine at 14 degrees on bar clamp which will give +31 to - 59 degrees by rotating bar and mount on fork tube.
PJ
Jfishsolevibe
Coast to Coast
updates?
Hannibal Smith
Active Member
Back from the work "trip", and back on the P38.
Got the gauge housings done, will get some pics when they come back from anodization-
Got the gauge housings done, will get some pics when they come back from anodization-
tWistedWheelz
BUILT NOT BOUGHT!
Glad this one is back! I can't wait to see your progress in pics!
Swapmeet Louie
Put some metal in yer eye....
Yup..


