
We noticed you are blocking ads. DO THE TON only works with community supporters. Most are active members of the site with small businesses. Please consider disabling your ad blocking tool and checking out the businesses that help keep our site up and free.
You are using an out of date browser. It may not display this or other websites correctly.
You should upgrade or use an alternative browser.
You should upgrade or use an alternative browser.
CB350 Reassembly Tips?
- Thread starter overdraft
- Start date
overdraft
Coast to Coast
huh, nada! i'd have thought with all the 350's on this board someone would have known something!
OK, how about this! I'll put down a bunch of my dumb ideas and maybe someone can say if they're any good or not? and ask some dumb questions too!
oil baffle in lower crankcase. i drilled and tapped where it is riveted into the lower crank so i could clean underneath... put it back with red locktite? will that work in hot oil?
i'm assuming that this bike is gonna rattle like a mofo being a twin so i'm using nyloc nuts everywhere instead of nothing or those split lockwashers. make sense?
for the bolts that go into the cases i have a stainless socket head fastener kit... never seize? blue locktite? any ideas?
is there any words of wisdom around getting the motor into the frame without banging the paint to hell?
the manual says apply 'liquid gasket' between the case halves and the let it dry before assembly???? i've never done that before... not that i've split cases before... but i've always assembled when it was wet. you guys?
i didn't see any torque specs for the case to case bolts... am i being blind? or if not, what number should i use?
should i fog the parts with wd40 or something before i assemble?
any help appreciated... i obviously have no clue what i'm doing!
[quote author=overdraft]oil baffle in lower crankcase. i drilled and tapped where it is riveted into the lower crank so i could clean underneath... put it back with red locktite? will that work in hot oil?[/quote]
Spot on.
[quote author=overdraft]i'm assuming that this bike is gonna rattle like a mofo being a twin so i'm using nyloc nuts everywhere instead of nothing or those split lockwashers. make sense? [/quote]
Not sure there's any harm in it. I stuck with bog standard nuts and lock washers on my 360 though.
[quote author=overdraft]for the bolts that go into the cases i have a stainless socket head fastener kit... never seize? blue locktite? any ideas?[/quote]
Never seize is a good idea.
[quote author=overdraft]is there any words of wisdom around getting the motor into the frame without banging the paint to hell?[/quote]
Wrap the frame in packing foam or similar (even cardboard or news paper can work) and take your time. Having a friend help is a pretty good idea. Also, you can put the motor on its side on the ground and lower the frame down on top of it. That's the option to use if you're doing it by yourself.
[quote author=overdraft]the manual says apply 'liquid gasket' between the case halves and the let it dry before assembly???? i've never done that before... not that i've split cases before... but i've always assembled when it was wet. you guys?[/quote]
I give it between two and five minutes to get tacky and still apply while wet.
[quote author=overdraft]i didn't see any torque specs for the case to case bolts... am i being blind? or if not, what number should i use?[/quote]
Between six and eight ft/lbs.
[quote author=overdraft]should i fog the parts with wd40 or something before i assemble?[/quote] Depends on the parts. That's what I used for my pistons and cylinders, but everything else got motor oil. When I went to fill it before starting, I poured the oil in through the top end (though a valve cover) rather than using the standard oil filling location.[/quote]
Flugtechnik
My bike is not transportation, it is a respite
I think your original question was too broad to answer. Thanks for breaking it down.
I can't answer all of them and my answers may not be right.
I coated everything ( except the exterior of the engine) with assembly lube. Mine was really thick red stuff from the auto parts store.
All of my external bolt that I replaced with stainless ones I put never seize on and used lockwashers.
To put the engine in the frame, I laid the engine on its side and lowered the frame down on to it. The frame is lighter. A friend helps.
overdraft
Coast to Coast
awesome! thanks guys...
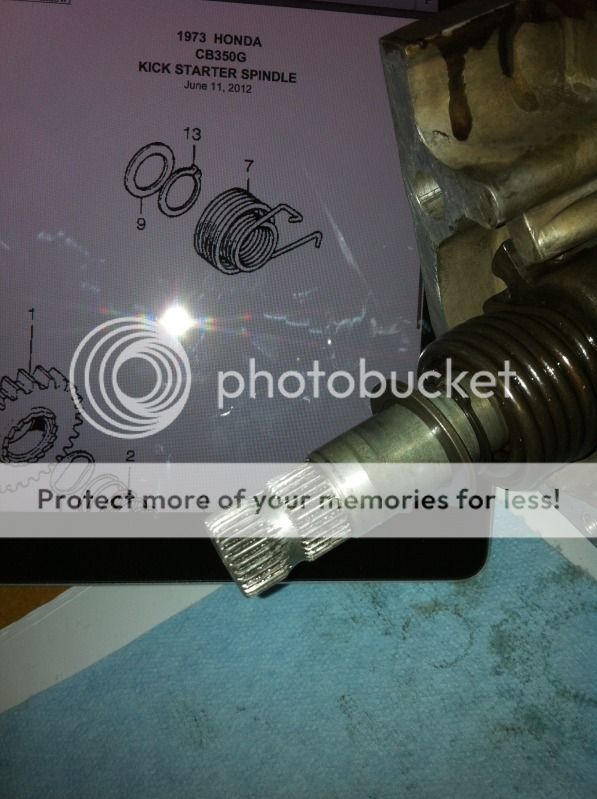
ok, im getting into it now and i have a tip and a question!
the tip is this... its not immediately obvious from the manuals, but the cases assemble upside down... so make some kind of a stand so that the upper case rests upside down with swinging room underneath for the rods and timing chain to dangle.
the question is this... i have one of the older mystery kickstarts that doesnt appear in any of the shop manuals i can find... so im going by logic and a *gasp* parts diagram. so the parts diagram kind of shows a big washer on the outboard end of the shaft, next a circlip, then the return spring. i cant see a purpose for the washer... it would make more sense for it to be on the spring side of the circlip to act as a stopper for the spring maybe? does anyone know how this is SUPPOSED to be assembled?
thanks for looking!
You mention having the cam reground, was it built up with weld or was the base circle ground down?Grinding down the base circle of the cam will create too much clearance between the cam and rocker arm....and no adjustment,,but there are ways to correct this.............good luck on your build
overdraft
Coast to Coast
ya, I've been wondering about this for a while as it was the grind down kind... it's a very mild grind and I couldn't fathom how to calculate the new gap so I've just been pressing on hoping the rockers had enough adjustment... what are these corrective measures of which you speak?


