Follow along with the video below to see how to install our site as a web app on your home screen.
Note: This feature currently requires accessing the site using the built-in Safari browser.
We noticed you are blocking ads. DO THE TON only works with community supporters. Most are active members of the site with small businesses. Please consider disabling your ad blocking tool and checking out the businesses that help keep our site up and free.
Thank you for the pointers on the crankshaft, PJ. The metal bits are in the larger hole which I'm pretty sure is the oil passage. I'll take your suggestion and try to get them out and wash with diesel fuel. My original assumption was that the metal bits were actually shavings from in the crankshaft bearing, rendering the bearing/crankshaft useless. After I get them out, I'll try to see if they may be from something else. Any ideas off the top of your head what the shavings would possibly be from? Maybe that one spot was a bottleneck and the oil flow caused them to collect in that location?
Various bits are pretty common, wear from gears, cam chain and tensioner, etc
If that's the oil hole it will go all the way through (about 1mm at bottom)
I think it may be the locating hole though?
I did some more investigating and found it was the oil hole after all. I used a pick to get all the bits out. After talking to a few people who know a good bit more than me about old bikes, I've come to the conclusion that these shards may not have been cleaned out from the factory. I don't see anywhere they could have come from and the bearing moves just as smooth and is just as tight as the other bearing. And apparently its not uncommon to find issues like this. I also found some more shavings in a bolt hole in one of the brake caliper mount holes in the lower fork. Seeing this in two places makes me wonder if my bike was assembled on a friday.
I talked to the person I bought the bike from and he was able to recommend a local machinist that only works on motorcycles, and mostly old motorcycles. So I took a drive to meet him and drop off my head, cylinders, and pistons. He's rebuilding the head and honing the cylinders for me. After he hones the cylinders he's going to let me know if they're within spec or if I need to jump to the next larger piston size.
I also built a nice little blasting cabinet to prep all the parts that are going to paint/powder.
I started with a small part to see how well it worked and I was super amazed. I love this thing!
Over the weekend my fiance and I went to the AHRMA Vintage Motorcycle Festival at New Jersey Motorsports Park. It was really nice to see the person I bought my bike from a few years ago. He had a stand in the swap meet with a ton of parts he was selling. It was really cool to be able to watch the old bikes tearing it up on the track!
I got my first round of shiny bits from the powder coater. That was a super exciting moment when things are starting to look good and you can actually start putting nice parts together instead of taking dirty parts apart.
The forks are all back together with new seals. I ordered a new set of dust covers from dcc but they sent me the wrong ones so I need to send them back and get the correct size.
The seals were easy to get on without a fork seal driver. I just used the old seal as a driver and tapped on it with a hammer. I put some tape on the upper forks to protect them from the hammer. As long as you tap lightly and work around each side so it drives In straight you shouldn't have a problem.
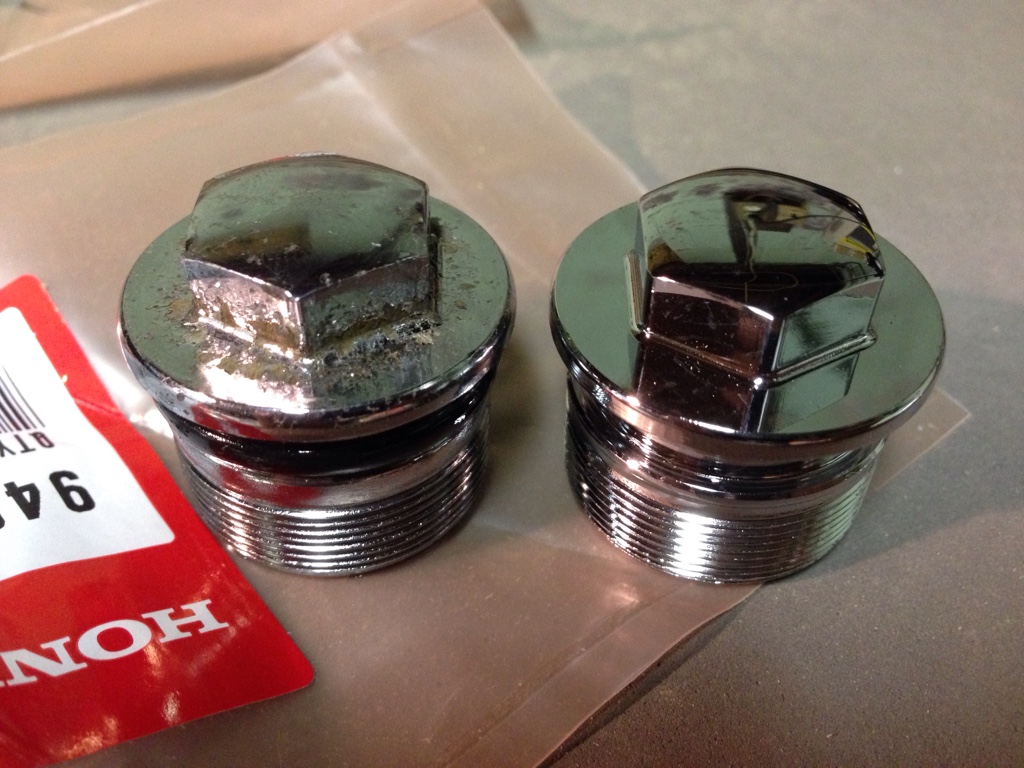
I also got a set of new old stock fork bolts because mine were nasty, even after soaking for 5 days in a vinegar bath. You can see the difference between the old and the new in this photo
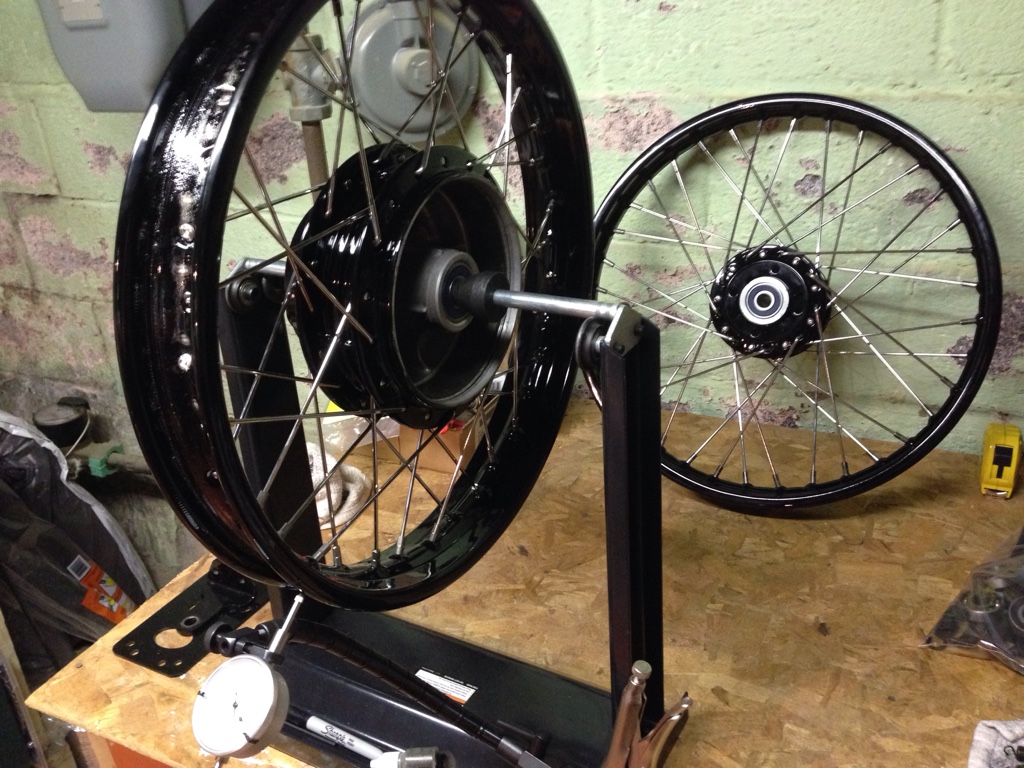
I got my new spokes all polished and wheels all laced up! After the first wheel was laced up correctly, the second wheel was a breeze. I also installed new All Balls wheel bearings. I'm glad I referred to the honda manual while putting the bearings in because I almost overlooked the smaller bearing spacer in the rear wheel. One thing I would do differently is make sure the spokes are the right size before spending hours polishing all of them. Mine ended up being the right size but it would have been horrible if they weren't. Not sure Buchanan would take back polished spokes.
Inner spoke pattern:
Threads greased up good with the anti-seize supplied by Buchanan.
All laced up:
They're all laced up and true but now I need to figure out what I'm going to do about tightening the spokes. I read a lot of people don't bother with actually setting the torque with a torque wrench. Since this is my first time lacing wheels and I don't know the feel of a tight spoke, I'm going to do some research to find the best method.
One more suggestion I'd make when lacing wheels is, when you start doing the outer spokes, let part of your wheel hang out over your workbench. This allows you to easily reach under to thread the spoke without having to lift up the wheel each time.
The only torque for spokes I have found...Keeping in mind it came from the "internet" is 6 lbs. NOw, what I would recommend doing is sending Buchanans a quick email and ask them. Then we will all know the answer.
Thanks trek. Most of my research so far points to ~40 to 60 in/lb. but that depends on the application. I'm also reading a lot of people saying not to worry about torque as much as making sure the wheel is true, spokes are greased, nipples tight, and that all the spokes have a similar sound when tapped with a wrench.
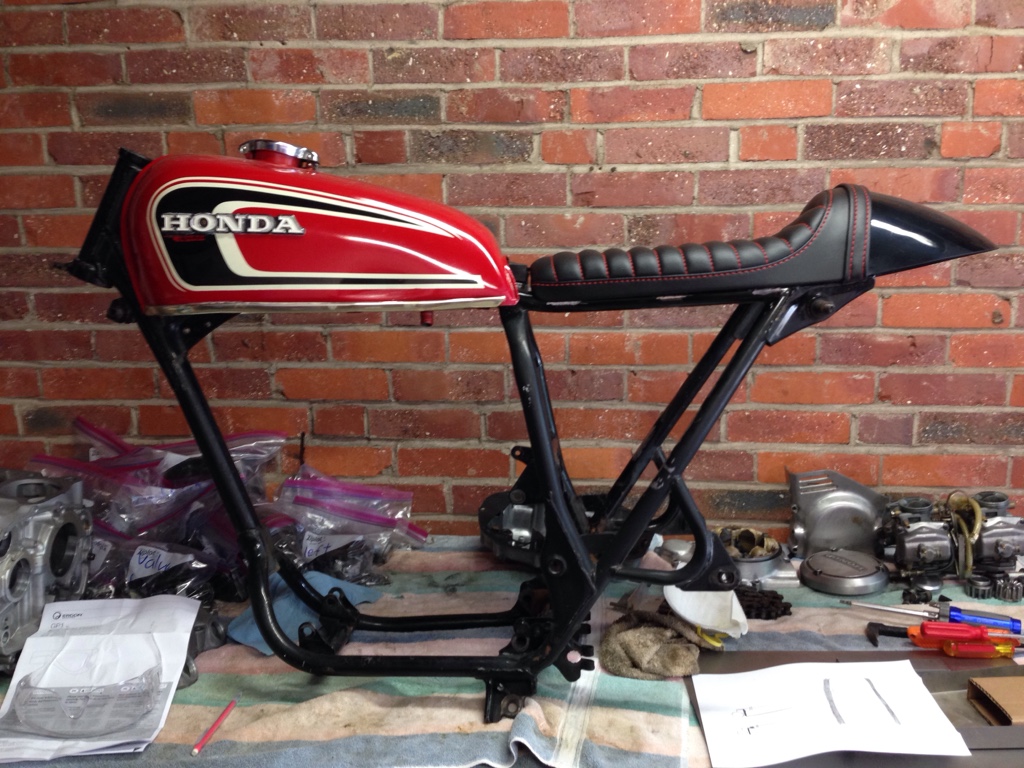
My seat came last week so I got the itch to do some frame work. I cut off all the extra tabs and rear end, and grinded down all the welds flush. She cleans up nicely
Now I'm figuring out placement of my electronics. I decided to ditch the HID setup, because of all the extra ballasts it requires, and go with Spark Moto's LED headlight instead.
I've figured out how I'm generally going to mount the seat but I have to figure out the specifics. Basically I want something that doesn't require anything flimsy like Velcro and doesn't use nuts that I have to keep track of every time I take the seat off. I found a great solution and will share when I can get it mocked up.
Got my wheels buttoned up today. Tires mounted and balanced and rear hub put back together with new shoes. The front tire went on without any issues. The rear tire gave me a hell of a time and, even with rim protectors, I ended up scratching my newly finished rims. So I ended up having a local shop mount the rear tire. Lesson learned.
I really liked those Conti's back in the day.
In fact, I liked them so much I got a set for my project (as yet unseen but may end up on 'the runner' ;D )
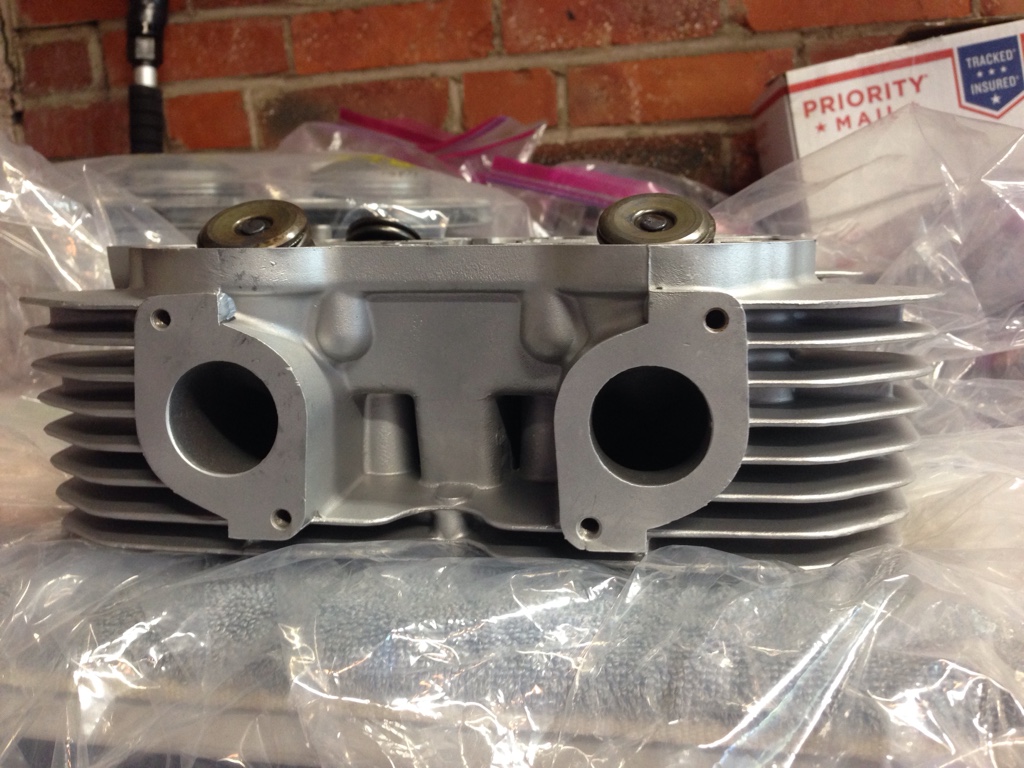
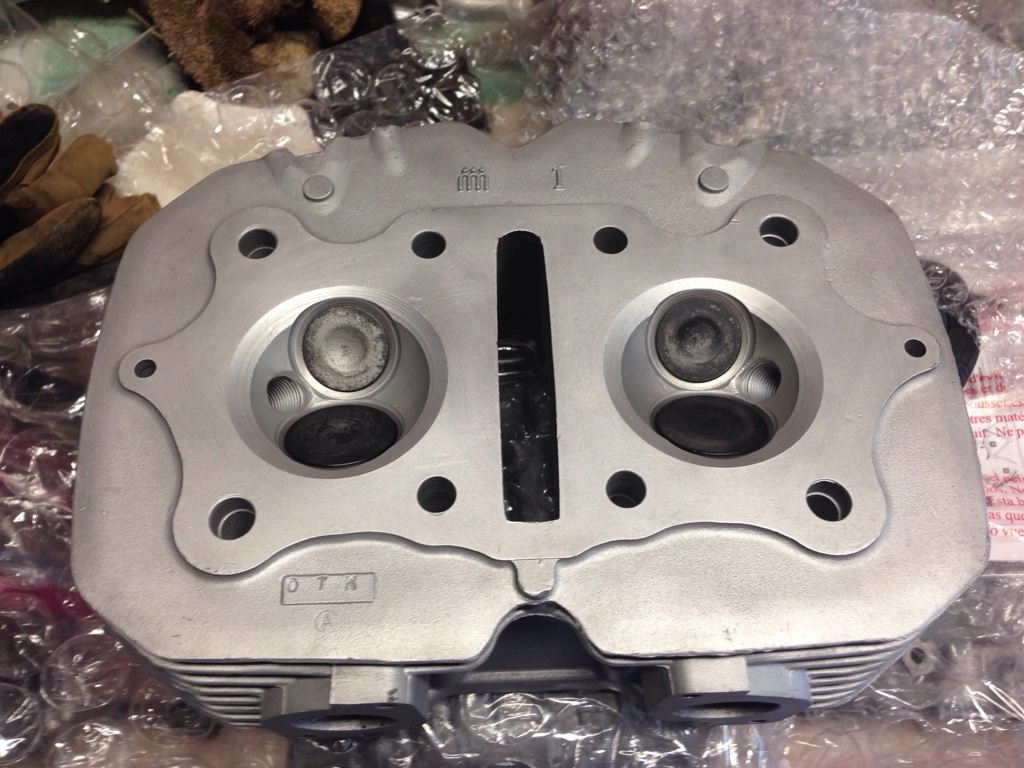
I got my head, cylinders and Pistons back from the machinist a couple weeks ago but hadn't provided an update. I was planning on painting them but they look so good now that I want to leave them bare. The head was fully rebuilt, the exhaust ports were opened up, and the cylinders were bored out for gs850 Pistons.
I'm actually still using the stock valves. he just matched the ports to the gasket size. Apparently he smoothed out some casting/machining imperfections in the intake ports as well for no extra charge
I use stock valves but would like to get 1mm OS intakes. (but every time I have some cash something more important comes along)
The exhausts are just about perfect size even though they look too small
1. Drilled out upper crank case oil passages
2. Opened up the oil filter exit passage with a dremel.
3. Previously drilled holes in the inner clutch basket
I've been a busy bee lately but have not been posting my progress. I guess I'm having too much fun
I decided to buy a welder so I can do my frame work. My first welder and first time mig welding. I have a lot of learning to do!
Fabricated a bunch of stuff
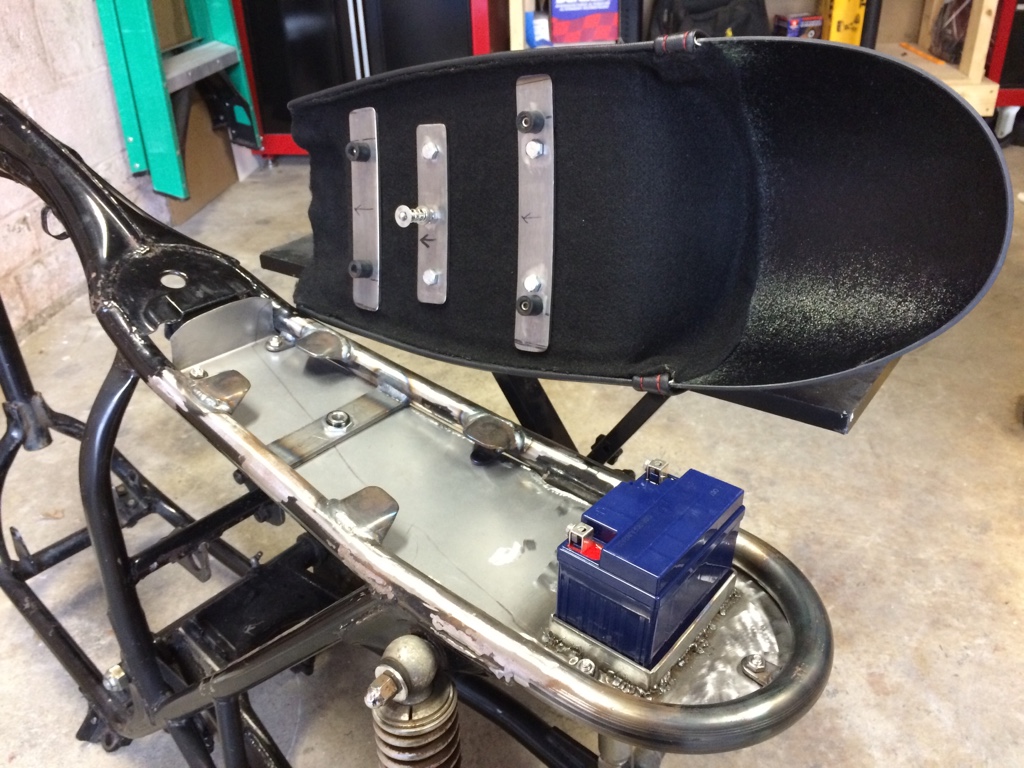
Seat mounting system
Electronics tray
Battery box
Rear seat hoop
I'm especially proud of how I decided to mount the seat. No bolts to deal with. I used a quick-latch http://www.quik-latch.com/black-anodized-mini-quik-latch.html so all I need to do is press a button to release the seat. And just have to snap the seat down to secure it. I got all my metal tabs from A&A Manufacturing. They were super helpful and even made me custom tabs for no extra charge!
I ended up going with a BikeMaster tru gel battery. They don't have a lot of cranking amps but I don't have an electric start so I think it should be sufficient. Way cheaper than those ballistic batteries. And not so finicky.
The black circle in the center of the electronics tray is the button for the seat latch
Like I said, my welding leaves a lot to be desired. But it's getting better. I keep practicing on any scrap I can find. Practice makes perfect right?
This site uses cookies to help personalise content, tailor your experience and to keep you logged in if you register.
By continuing to use this site, you are consenting to our use of cookies.


")