
We noticed you are blocking ads. DO THE TON only works with community supporters. Most are active members of the site with small businesses. Please consider disabling your ad blocking tool and checking out the businesses that help keep our site up and free.
You are using an out of date browser. It may not display this or other websites correctly.
You should upgrade or use an alternative browser.
You should upgrade or use an alternative browser.
CB400F First Build! College Kid's Cafe Project
- Thread starter aaron33royer33
- Start date
aaron33royer33
New Member
DohcBikes
Fuck You.
Awesome.Sonreir said:Thread cleaned.
I'd really appreciate it if you'd left the advice to buy a running bike. Regardless of how much it makes people want to cry a little on the inside, it's good advice that more people should follow.
Thanks so much.
mechanicalATL said:My carb cleaning process is the following:
1) disassemble
2) soak in carburetor cleaner for 20 min
3) run the agitator for 5 min
4) rinse
5) dry with compressed air
6) assemble with new jet components
First, please, please, PLEASE do not think that this process is in any way whatever of any value, except to fool you into thinking that the carbs are "clean" and that you can eliminate them from whatever problem you may incur. While it is indeed possible that this might be fine, there is zero certainty that it will be. The only way to know with certainty that the carbs will function properly is to inspect each and every passageway by seeing a clean and sharp stream of carb cleaner pass through it. There are more threads on this very forum than I can count that have gone on for endless pages searching for some mystery problem that couldn't be the carbs because they were "(already personally, carefully, professionally, ultrasonically, etc) cleaned", only to find out at the end that they really were not.
Secondly, do not replace ANY parts in your carbs unless they are actually damaged somehow. If you have rebuild kits, take out the gaskets and throw everything else away. That means any jets, needles etc.
I could not even guess how many bikes have come into my shop to be repaired that "couldn't be the carbs 'cause I just had them professionally cleaned by the dealer" etc. that simply needed the carbs cleaned. Nearly as common, is "rebuilt" carbs with "brand new carb kits with all new brass" with mystery running issues. Take carbs apart, clean them, and replace all the "new" jets and needles with "old wore out FACTORY OEM parts" from my stash of junk carbs and by some miracle, the bike runs flawlessly.
FWIW, I actually have one of these bikes, and it is a particular favorite! Best sounding engine in any vehicle ever made (IMHO) or at least that I have heard, and I have been around a lot longer than the bike so I have heard quite a few!
aaron33royer33
New Member
surffly said:Will the 3D printed plastic hold up for fuel?
I'm sure Honda still has the parts you need.
The plastic will not be fuel resistant, so I will be coating it with a chemical coating to make it a usable part. Thinking por15, EC-776 from 3M, etc. Ideally I wouldn't have to order something in a massive quantity.
DohcBikes
Fuck You.
More serious advice.
Lest anyone here forget that my reasoning for pointing out some of the realities is to not only warn of upcoming challenges, but to motivate.
Anyone ever told you that you couldn't do something? How bad did that make you want it?
Beware online resources. Beware smiling faces and okie-dokes. This will get you into trouble faster than anything.Powderfinger said:With all the resources that are online these days there is no reason you can't do whatever you want with this bike.
20 years ago PEOPLE were different. Take from that what you want.Powderfinger said:20 years ago it would of been tougher but still very doable.
Lest anyone here forget that my reasoning for pointing out some of the realities is to not only warn of upcoming challenges, but to motivate.
Anyone ever told you that you couldn't do something? How bad did that make you want it?
DohcBikes
Fuck You.
This is the beginning of a very long road for you. You are going to obsess over very small details, try to reinvent the wheel the whole way, and never get to where you want to go.mechanicalATL said:The plastic will not be fuel resistant, so I will be coating it with a chemical coating to make it a usable part. Thinking por15, EC-776 from 3M, etc. Ideally I wouldn't have to order something in a massive quantity.
You do know, that when a REALLY nice bike is built, it quite often goes together and comes apart SEVERAL times, right?
aaron33royer33
New Member
Mobius,
Thank you for the advice on the carbs. I will be sure to inspect all of the passageways with the carb cleaner spray to ensure that they're good to go. Some of the original jet components inside the carb (main jet and valve seat) were chipped and coroded and needed to be replaced. The jet kits included in the purchase of the bike are the stock sizes for the components (main jet #100, slow jet #40) so I'm hoping they get the job done.
Dohc,
The balanced input is definitely appreciated. I realize the printing is unconventional, but I figured I'd give it a shot since it's an accessible resource that's very convenient for me to use on campus.
This is where my advice to not over complicate things was aimed.mechanicalATL said:The plastic will not be fuel resistant, so I will be coating it with a chemical coating to make it a usable part. Thinking por15, EC-776 from 3M, etc. Ideally I wouldn't have to order something in a massive quantity.
surffly
Over 1,000 Posts
Silly to do all this for a $5 part that is easy to get.
Emgo gauges are not worth $90.
Hell you are an engineering student! Make them, at least that is a simple project that you can actually make work.
If not buy a Morgan CarbTune.
The others are right, you aren't actually cleaning the carbs.
A lot more to it.
Honestly thought the subsonic cleaner was a joke....
You will be very will served to replace anything in the carbs with nothing but authentic OEM parts. You should be able to get everything pretty easily. They often are very pricey compared to "kits" but it is for good reason.
Keeping things simple is one of the hallmarks of good engineering. Protective coatings for anything in the fuel system is definitely a last ditch patch. Everything in the fuel system is already plagued with being contaminated - even from (especially?) the fuel itself. It takes so little to cause trouble that adding another potential source unnecessarily is begging for issues down the road. Save any modifications and 3d printing for things you are trying to improve, not repair. You have a wonderfully engineered and very reliable bike (did I mention it is a favorite of mine?) - keep the things that have already been engineered and work perfectly. That said, there are a lot of things that can be improved on this bike so place your time and effort into determining what those things are and how to make useful changes.
Keeping things simple is one of the hallmarks of good engineering. Protective coatings for anything in the fuel system is definitely a last ditch patch. Everything in the fuel system is already plagued with being contaminated - even from (especially?) the fuel itself. It takes so little to cause trouble that adding another potential source unnecessarily is begging for issues down the road. Save any modifications and 3d printing for things you are trying to improve, not repair. You have a wonderfully engineered and very reliable bike (did I mention it is a favorite of mine?) - keep the things that have already been engineered and work perfectly. That said, there are a lot of things that can be improved on this bike so place your time and effort into determining what those things are and how to make useful changes.
aaron33royer33
New Member
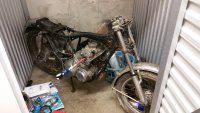
After two weeks of exams, I've been able to make some nice progress on the project during the weekend.
1) Engine is back in the frame, and mounted up. Old oil sludge cleaned from oil pan and replaced with new gasket. New oil filter installed.
2) Successful compression test. All cylinders have >150 psi of compression, which is enough to get the bike running again without having to do a top end rebuild.
3) Carburetors are rebuilt and are complemented by a fresh set of intake manifolds.
Remaining tasks before starting:
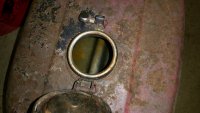
1) Gas Tank. The gas tank has slight rust on the inside, and I have seen a variety of methods to remove it (rust-remover formula, electrolysis, sloshing the tank with BBs and bolts, and hydrochloric acid). Does anybody have any experience or recommendations for DIY tank restoration?
2) Ignition. I have removed the wiring harness from the bike, and am looking to do the most bare bones wiring possible for the start. Kick start only with charger to battery. I am going to have to check all of the old components (rectifier, regulator, coils, and points) before any fabrication can begin. There's a lot of great wiring diagrams that I have found on this forum and around the web that appear straight forward.
3) Attaching throttle cables and clutch cable along with handlebars to the bike.
4) Attaching carburetors to cylinder head.
1) Engine is back in the frame, and mounted up. Old oil sludge cleaned from oil pan and replaced with new gasket. New oil filter installed.
2) Successful compression test. All cylinders have >150 psi of compression, which is enough to get the bike running again without having to do a top end rebuild.
3) Carburetors are rebuilt and are complemented by a fresh set of intake manifolds.
Remaining tasks before starting:
1) Gas Tank. The gas tank has slight rust on the inside, and I have seen a variety of methods to remove it (rust-remover formula, electrolysis, sloshing the tank with BBs and bolts, and hydrochloric acid). Does anybody have any experience or recommendations for DIY tank restoration?
2) Ignition. I have removed the wiring harness from the bike, and am looking to do the most bare bones wiring possible for the start. Kick start only with charger to battery. I am going to have to check all of the old components (rectifier, regulator, coils, and points) before any fabrication can begin. There's a lot of great wiring diagrams that I have found on this forum and around the web that appear straight forward.
3) Attaching throttle cables and clutch cable along with handlebars to the bike.
4) Attaching carburetors to cylinder head.
Attachments
surffly
Over 1,000 Posts
Why do people want to always make a new harness? Take the stock harness and remove what you don't need. Honestly there is not much to remove. Deleting the starter is kinda dumb in my mind. Not going to save enough weight to matter, not going to have some better looking option either. SO what is the gain? Would rather cut weight in other areas if real performance is the goal. Hell at some point if everything is so dialed in that the starter is holding you back fine, but start some place else first. The starter is a good thing to have while tuning and getting other things done on the bike.
Go to Walmart of the Dollar store and buy some "The Works" toilet bowl cleaner.
Cheapest way to clean the tank. Plenty of posts about how to make it work.
Go to Walmart of the Dollar store and buy some "The Works" toilet bowl cleaner.
Cheapest way to clean the tank. Plenty of posts about how to make it work.
surffly
Over 1,000 Posts
Says the guy selling harnesses.
On a full crazy custom build I get the point.
But on this type of project what would really change?
Even if you really needed to remove the blinker wires, how hard is that?
Most everything else will be stock parts in a stock, or close location.
Biggest change will be tail light location, if going cliche axle mount.
Vintage connection will sell you all the original style bullets to mate to the OEM harness, or repair it if need be.
I would rather see a newbie sit with the factory stuff and manual to figure out what's what and make junk work. Starting "fresh" is often something thst overloads people and they get fried....pun....
surffly said:Says the guy selling harnesses.
I would rather see a newbie sit with the factory stuff and manual to figure out what's what and make junk work. Starting "fresh" is often something thst overloads people and they get fried....pun....
Back when we first started three years ago, we used to refurb and modify stock harnesses, but the time it took ended up being not worth it.
Your point is taken, though. Electrical work isn't for everyone and modification can sometimes be easier than fabrication.


