We noticed you are blocking ads. DO THE TON only works with community supporters. Most are active members of the site with small businesses. Please consider disabling your ad blocking tool and checking out the businesses that help keep our site up and free.
You are using an out of date browser. It may not display this or other websites correctly.
You should upgrade or use an alternative browser.
You should upgrade or use an alternative browser.
Discolored casing
- Thread starter OpTiCz
- Start date

Clinedesign
a sleepy mill town with a smokestack on one end
Elbow grease and polish!

AlphaDogChoppers
Science is true whether you believe in it or not.
Bead blast followed by polishing on a high speed buffing wheel.


I agree w Alpha dog...bead blast or walnut shells do a good job also...but you gotta find em. Then the polishing is pretty easy. on the bench grinder w a cheap buffing wheel and compound from harbor freight. The big flat spots are really easy and take just a couple minutes to do...its all those damn nooks and crannies that drive me nuts.
Alpha dog did a really nice job on the cover he is showing off.
Alpha dog did a really nice job on the cover he is showing off.
AlphaDogChoppers
Science is true whether you believe in it or not.
Just for the record, that case I showed took a lot more than just bead blast before polishing. I did some reshaping and worked out the gouges by sanding. I used 220, 320, 400, 600 grits before polishing. I did the bead blast first just to get all the remaining lacquer and aluminum oxide off so that I was starting with raw aluminum. The oxide on the surface and any remaining lacquer are much tougher to buff or sand off.
For those with no access to bead blasting, wet sanding with 320, 400, 600 paper before buffing works well, too.
It's not worth it to try and buff them on the engine. MUCH easier to pull them off the engine to polish. Then you can put them back on with some nice stainless socket head cap screws.
For those with no access to bead blasting, wet sanding with 320, 400, 600 paper before buffing works well, too.
It's not worth it to try and buff them on the engine. MUCH easier to pull them off the engine to polish. Then you can put them back on with some nice stainless socket head cap screws.
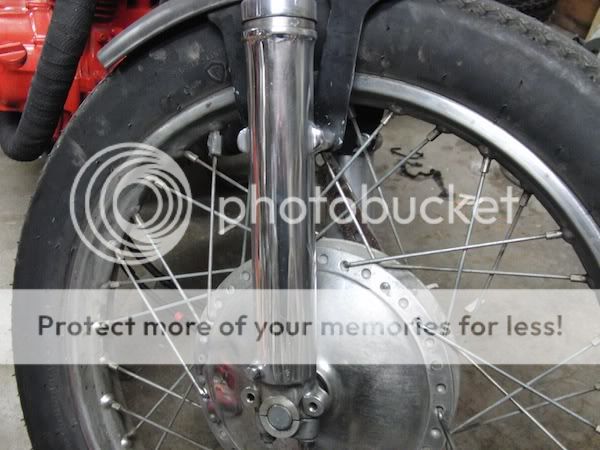
OK after reading this post I was having a cup of coffee and a smoke, looking at my F-d up wheels. Since I just got done telling you how easy it is to polish crappy stuff to look good. I dug out 4" grinder, old wheel and compound. I didnt clean em up first...parked in garage since fall. I didnt sand or bead blast or do nothin...I dint even take the fender off or pull wheel off the bike. This is just gonna be a quick half ass job at best.
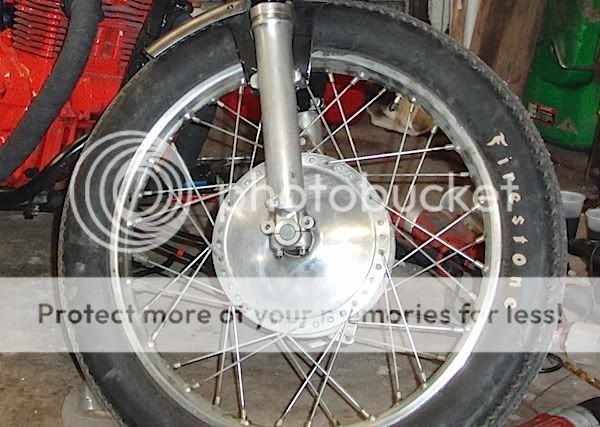
They cast no reflection at all.
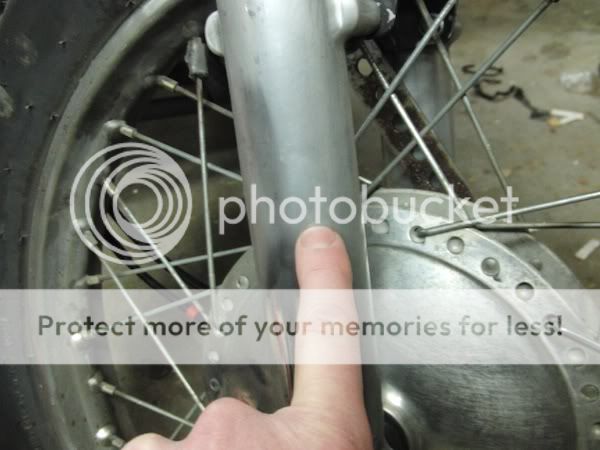
After about 10 seconds of touching them with wheel...looks promising. REMEMBER dont use a lot of pressure. like using a buffer to apply wax to your car.
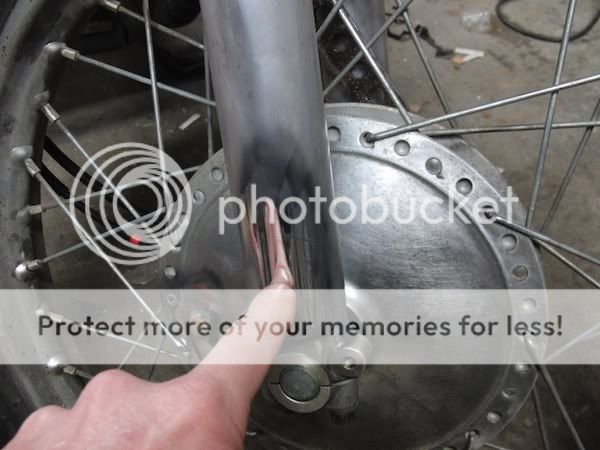
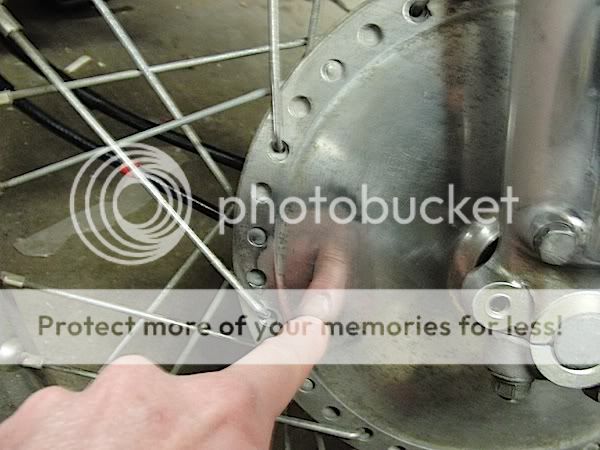
After about 10 minutes. I used stage 1 Heavy Duty cleaner compound and stage 2 aluminum polish. didnt change polishing wheels or nothing.
After 10 minutes of hard labor I took a break and had a smoke and a cup of coffee.
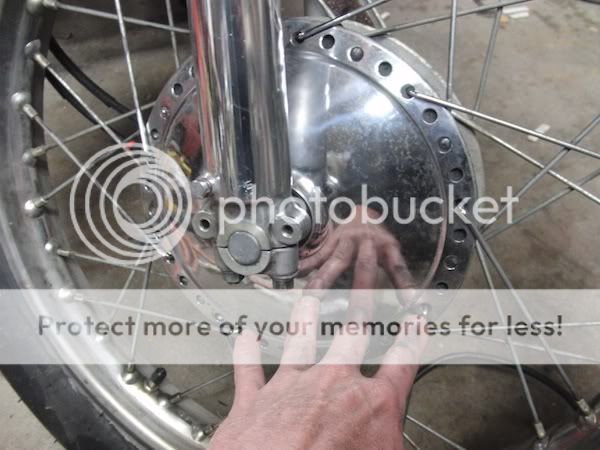
20 minutes on Hub. Damn now my spokes and rear hub REALLY look like crap. Screw em. Looks good enough from 10 feet.

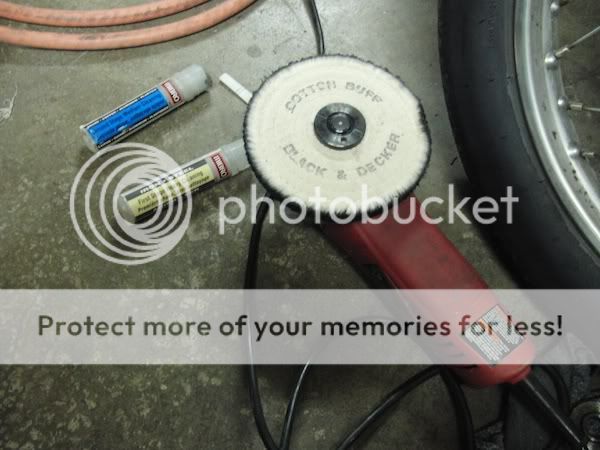
I bought the grinder, wheel and compounds at menards for like $35 bucks. You can use your dremel or bench grinder works very well. I think the 4" grinder spins a little too fast. but it works.
So after about 40 minutes including smoke/coffee breaks ...totally half assed it dont look to bad.
Now I have to go do the other fork.
It took longer to load these pics and make this post. Than it did to half ass polish this stuff !!!!
They cast no reflection at all.
After about 10 seconds of touching them with wheel...looks promising. REMEMBER dont use a lot of pressure. like using a buffer to apply wax to your car.
After about 10 minutes. I used stage 1 Heavy Duty cleaner compound and stage 2 aluminum polish. didnt change polishing wheels or nothing.
After 10 minutes of hard labor I took a break and had a smoke and a cup of coffee.
20 minutes on Hub. Damn now my spokes and rear hub REALLY look like crap. Screw em. Looks good enough from 10 feet.
I bought the grinder, wheel and compounds at menards for like $35 bucks. You can use your dremel or bench grinder works very well. I think the 4" grinder spins a little too fast. but it works.
So after about 40 minutes including smoke/coffee breaks ...totally half assed it dont look to bad.
Now I have to go do the other fork.
It took longer to load these pics and make this post. Than it did to half ass polish this stuff !!!!
AlphaDogChoppers
Science is true whether you believe in it or not.
trek97 said:You can use your dremel or bench grinder works very well. I think the 4" grinder spins a little too fast. but it works.
A Dremel would be a waste of time. Waaay under powered.
You NEED the high speed of the grinder. Professional buffers all run over 3,000 RPM. The secret to effective polishing is high speed and plenty of power. The reason for this is that you have to generate a good bit of heat in the piece you are polishing. The abrasive bars, like emery, are made of tallow. You need enough heat to melt the tallow.
With small pieces, it's not too hard to get the piece warmed up with friction from the buffer. Larger pieces can take a while to warm up or even never get warm enough to work. I have a 6" buffer from Harbor Freight that runs at 3,600 RPM, and it is underpowered for large pieces like fork legs. I pre-warm them in the oven at 150° first, and I have found that this makes the work go about four times as fast!
Scotchbright is a good way to remove some of that oxidation that your polishing couldn't get, you polish. These things are great.
http://www.harborfreight.com/4-inch-400-grit-fine-grade-abrasive-ball-96946.html
Some of that deeper oxidation that you had needs something a little more aggressive than the buffing wheel to get it out of there. Remember, aluminum oxide is actually used as an abrasive. It is very hard. You also didn't seem to have any clear coat on those pieces. That stuff can be REALLY hard to remove with a buffing wheel.
As far as maintaining, I had very poor results with rattle can lacquer on engine cases. It turned yellow within days, and was all crackled and started flaking off in a few weeks. I now use clear powdercoat, which of course requires pieces to be removed and completely disassembled to go into the oven. They can also be maintained with an occasional re-polishing with Mothers aluminum polish or Simichrome. A good coat of wax can also slow down the greying of the aluminum.
Any time you clearcoat the pieces, you have to give them a good cleaning with acetone because the buffing bars leave a greasy residue.
AlphaDogChoppers
Science is true whether you believe in it or not.
Also, it is considered poor practice to use the same buffing wheel with more than one abrasive. If switching from emery to rouge, you have to at least use a buff rake to remove as much emery from the buff as you can before switching to rouge. Otherwise, the emory just contaminates the finer abrasive step, and you don't achieve optimum results. The rouge step is where you REALLY get that mirror "show polish." I have all of my abrasive bars and buffs stored in separate lidded plastic containers, with buffs of different sizes and shapes kept with the abrasive that they are dedicated to.
Here is a good primer on polishing:
http://www.eastwood.com/metal-polishing-buffing-machines-instructions-eastwood-tech-library
Better yet, download this PDF on buffing.
www.caswellplating.com/buffs/Buffbook.pdf
LOTS of good instructional info on these two sites.
http://www.eastwood.com
caswellplating.com
Hey Alpha
can you spell ANAL ? lol HA i just kill myself!
bazinga
No really any & all info or life lessons are greatly appreciated. Just about every link to a product I get on here gets bookmarked in the Honda folder. cause. someday? Ill need that info. It will suck if one day I log on to dotheton and all my past PMs and Posts are gone. I keep tons of info from guys like you...guys who know. and may someday answers to questions that I just cant get answered. Like the wheel rake I didnt know they had that..I lways just used sharp edge of sheet metal or my file cleaning short wire brush thingy (if i can find it easily)
AlphaDogChoppers
Science is true whether you believe in it or not.
Anal? Me? ")
As for the buff rake, I just use a saw blade from my reciprocating saw.
As for the buff rake, I just use a saw blade from my reciprocating saw.
crazypj
Split personality, I fake being smart
ADC, that Suzuki (Kawasaki?) cover looks good, I know it took a while to get it that nice.
One thing I have found, the emery compound from Harbor Freight is a bit 'dry' so after loading wheel I apply a little red compo then switch between red/emery ('black)
Makes it work much better.
Home Depot emery compo is 'softer' and cuts better.
It was also cheaper than the HF stuff
Next time though, I'm going to order some from Caswell Plating, bigger bars are more cost effective
My father used to use a house brick broken in half, said it gave a better finish to mops (he was a professional metal polisher for about 30 yrs)
I got to get me some green balls ;D
AlphaDogChoppers
Science is true whether you believe in it or not.
crazypj said:I got to get me some green balls ;D
Just don't wash them for a while...
Here's where I get most of my abrasives:
http://www.aaabrasives.com/
They are in Philadelphia, so I can just go there and pick stuff up if I need to. More convenient to order from their Web site most of the time.
Their 2.75 pound emery brick is only $8.39


