
We noticed you are blocking ads. DO THE TON only works with community supporters. Most are active members of the site with small businesses. Please consider disabling your ad blocking tool and checking out the businesses that help keep our site up and free.
You are using an out of date browser. It may not display this or other websites correctly.
You should upgrade or use an alternative browser.
You should upgrade or use an alternative browser.
Dr. Jekyll and Mr. Hyde ( a pair of KZ400s)
- Thread starter Nebr_Rex
- Start date
Joe Suzuki
Been Around the Block
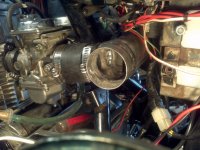
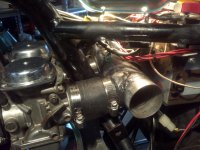
Be careful using hardware store rubber couplers. They will suck in at higher rpm's, and it get's worse as things warm up and they soften. This can suffocate you're engine and make it lean out. If you have metal almost all the way inside it, then no worries.
Nebr_Rex
Coast to Coast
Thank you for mentioning that. I did not take that into concideration. But I think I'll be okay.
What is not supported by metal is basically what's between the hose clamps. And the rubber
is also a 1/4 in. thick. I changed the jetting. Jet needle is now a straight shallow taper 10A.
Not an abrupt taper like the other two sizes of Keihin jet needles I have, 1A and 2A. Increased
the main to a 160 Keihin with the needle shimmed remains at .060. Idle is good and off idle
response is great. Now the top end is lean starting around 5k. Looks like I either need a little
more taper on the needle or take the shims out and use a bigger main.
.
Nebr_Rex
Coast to Coast
danker16
Been Around the Block
Nebr_Rex said:Bad part about it is that the engine had a knock. So this is a reminder that you need to check
and change your oil regularly. Because they do not make some parts for these old bikes
anymore.
.
what part is this?
Nebr_Rex
Coast to Coast
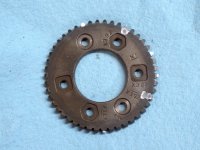
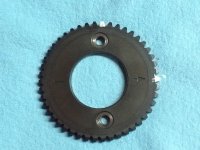
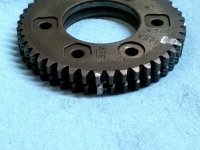
Bolting the KZ750/4 cam sprocket to the KZ440 cam can alter valve timing.
Using the different holes can result in advancing or retarding the cam. Rotation
of the sprocket is counterclockwise when mounted on the engine. The following
pics will show the different positions. The first pic is of the 440 sprocket with the
highlighted teeth showing the one closest to the top bolt hole. Then the 12th
tooth to where the timing mark is that lines up with the top of the head when
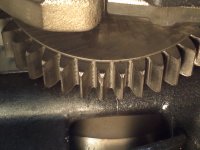
installed on the engine. The second pic is the 750/4 sprocket. The same sprocket
is used on the intake ( round hole ) and exhaust ( one of the other holes dependent
on the model ). The different marks correspond with tooth closest to the top bolt
hole and the 12th tooth for timing alignment.
.
Using the different holes can result in advancing or retarding the cam. Rotation
of the sprocket is counterclockwise when mounted on the engine. The following
pics will show the different positions. The first pic is of the 440 sprocket with the
highlighted teeth showing the one closest to the top bolt hole. Then the 12th
tooth to where the timing mark is that lines up with the top of the head when
installed on the engine. The second pic is the 750/4 sprocket. The same sprocket
is used on the intake ( round hole ) and exhaust ( one of the other holes dependent
on the model ). The different marks correspond with tooth closest to the top bolt
hole and the 12th tooth for timing alignment.
.
Attachments
Nebr_Rex
Coast to Coast
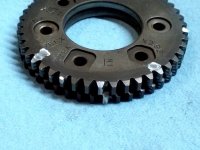
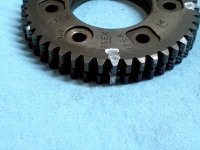
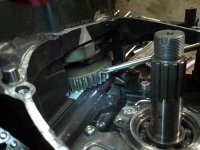
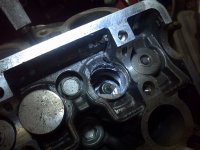
Just to let everyone know I haven't abandoned my projects. I've just been sidetracked lately.
Along with the KZ440 LTD bobber engine rebuild etc... . My cousin asked if I would look at his
sons mini sprint engine. They only got three races on their ' race preped ' r6 Yamaha. I was told
it never seemed to run right. Which turned out to be the titanium valve were shot and out of
adjustment. But on the third night out it started a nocking/squealing noise I was told. And this
is what I found, a broken tooth on the crank gear that drive the clutch basket. Looks like something
got caught between the teeth.
.
Attachments


Nebr_Rex
Coast to Coast
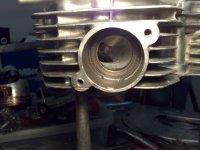
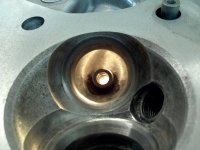
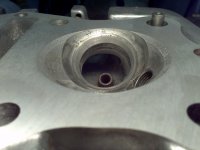
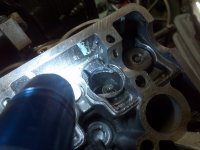
And the intake port.
If you look at the first pic. On the valve seat from the 12 o'clock to 2 o'clock
position is some serious pitting. I had to break out the old Sioux valve seat grinder
to remove the pitting on the 45° cut. I usually get by with just grinding the valves
lapping the seats, but not this time. Then I narrowed the seat down by cutting the
bottom 60° cut.
.
Attachments
Nebr_Rex
Coast to Coast
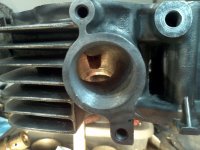
Cousin and his kid brought me a head today for their r6 mini sprint motor.
I can understand trying to keep the cost down. So instead of buying all
new titanium valves for their old head I was going to freshen up this one.
That would include a dip in the cycle shops ultrasonic cleaner and maybe
a touchup with stones by hand on the seats. Checked an intake and exhaust
valve on no. 1 cylinder and the seat and valve looked really good. Probably
be no need to touch the seats I thought. Until I seen an intake hanging open
on no.4. Maybe they should pony up the $1100 for new valves for their old head.
.
Attachments
Nebr_Rex
Coast to Coast
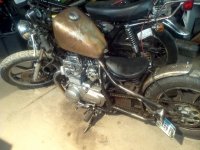
The bobber is done, owner is picking it up this weekend. Besides the engine
I rebuilt the forks, installed the new chain and sprockets and fabricated a brake
stay bar. The 'builder of this machine' just bolted it to the frame, not allowing
for chain adjustment. Also started regrinding a cam today. It's not a KZ but
the factory color is also green.
I rebuilt the forks, installed the new chain and sprockets and fabricated a brake
stay bar. The 'builder of this machine' just bolted it to the frame, not allowing
for chain adjustment. Also started regrinding a cam today. It's not a KZ but
the factory color is also green.
Attachments
rockcitycafe
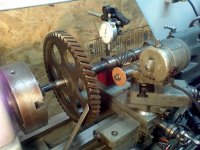
I make things.
that's a neat process, do you plan on any post grinding heat treatment? I've heard the chill hardening on cast iron isn't all that deep
rockcitycafe
I make things.
also... why the hell isn't anyone posting on this thread? The stuff you're doing is awesome!


