First time motor tear down

facefirst35

Coast to Coast
So I have a '71 CL175 that I'm tearing sort and rebuilding into a track bike style bike. The kick shaft has been sheared off, so it looks like in order to fix it I'll need to split the cases.

So do any of you fellas in the know have any advice when taking apart a motor?
 
Workshop manual is a must. Read it thoroughly and amass all the tools you need before you start.

Plus a clean, large enough bench / workspace to do the job.
 
I have a digital copy of the shop manual. Not ideal but it'll work. I've never worked on a motor before but I am pretty good with my hands. I mean I was able to rebuild a carburetor that was completely dismantled, so I assume a motor is just more of the same but more complicated.
 
lots of pictures, bag and tag EVERYTHING, get a bunch of bins or boxes and keep alike items with each other that way different things dont get mixed up if you take a prolonged break from the project. do the full tear down and make a parts list as you go along, then order it all at once and save yourself the shipping.
 
skatetheame said:
Print it out and bind it or throw it in a notebook, much easier to work with.

+1. My manual is on the computer and it's miserable. Nice to print it and then not worry about messing it up, because you can print another. Not that I've done that, so I am unhappily running to wash my hands and consult the computer all the time.

Keep a system for bagging (or otherwise containing) and labeling everything.

You might consider getting a complete set of studs and fasteners if available. I know it sounds like overkill, but it's nice (in my VERY limited experience) to have all new stuff to put in, and save whatever's left over that's useful from the original engine.

Definitely be prepared to find some less-than-awesome fasteners. 100% better to have replacements on-hand than to have to run to the store or, even worse, order online. Bolt/thread gauges also a huge help. Have EZ-outs on hand.
 
+1 to the FACTORY service and parts manuals. Use a Haynes manual as a secondary source and lastly a Clymer manual as a shim underneath your work table to make it level. And yes, printing and binding them is better than referring to a computer screen

+1 to photographs, notes and bagging.

As long as you are in there, new gaskets, seals and bearings.

Clean the exterior of the motor as best you can before you start. I use Simple Green.

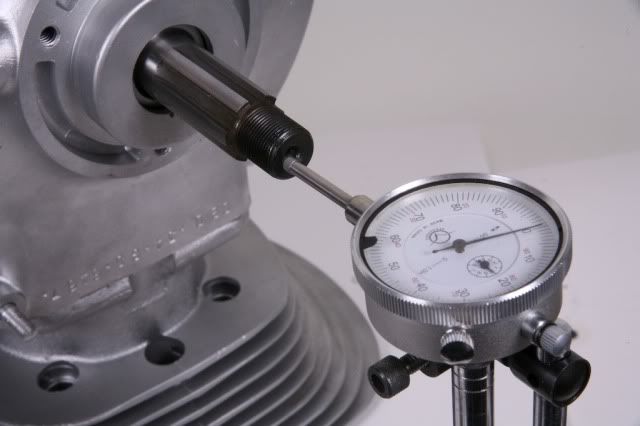
Keep a clean, uncluttered and well lit work surface free of other parts or unnecessary tools. Measure everything with proper calipers, micrometers and Plastic-Gauge and make note of the cylinder bores, ring gaps, valve stem diameters, journal diameters etc. Replace anything out of tolerance, worn, scored or questionable.

Clean, clean and clean everything again. Use gasket remover on old gasket and sealer residues. Now is the time to repaint and heat treat your cases now that they are apart.

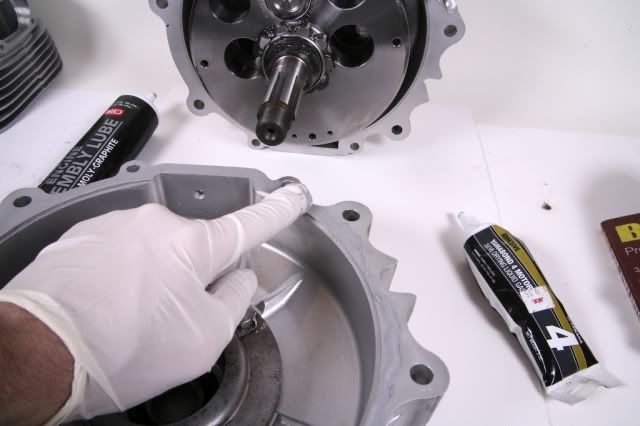
Rebuild carefully, slowly and by the book. Following the factory torque specifications, use anti-sieze, motor rebuild lube on the parts and Yamabond sealer on both halves of the cases.
IMG_9416-1.jpg


IMG_9338-Version2.jpg


IMG_9344-Version2.jpg


If you do not know what you are doing, STOP, do not guess- re-read the manual until you understand what you are doing and how. Once you have done this, it will be easier to do the next one. Do it right the first time and you will not have to redo it a second time. Good luck and post your progress.
 
Baking trays. Get a few cheap ones from your local store to segregate parts. Bag and tag of course plus lots of photos as it starts to come apart so that you can see how things were assembled.

Fortunately they are simple motors.
 
Beards are the key to splitting cases and so are skinny jeans if that fails heat helps. Like Swan we also like SimpleGreen but we like the lemon scent better but don't leave your aluminum carb parts in too long or it will change color. We like the stackable big plastic containers and we bag and tag everything in ziplock bags. If you are building a track style bike...the first thing they do is get rid of of the weight (no kick start needed or electric start) this way you can start a new fad by push starting your bike in full leathers. If you choose to fix the kick start consider keeping the electric start until you get to know the ins and outs of your bike and why it won't start. We still have our electric start one year later but no kick start. This will save you hours and hours of kick starting your 175 and trust me we will not pull your cafe racer DTT card for not learning the hard way. There are some seasoned twostrokers on this site that are gluttons for YOUR punishment and will say that your manhood is in question if you don't use a kick start especially if you are building a four stroke. I suggest getting a nine year old to mentor. That way you can lose valve keepers, brand new racing clutch springs, and various small things that go flying across the shed. Get a parts bike. Get one of those giant wand magnets that Home Depot has out for Christmas and you will thank me later. Do NOT use your significant other shared appliances no matter how tempting it seems to be. Yes the oven will give you a baked enamel paint job and the crockpot will clean your carbs but consider the ramifications.


Do yourself a favor and go read Swans build. It is insane. His pictures are museum quality and so are his bikes...with one caveat he rides his. Teazer has carnal knowledge of the 175. Google "Teazer 175" read every post. Read Sonreir's how to build a functional cafe racer. GO FOR IT!


Sent from my iPad using Tapatalk
 
Back
Top Bottom