We noticed you are blocking ads. DO THE TON only works with community supporters. Most are active members of the site with small businesses. Please consider disabling your ad blocking tool and checking out the businesses that help keep our site up and free.
You are using an out of date browser. It may not display this or other websites correctly.
You should upgrade or use an alternative browser.
You should upgrade or use an alternative browser.
FRANKENHONDA II the 1982 DOHC CB 750F2 Build
- Thread starter cb250nproject
- Start date

cb250nproject
If you can make it better do so
So I just went a little silly and got the cycle x high performance charging system  I’m hoping it’s well worth the money spent.
I’m wondering if this means I can safely run a lithium battery like anti gravity ??
Sent from my iPhone using DO THE TON
 I’m hoping it’s well worth the money spent.
 I’m wondering if this means I can safely run a lithium battery like anti gravity ??
Sent from my iPhone using DO THE TON
Maritime
Over 10,000 Posts
cb250nproject said:So I just went a little silly and got the cycle x high performance charging system
I’m wondering if this means I can safely run a lithium battery like anti gravity ??
Sent from my iPhone using DO THE TON
First off, looks great. Second the main thing you need to run LI battery is a modern R/R. Although the charging upgrade will be nice too. I think Sparck Moto sells the anti-gravity and they have the over/under charge protection in them so they are good batteries.
Sderbyshire
Into Sailing, classic Triumph cars and motorbikes.
I have the Sparc Moto regrec with a lithium battery on my cb360 and it’s worked well.
cb250nproject
If you can make it better do so
Kit comes with a R/R I hope it’s the goodsLightsOut said:I’m not an expert but from what I understand the cycle x kit is a permanent magnet solution, same as on older British bikes. Not convinced that’s an upgrade? A modern R/R is a good idea when running lithium battery though.
Sent from my iPhone using DO THE TON
Sent from my iPhone using DO THE TON
Attachments

Yeah no reason to think the R/R they include isn’t up to snuff! Just saying that being able to run a lithium battery doesn’t have to cost 500 bucks. A quality R/R for something like $120 new would work just as well. The cycle x system is lighter, which is nice, but unless the current stator is toast I’d put that money toward something else, but then I am a cheap bastard ")
Btw, can’t remember if you’ve posted but what’s your plan for exhaust? There’s a really sweet yoshimura replica one made by a member on cb1100f, youtube ’Chris Lee Design’ to see it.
Sent from my iPhone using DO THE TON
Btw, can’t remember if you’ve posted but what’s your plan for exhaust? There’s a really sweet yoshimura replica one made by a member on cb1100f, youtube ’Chris Lee Design’ to see it.
Sent from my iPhone using DO THE TON
cb250nproject
If you can make it better do so
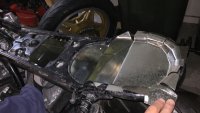
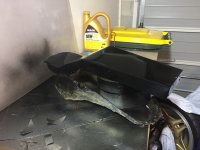
It’s pretty cold outside but I decided to get into the garage and tackle the battery tray.
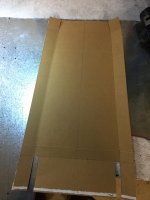
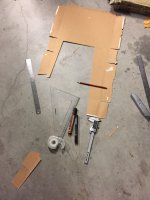
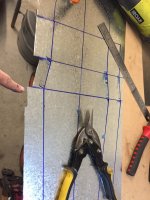
Got out the trusty cereal box / template cardboard and an arrangement of rulers, triangle, pencil, markers and a Stanley knife.
I measured up the space and began to make my template
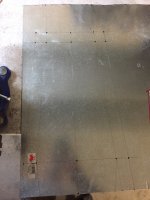
She came up alright so I began to mark up the gal sheet I had
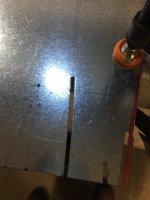
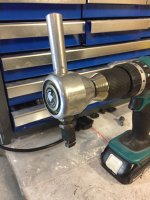
Luckily a friend of mine lent me an attachment for the drill which made cutting the sheet a whole lot easier and finished nicer than tinsnips
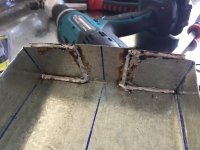
Once it was all cut out I started bending it all up into shape then drilled it out and pop riveted it.
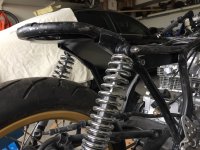
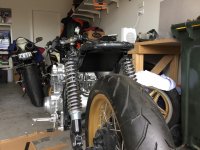
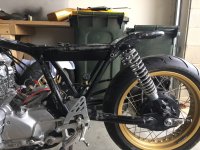
I bent one end so it would hook up under the frame, the other end is only partially finished
The unit needs to be siliconed and then sprayed black, I’m thinking I’ll need to weld some small tabs to the frame so the tray can be fastened
The ultima wiring unit and R/R fit with plenty on space, just the battery that will be the difficult part
I still need to make the section to fit in the area where the rear hoop is
Sent from my iPhone using DO THE TON
Got out the trusty cereal box / template cardboard and an arrangement of rulers, triangle, pencil, markers and a Stanley knife.
I measured up the space and began to make my template
She came up alright so I began to mark up the gal sheet I had
Luckily a friend of mine lent me an attachment for the drill which made cutting the sheet a whole lot easier and finished nicer than tinsnips
Once it was all cut out I started bending it all up into shape then drilled it out and pop riveted it.
I bent one end so it would hook up under the frame, the other end is only partially finished
The unit needs to be siliconed and then sprayed black, I’m thinking I’ll need to weld some small tabs to the frame so the tray can be fastened
The ultima wiring unit and R/R fit with plenty on space, just the battery that will be the difficult part
I still need to make the section to fit in the area where the rear hoop is
Sent from my iPhone using DO THE TON
Attachments
-
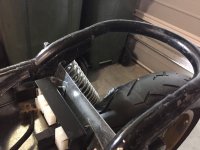 Image1530447264.496329.jpg1.6 MB · Views: 257
 -
 Image1530447187.790656.jpg1.6 MB · Views: 263
 -
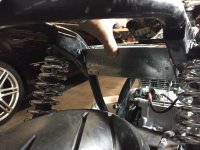 Image1530447171.049032.jpg1.5 MB · Views: 259
 -
 Image1530447154.505131.jpg1.6 MB · Views: 260
 -
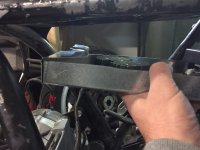 Image1530447034.463953.jpg1.6 MB · Views: 237
 -
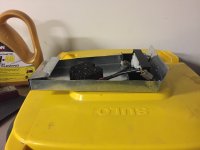 Image1530446947.676928.jpg1.4 MB · Views: 252
 -
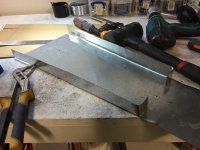 Image1530446828.116789.jpg1.7 MB · Views: 256
 -
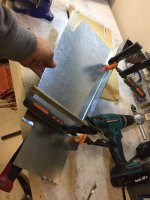 Image1530446786.810077.jpg1.7 MB · Views: 263
 -
 IMG_2670.JPG1.7 MB · Views: 245
 -
 IMG_2669.JPG1.6 MB · Views: 234
 -
 IMG_2668.JPG1.6 MB · Views: 227
 -
 IMG_2667.JPG1.7 MB · Views: 223
 -
 IMG_2666.JPG1.6 MB · Views: 223
cb250nproject
If you can make it better do so
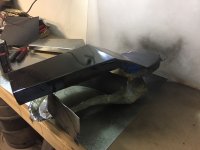
Wasn’t very happy with the tray so true to my form I had another crack at it
Sent from my iPhone using DO THE TON
Sent from my iPhone using DO THE TON
cb250nproject
If you can make it better do so
It’s a little better than the last one still have to sort how it will mount to the frame.
Perhaps a few more adjustments to make before spraying it up
Sent from my iPhone using DO THE TON
Perhaps a few more adjustments to make before spraying it up
Sent from my iPhone using DO THE TON
Attachments

cb250nproject
If you can make it better do so
Just a little more progress on the tray.
I riveted the rest of it and then siliconed the riveted and all spaces where water may get in. I sprayed it satin black, hopefully it will be dry tomorrow morning.
I’ve got some thin rubber matting for the inside.
I’m thinking I’ll use some bolts and spacers to keep the R/R up of the rubber so there is airflow all around it.
Sent from my iPhone using DO THE TON
Attachments
cb250nproject
If you can make it better do so
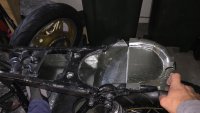
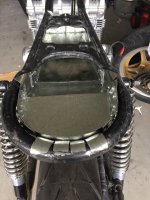
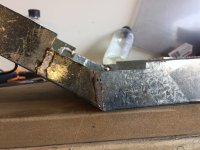
So after rigging up a heater in the garage to help dry the paint I was able to fit up the tray
I used a m6 bolt to thread through the tray onto an exisiting slot that was already in the frame.
I’m not entirely happy with the tray, I still need to work out a better way to fasten it to the back of the frame and I still think I need to line it with rubber and also have some rubber on parts that make contact with the frame the last thing I want is a rattle that’s not supposed to be there.
Sent from my iPhone using DO THE TON
Attachments
cb250nproject
If you can make it better do so
So I had a discussion with the old man about the electrical tray. He gave me some suggestions on how I could improve the section with a radius on it.
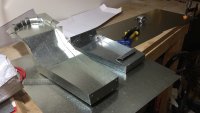
So here is Electrical tray version 4.0. The majority of V 3.0 was ok all except the radius and how it mounted to the frame
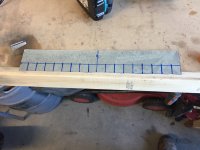
First I measured her all up again. Except this time I was doing the radius in 3 parts, so on the initial cut out all that is there is the base.
The next thing was at the back of the tray where it angled up and reduced in width I needed to cut the sides shorter to allow it to slip up and under the bike frame.
Next I used a combination of the bench vice and metal bender to start bending it into shape.
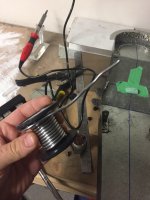
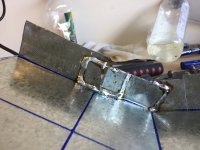
This time instead of using rivers which stick out and then need to be siliconed after I decided to use solder.
You have to prep both surfaces, unfortunately there was over spray from the previous tray on the metal so I had to hit that with turps, then wax and grease remover then the flux before soldering.
Next I soldered the sides where the tray angled up. Because in this section the width decreases from 185mm to 170 mm the continues up for another 100 mm at 170 mm wife to the base of the radius. I had to cut the sides then solder in a piece of metal on the inside.
The next thing I did was cut the sides for the radius, it was about 355mm long and 40mm wide plus 20mm for the tabs which I cut out to allow me to bend the radius.(credit to old man Murphy)
Then I used the metal bender to bend the tabs at a 90 degree before bending it then clamping it down. As I bent it I made the tabs go over, under, over, under so it would remain even. Once it was bent I clamped it down then soldered it in place.
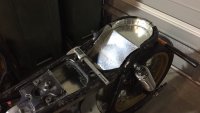
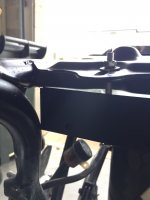
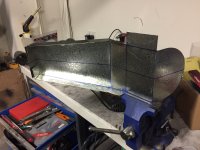
I put it in to see how I was going for fit and she was all good, so the next part was the flange that would sit along the top side of the tail hoop ( credit to old man Murphy for this idea).
So for this one I outlined the radius of the tray onto the sheet metal then went an additional 20 mm further to serve as the flange lip and in 20 mm for the tabs. Cutting the tabs on the inside of the radius was a little more challenging to try and keep them all even.
Once all the tabs had been cut I bent them all up at 90 using a pair or pliers, once this was done I put it into place and secured it with clamps before soldering it in place.
I had to trim the flange back a little at the base of the radius on both sides so it followed the bike frame as it tapered down
So that’s version 4.0 still needs to be sprayed but it was too late and I was happy with today’s progress, plus I want to work out how I’m going to run the electrical wires out I’ve bought rubber grommets and flexible conduit. I’ll have to work out everything that’s going in the tray and check what wiring is going to come out.
Still not 100% on battery location but we will see.
Sent from my iPhone using DO THE TON
So here is Electrical tray version 4.0. The majority of V 3.0 was ok all except the radius and how it mounted to the frame
First I measured her all up again. Except this time I was doing the radius in 3 parts, so on the initial cut out all that is there is the base.
The next thing was at the back of the tray where it angled up and reduced in width I needed to cut the sides shorter to allow it to slip up and under the bike frame.
Next I used a combination of the bench vice and metal bender to start bending it into shape.
This time instead of using rivers which stick out and then need to be siliconed after I decided to use solder.
You have to prep both surfaces, unfortunately there was over spray from the previous tray on the metal so I had to hit that with turps, then wax and grease remover then the flux before soldering.
Next I soldered the sides where the tray angled up. Because in this section the width decreases from 185mm to 170 mm the continues up for another 100 mm at 170 mm wife to the base of the radius. I had to cut the sides then solder in a piece of metal on the inside.
The next thing I did was cut the sides for the radius, it was about 355mm long and 40mm wide plus 20mm for the tabs which I cut out to allow me to bend the radius.(credit to old man Murphy)
Then I used the metal bender to bend the tabs at a 90 degree before bending it then clamping it down. As I bent it I made the tabs go over, under, over, under so it would remain even. Once it was bent I clamped it down then soldered it in place.
I put it in to see how I was going for fit and she was all good, so the next part was the flange that would sit along the top side of the tail hoop ( credit to old man Murphy for this idea).
So for this one I outlined the radius of the tray onto the sheet metal then went an additional 20 mm further to serve as the flange lip and in 20 mm for the tabs. Cutting the tabs on the inside of the radius was a little more challenging to try and keep them all even.
Once all the tabs had been cut I bent them all up at 90 using a pair or pliers, once this was done I put it into place and secured it with clamps before soldering it in place.
I had to trim the flange back a little at the base of the radius on both sides so it followed the bike frame as it tapered down
So that’s version 4.0 still needs to be sprayed but it was too late and I was happy with today’s progress, plus I want to work out how I’m going to run the electrical wires out I’ve bought rubber grommets and flexible conduit. I’ll have to work out everything that’s going in the tray and check what wiring is going to come out.
Still not 100% on battery location but we will see.
Sent from my iPhone using DO THE TON
Attachments
-
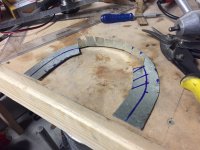 Image1530876884.459478.jpg1.7 MB · Views: 284
 -
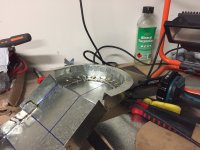 Image1530876962.247579.jpg1.6 MB · Views: 251
 -
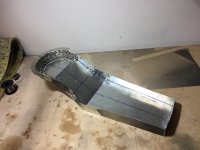 Image1530877055.457516.jpg1.5 MB · Views: 271
 -
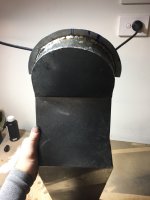 Image1530877097.157736.jpg1.4 MB · Views: 274
 -
 Image1530877196.498325.jpg1.7 MB · Views: 268
 -
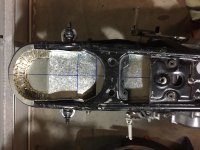 Image1530877219.165327.jpg1.7 MB · Views: 241
 -
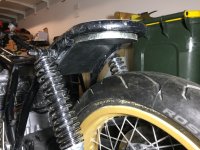 Image1530877239.356952.jpg1.7 MB · Views: 245
 -
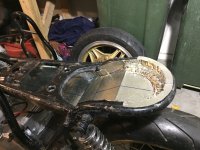 Image1530877262.044601.jpg1.8 MB · Views: 287
 -
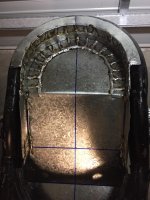 Image1530877275.932314.jpg205 KB · Views: 263
 -
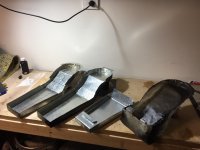 Image1530877294.316937.jpg1.5 MB · Views: 247
 -
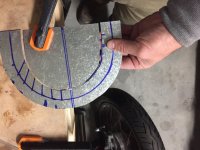 Image1530876533.259902.jpg1.7 MB · Views: 267
 -
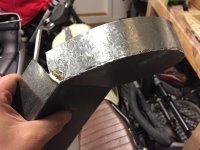 Image1530876398.175340.jpg1.6 MB · Views: 272
 -
 IMG_2754.JPG1.8 MB · Views: 227
 -
 IMG_2756.JPG1.7 MB · Views: 225
 -
 IMG_2758.JPG1.6 MB · Views: 222
 -
 IMG_2761.JPG1.6 MB · Views: 225
 -
 IMG_2771.JPG1.8 MB · Views: 215
 -
 IMG_2772.JPG1.6 MB · Views: 207
 -
 IMG_2774.JPG1.6 MB · Views: 208
 -
 Image1530876065.139430.jpg1.6 MB · Views: 236
 -
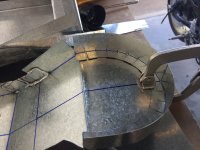 Image1530876247.323169.jpg1.7 MB · Views: 239
 -
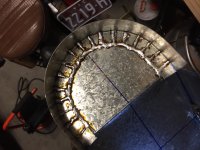 Image1530876321.277756.jpg1.7 MB · Views: 252
cb250nproject
If you can make it better do so
I think a lick of paint is about all she will be getting electrical tray is done1fasgsxr said:Now finish it out nice and smooth and use it for a mold and make a fiberglass one....again...lol..or vacuum bag a nice carbon fiber one.
Sent from my iPhone using DO THE TON
cb250nproject
If you can make it better do so
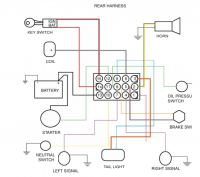
so I was looking at the diagram for the Ultima Wiring Harness I purchased and I believe I've purchased it in error as all their stuff seems to be for Harley Davidson V twin and this is a 4 cylinder.
Ive compared this to a diagram I found on here for the DOHC wring and there is provision for cable going to two spark units then to two coils
As I read it looks like there is only a feed for a single coil :/ Before I go and make the loom from scratch can anyone confirm this is the case, I'm electrically challenged at best
cheers in advance
thanks in advance
Attachments
cb250nproject
If you can make it better do so
Alex jb said:Good work, what does V4 weigh compared to V3?
Your talking perhaps 200- 300 grams with V4 there is the additional flange on top also.
That’s by eye the roll of solder is 250 grams and that’s what’s left on it.
If you were all about weight reduction I think the rivets would be the way to go but this bike won’t be breaking any land speed records
Sent from my iPhone using DO THE TON