We noticed you are blocking ads. DO THE TON only works with community supporters. Most are active members of the site with small businesses. Please consider disabling your ad blocking tool and checking out the businesses that help keep our site up and free.
You are using an out of date browser. It may not display this or other websites correctly.
You should upgrade or use an alternative browser.
You should upgrade or use an alternative browser.
Greetings - from deepest darkest Africa BMW R100
- Thread starter cafe99
- Start date
cafe99
Retro classics
Thanks guys for the inspiration and encouragment. This is my first project bike and I really don't want to lose focus. Anyone can strip shit down, but putting it back together so that it doesn't look like a backyard hack job and looks similar to some of the work you guys have done on this site is going to be the challenge.
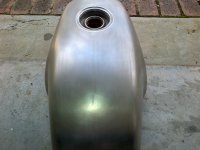
I stripped the tank down to bare metal this weekend and repaired two small dents with spot putty.
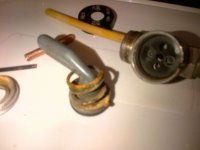
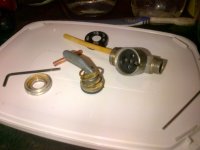
I also took the petcocks apart. The one was leaking and upon the disassembly I saw it was full of dried "stuff in there and could have caused a leak. Anyway, cleaned them out properly. All the seals seemd 100%, so oiled the assembly, put it back together and it is now clicking away like a bought one for zero cost. We will see when I assemble them onto the tank though.
Next week I will tackle the forks and trees. Strip them off the bike for cleaning and painting or polishing. Not sure of the finish and colour schemes I want yet.
I stripped the tank down to bare metal this weekend and repaired two small dents with spot putty.
I also took the petcocks apart. The one was leaking and upon the disassembly I saw it was full of dried "stuff in there and could have caused a leak. Anyway, cleaned them out properly. All the seals seemd 100%, so oiled the assembly, put it back together and it is now clicking away like a bought one for zero cost. We will see when I assemble them onto the tank though.
Next week I will tackle the forks and trees. Strip them off the bike for cleaning and painting or polishing. Not sure of the finish and colour schemes I want yet.
Attachments
cafe99
Retro classics
So these last few weeks have been busy at work, and not lots of time to do the things I enjoy.
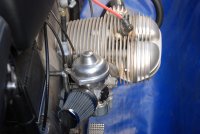
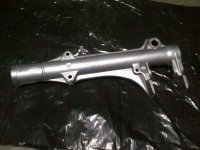
I stripped the front shocks. Cleaned up and resprayed the tubes with a clear gloss. The natural grey colour looks great.
I stripped the rear Brembo and will will get this powdercoated black.
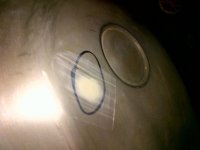
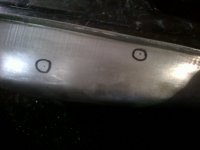
The tank is a complete balls up. I found two small pin holes, and with the oxyactelene set managed to repair them very nicely. Then on the other side of the petcock I found the whole section was paper thin and just bust through. I tried repairing it with a brass brazing rod and flux but this did not work. I then tried a low melt solder to lay down a thick base but also no luck. I think I will have to chop out the rotten section and silver solder a new piece of plate.
This was caused by the bike being stored for many years with fuel in the tank.
I stripped the front shocks. Cleaned up and resprayed the tubes with a clear gloss. The natural grey colour looks great.
I stripped the rear Brembo and will will get this powdercoated black.
The tank is a complete balls up. I found two small pin holes, and with the oxyactelene set managed to repair them very nicely. Then on the other side of the petcock I found the whole section was paper thin and just bust through. I tried repairing it with a brass brazing rod and flux but this did not work. I then tried a low melt solder to lay down a thick base but also no luck. I think I will have to chop out the rotten section and silver solder a new piece of plate.
This was caused by the bike being stored for many years with fuel in the tank.
Attachments

cafe99
Retro classics
Howzit All,
Been really busy at work and had little time for my project.
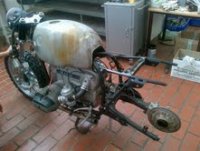
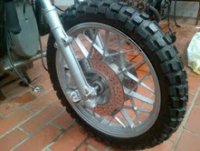
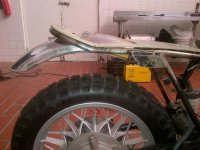
Update so far, I have put rubber on the wheels, and started doing the rear section. I was going to build a whole new rear from scratch, but decided to modify the original. A lot less effort and I think it will still look good.
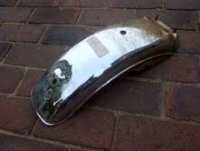
A bought an old rear fender from a place called the Bike Hospital. They must have thousands of bikes and parts lying all over their yard. Even picked up some old carbs pieces for my '76 Honda.
So looking forward to getting the bike completed, but at this rate I think it willl be now after Christmas
Been really busy at work and had little time for my project.
Update so far, I have put rubber on the wheels, and started doing the rear section. I was going to build a whole new rear from scratch, but decided to modify the original. A lot less effort and I think it will still look good.
A bought an old rear fender from a place called the Bike Hospital. They must have thousands of bikes and parts lying all over their yard. Even picked up some old carbs pieces for my '76 Honda.
So looking forward to getting the bike completed, but at this rate I think it willl be now after Christmas
Attachments
cafe99
Retro classics
Howzit,
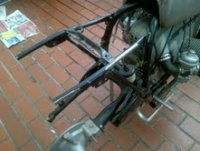
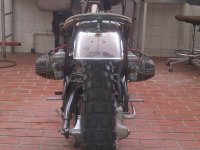
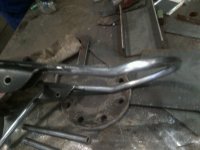
See pics below. I had some chromolly bent to the correct radius and welded back on. Also raised it a bit.
I know Ihave not posted for a while but with work and family I have not been able to afford this build the time it deserves. Anyway I am back on it and have done the following:
1. Front wheel, calipers and pads on and installed.
2. Rear wheel on, still busy painting caliper
3. Discs machined so are now nice and true.
4. Rear frame cut, bent and welded back together
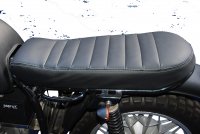
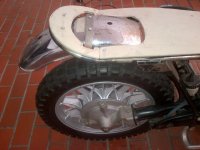
5. Seat pan cobbled together. I used some 8mm polyethylene sheet. It's great because is it sturdy, and you can cut it to shape really easy.
6. Bought a rear fender from a scrap dealer and chopped it to the size I need, then took a bit of time getting the correct angle and position, but I think now it is excatly where I want it.
7. Pulled the carbs off and right now busy stripping, refurbing and polishing them.
Things I still have to do:
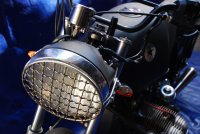
1. Busy making new headlight brackets (stainless steel)
2. Paint tank and fenders
3. Powder coat rear frame
4. Get seat foam and cover
5. Make battery bracket. I think I am going to install it underneath right behind the sump
That should keep me busy for a while.
Peace out
See pics below. I had some chromolly bent to the correct radius and welded back on. Also raised it a bit.
I know Ihave not posted for a while but with work and family I have not been able to afford this build the time it deserves. Anyway I am back on it and have done the following:
1. Front wheel, calipers and pads on and installed.
2. Rear wheel on, still busy painting caliper
3. Discs machined so are now nice and true.
4. Rear frame cut, bent and welded back together
5. Seat pan cobbled together. I used some 8mm polyethylene sheet. It's great because is it sturdy, and you can cut it to shape really easy.
6. Bought a rear fender from a scrap dealer and chopped it to the size I need, then took a bit of time getting the correct angle and position, but I think now it is excatly where I want it.
7. Pulled the carbs off and right now busy stripping, refurbing and polishing them.
Things I still have to do:
1. Busy making new headlight brackets (stainless steel)
2. Paint tank and fenders
3. Powder coat rear frame
4. Get seat foam and cover
5. Make battery bracket. I think I am going to install it underneath right behind the sump
That should keep me busy for a while.
Peace out
Attachments
compoundcycles
Been Around the Block
Can't wait to see what happens in Johannesburg. Welcome!
redbiker
Friend of BillW,trudging the road of Happy Destiny
I miss my 78 R100/7.He has the fairing off so it's no longer an RT. Left the side bag frames on, good call. They can be a pain to put on or pull off. The stock R100GS had the same exhaust as a R100RT. The GS were taller and had a skid plate I think. Any other changes are up to you. Air shocks/suspension? That sounds like a keeper to me.
Enjoy the bike and ride safe.
Enjoy the bike and ride safe.
cafe99
Retro classics
Ok, so I know it has been a while but with work, family etc etc.... I know excuses excuses. Anyway, I have finished my build and I realize that it is similar to a lot of builds out there, but like food, music and wine,.....if it's what you like, then it's great.
Attachments
cafe99
Retro classics
more pics