sprocket2cog
Been Around the Block
i just finished fitting the chinese oil cooler kit to the front of the frame on the ace and thought i would share the bracket plan and fitting tips.
the oil cooler came from china via aliexpress and the oil gauge kit i also fitted came from ebay as well as the aluminium sheet if you cant find 3mm alloy locally.
oil cooler- http://www.aliexpress.com/item/Medium-size-Oil-Cooler-Radiator-Cooling-Parts-Fit-CG125CC-CG150cc-Vertical-Motorcycle-Engine-Dirt-Bike-ATV/1878272075.html
aluminium plate 3mm marine grade http://www.ebay.com.au/itm/Aluminium-Sheet-Plate-Marin-Grade-Pvc-Coated-One-Side-300-X200-3-Mm-/221699467427
oil gauge kit- http://www.ebay.com.au/itm/Oil-Gauge-Kit-Inculdes-Oil-Tank-Black-Face-Oil-Pressure-Fitting-Motorcycle-/191522085336
banjo bolt adaptor for the oil gauge- http://www.ebay.com.au/itm/Russell-640700-M12-x-1-25-Banjo-Bolt-1-8-Fuel-Pressure-Gauge-Take-Off-Honda/231100197078
Materials- you will also need a piece of 3mm thick marine aluminium to fabricate the brackets
2x 25mm, 2x 50mm and 2x 60 M6 bolts, some spring washers and flat washers and a piece of rubber inner tube or similar to protect the frame from scratches.
Tools- i used a flat and round bastard file, a hack saw and coping saw, a center punch and a drill with a pilot drill and a 1/4 inch step drill to ream the holes .
i also used peratex aviation gasket #3 for the npt threads on the oil gauge as it is recommended for thread sealing, but dont use thread sealer on the banjo bolts thats what the crush washers are for.
1- mark out the plan of you aluminium sheet and make sure you have the holes lined up, it pays to experiment with a 3mm plywood template first so you can check it out.
.
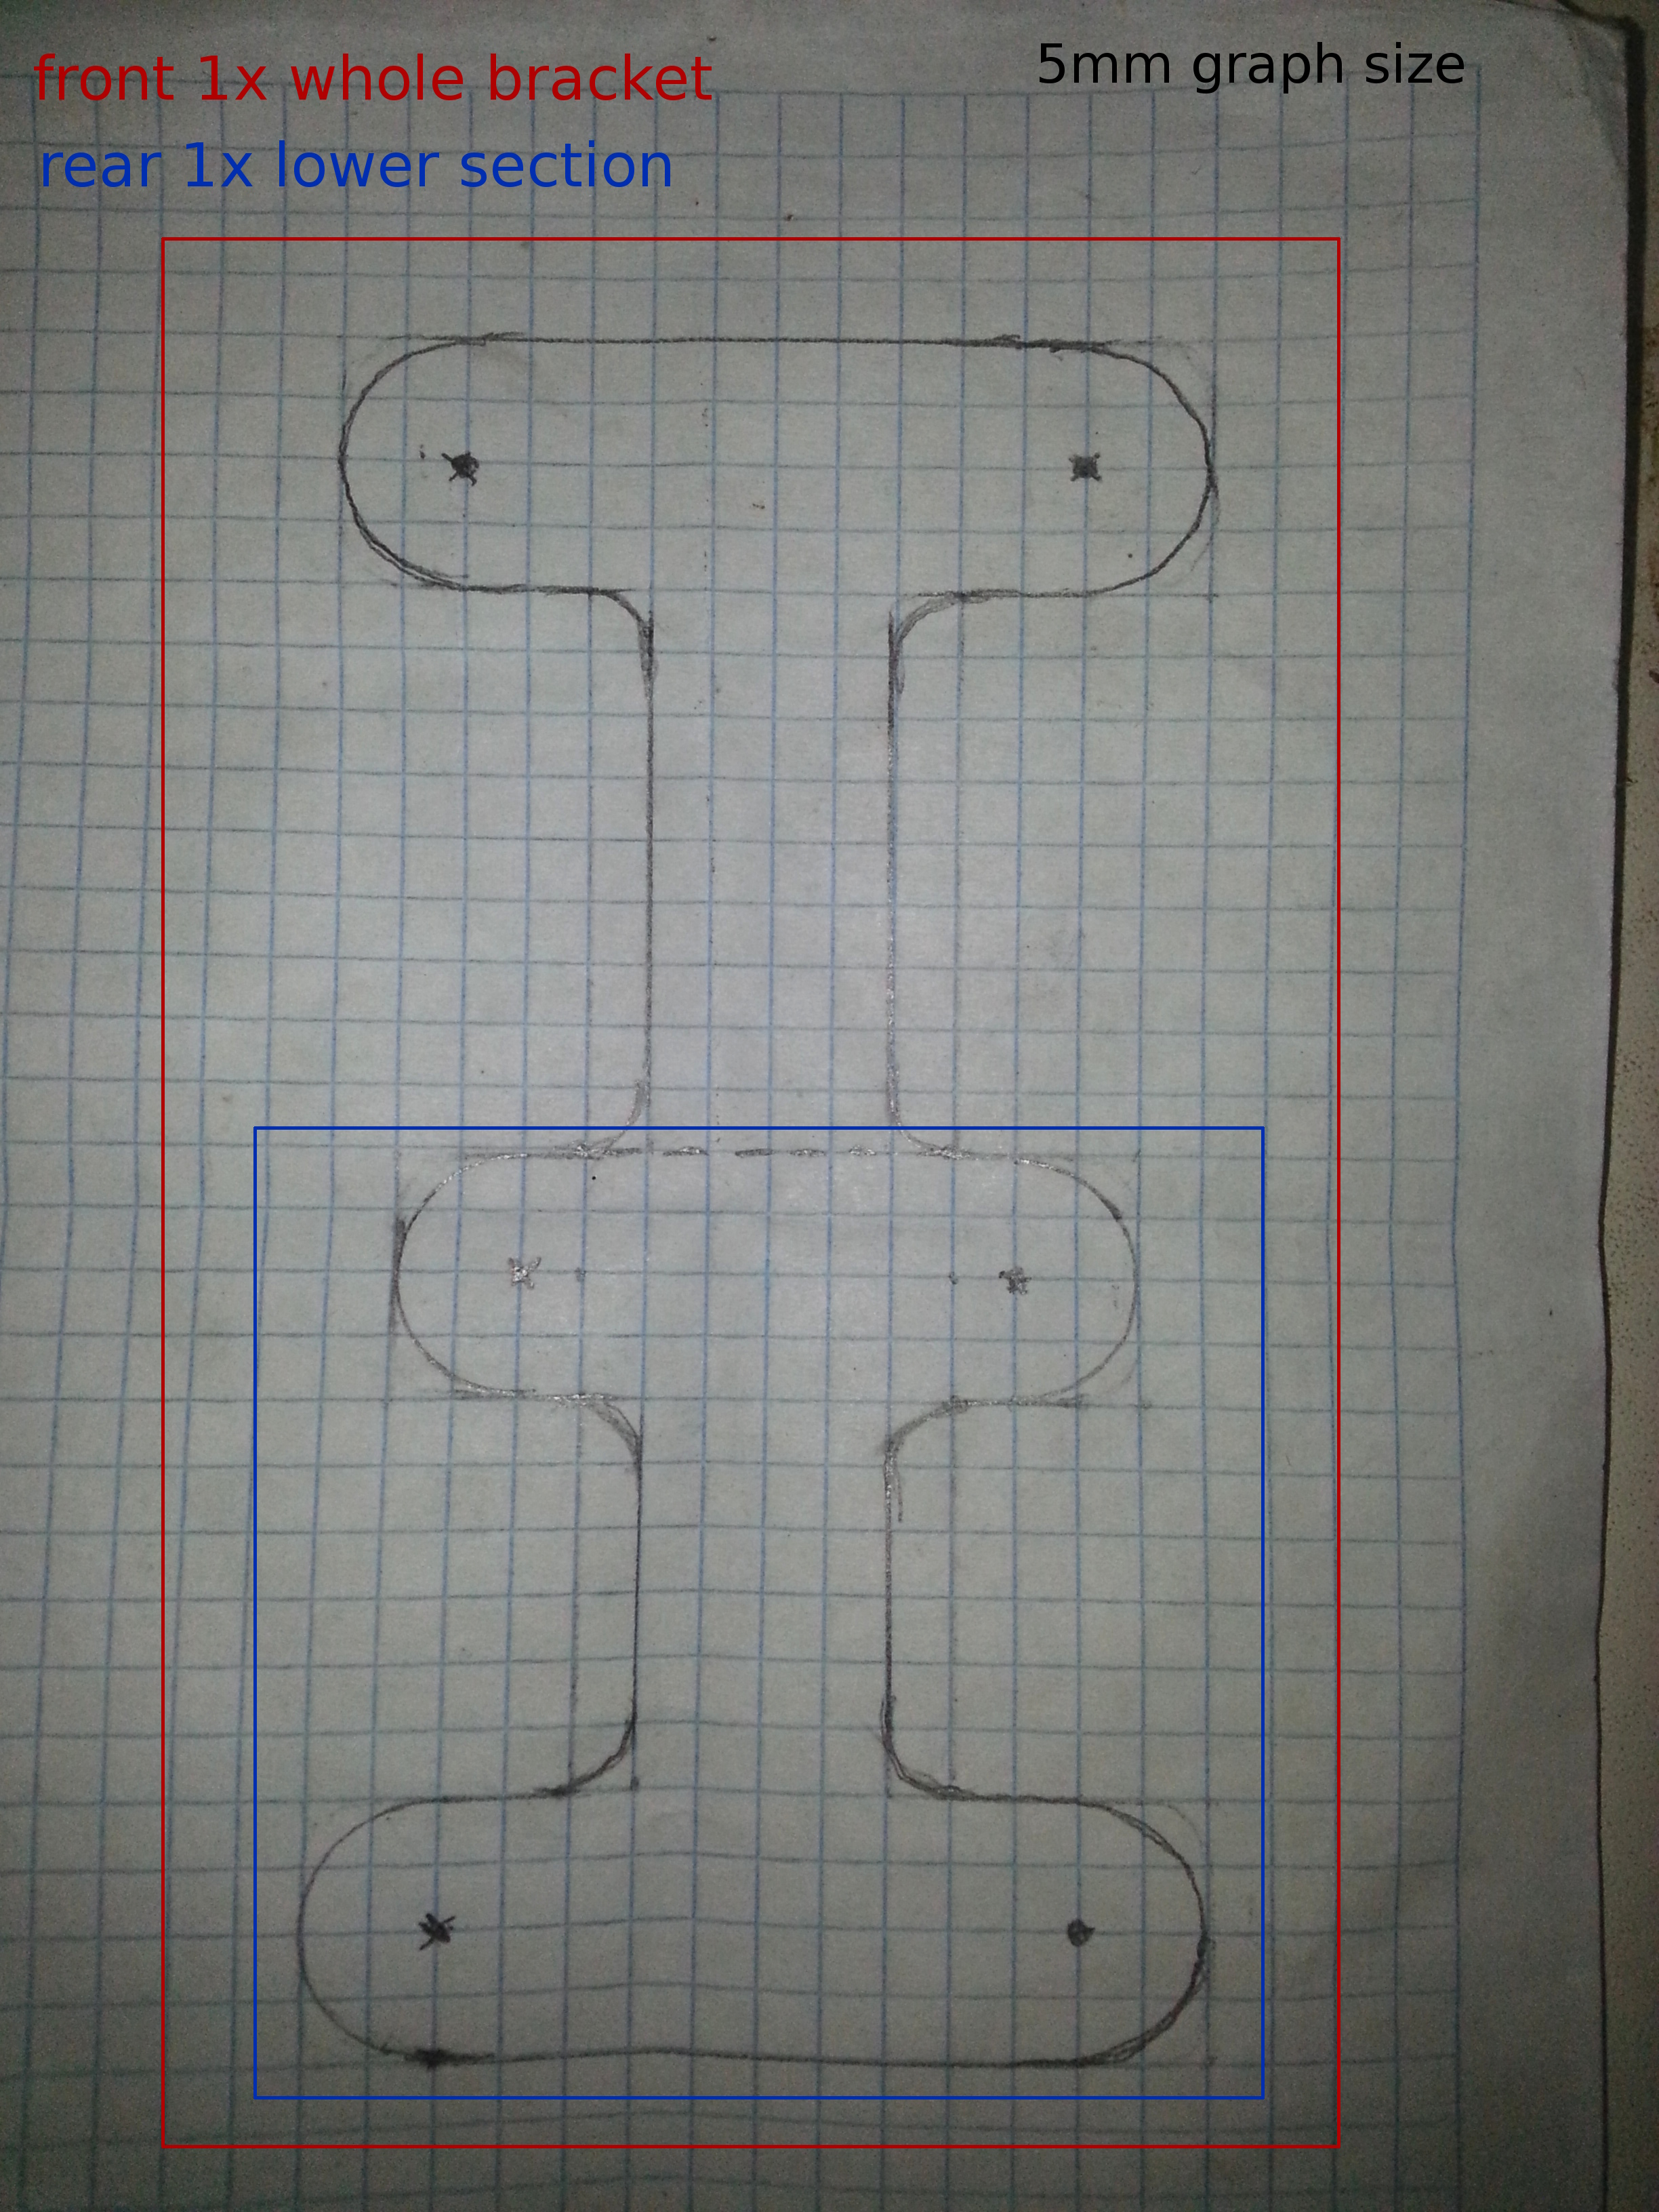
2.cut it out and drill out the holes, the holes need to 6.5mm to take 6mm bolts. but 1/4 inch will work fine and give you a little wiggle room to fit it. double check the spacing of the holes in the brackets before you drill.
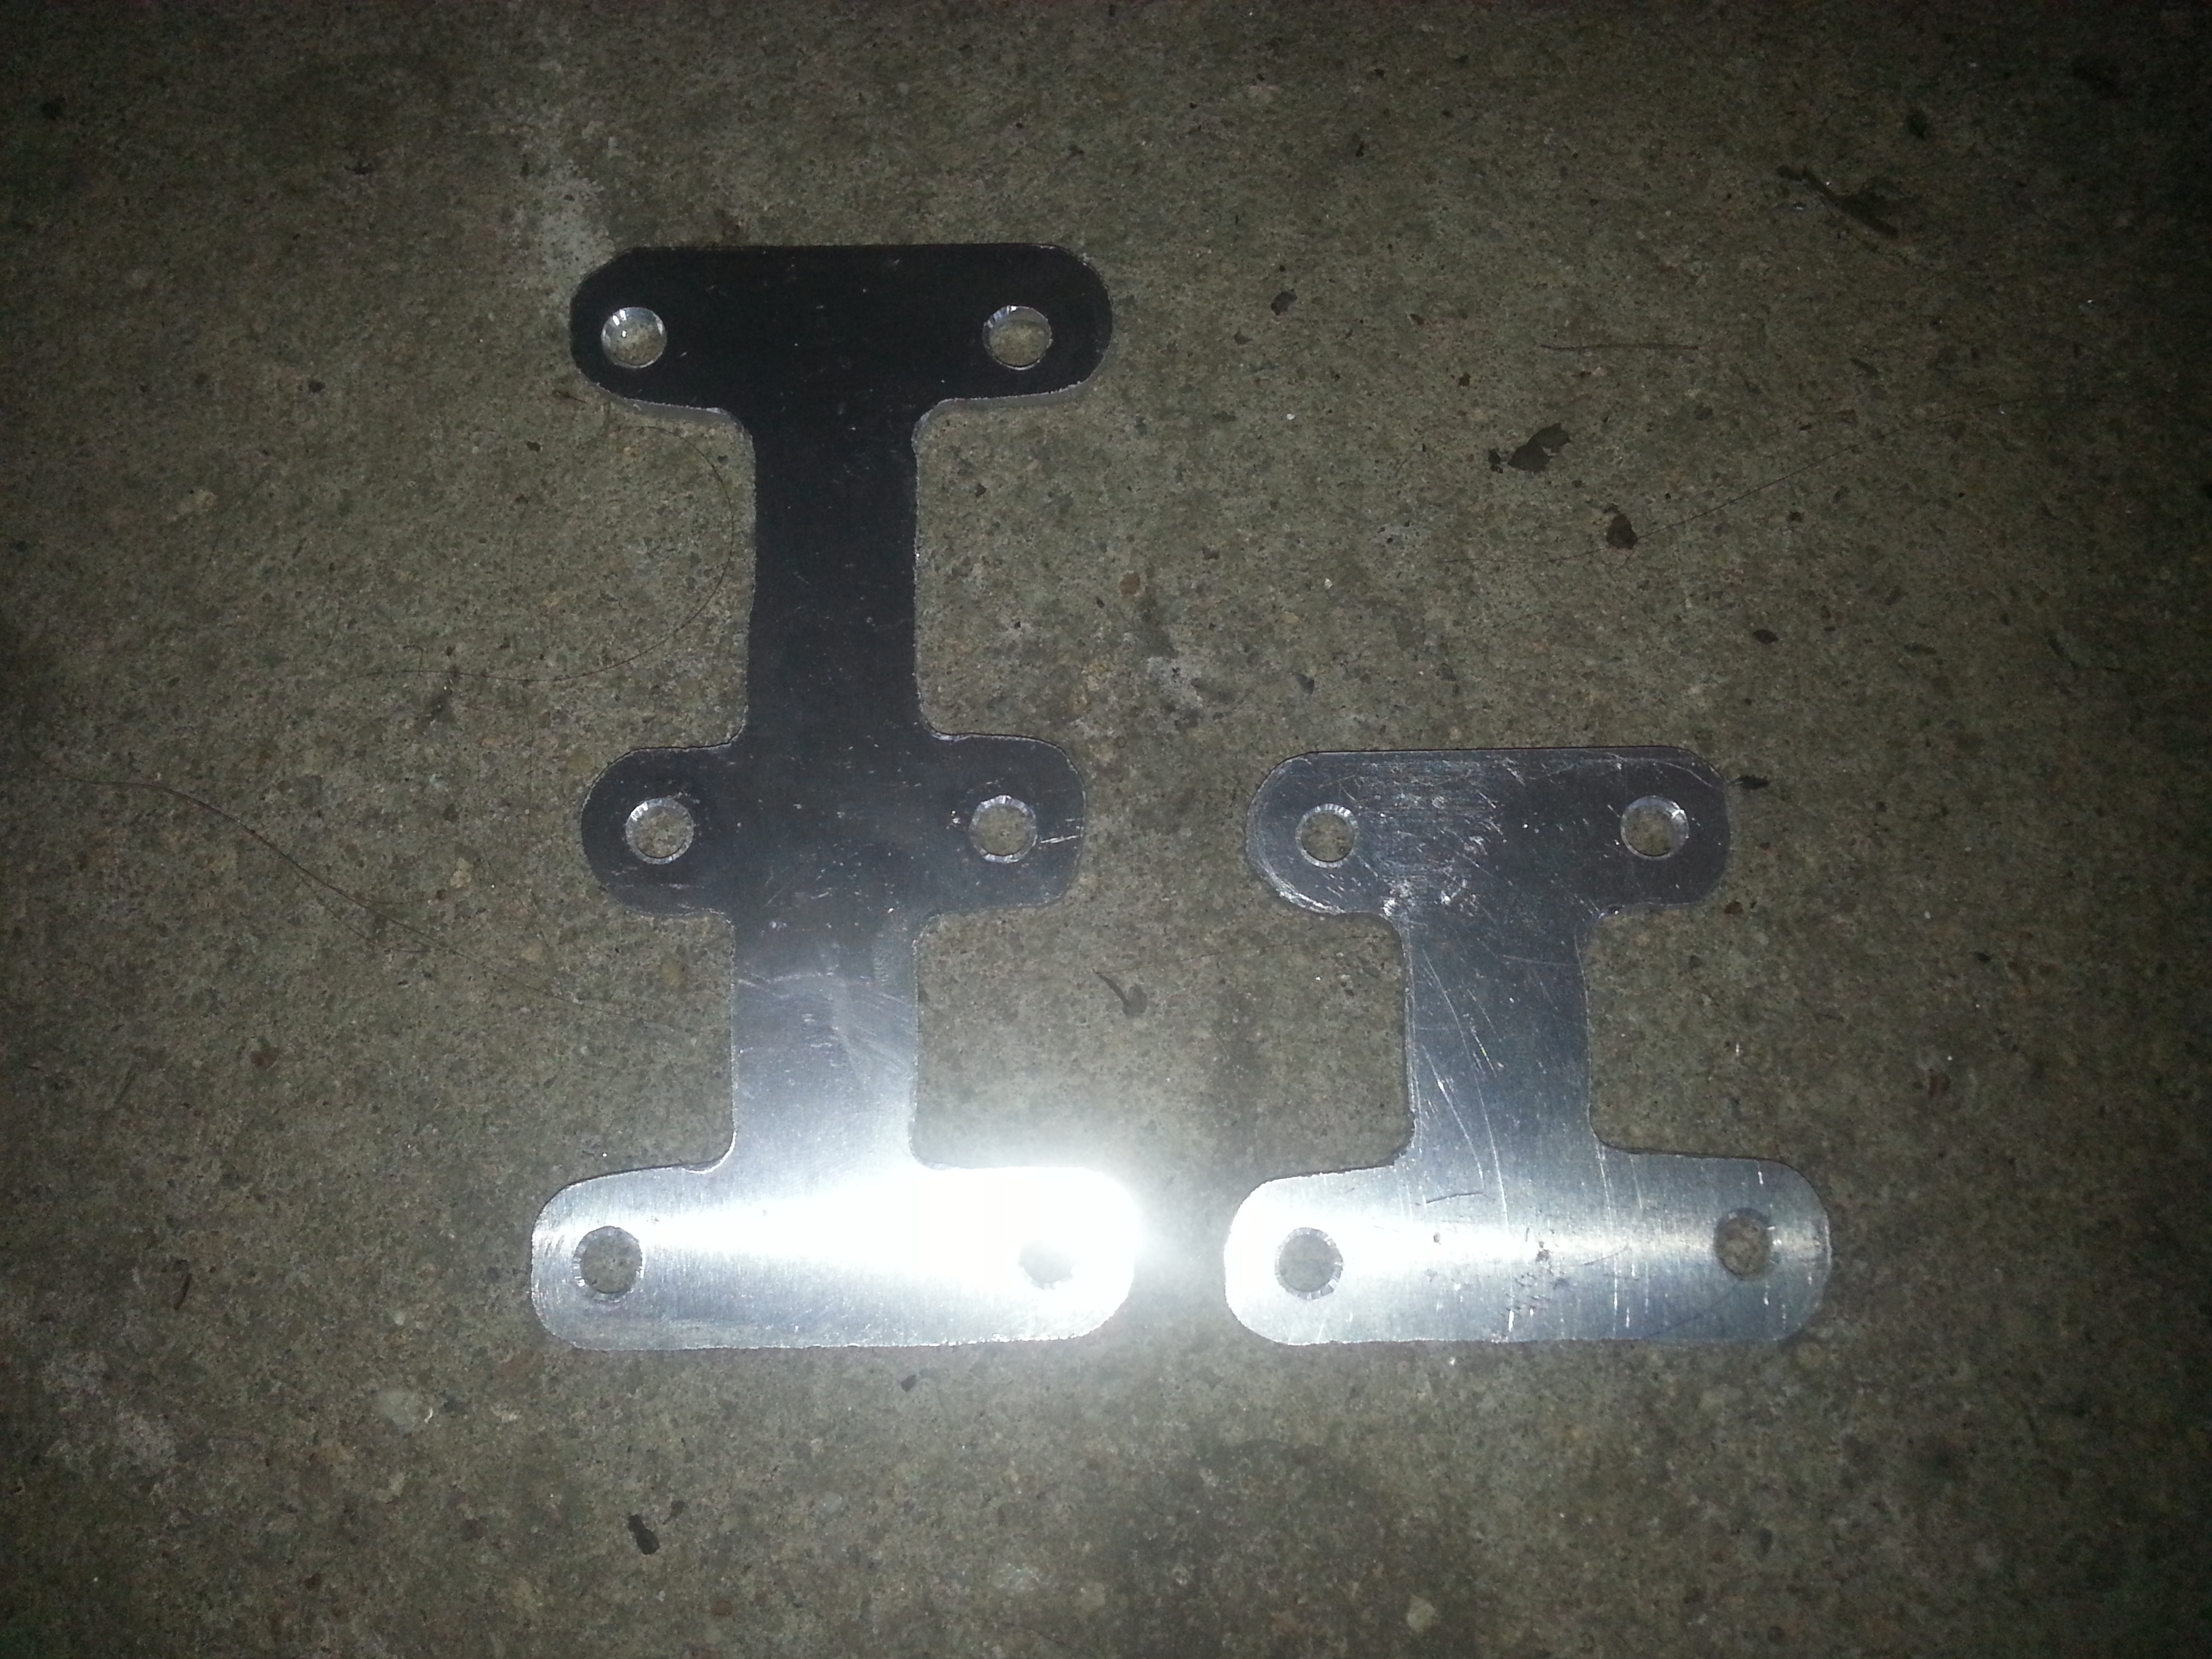
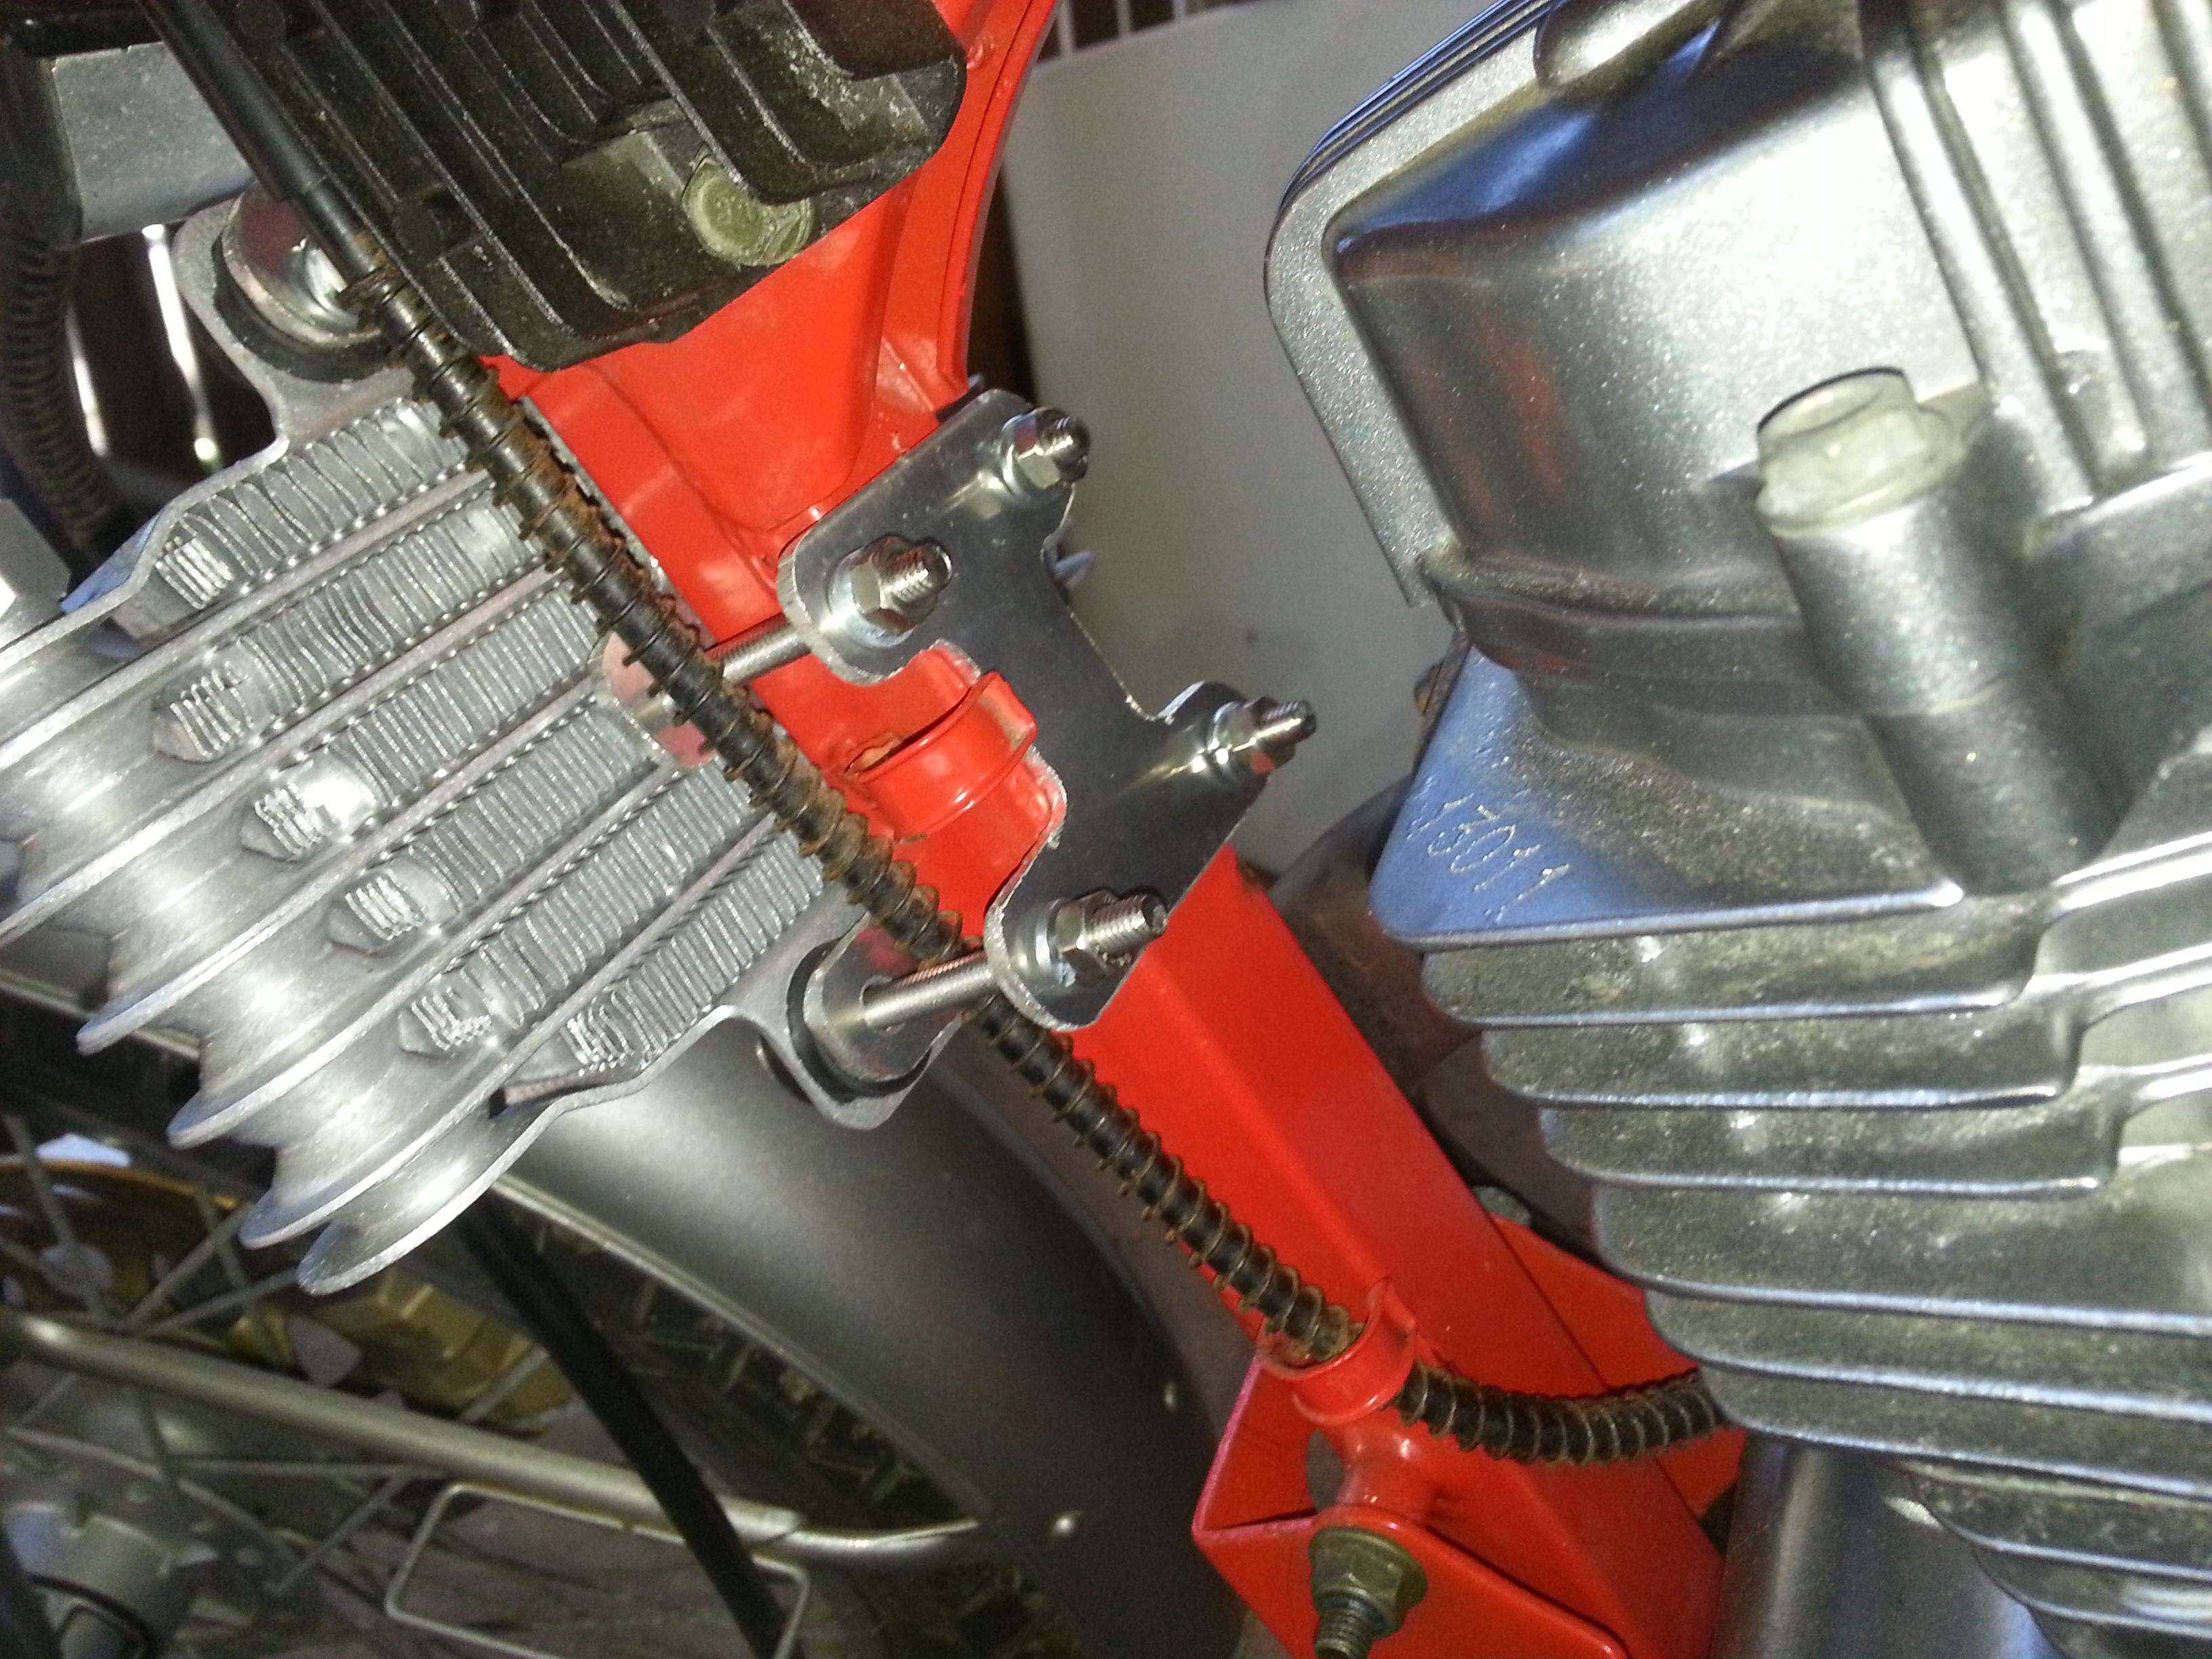
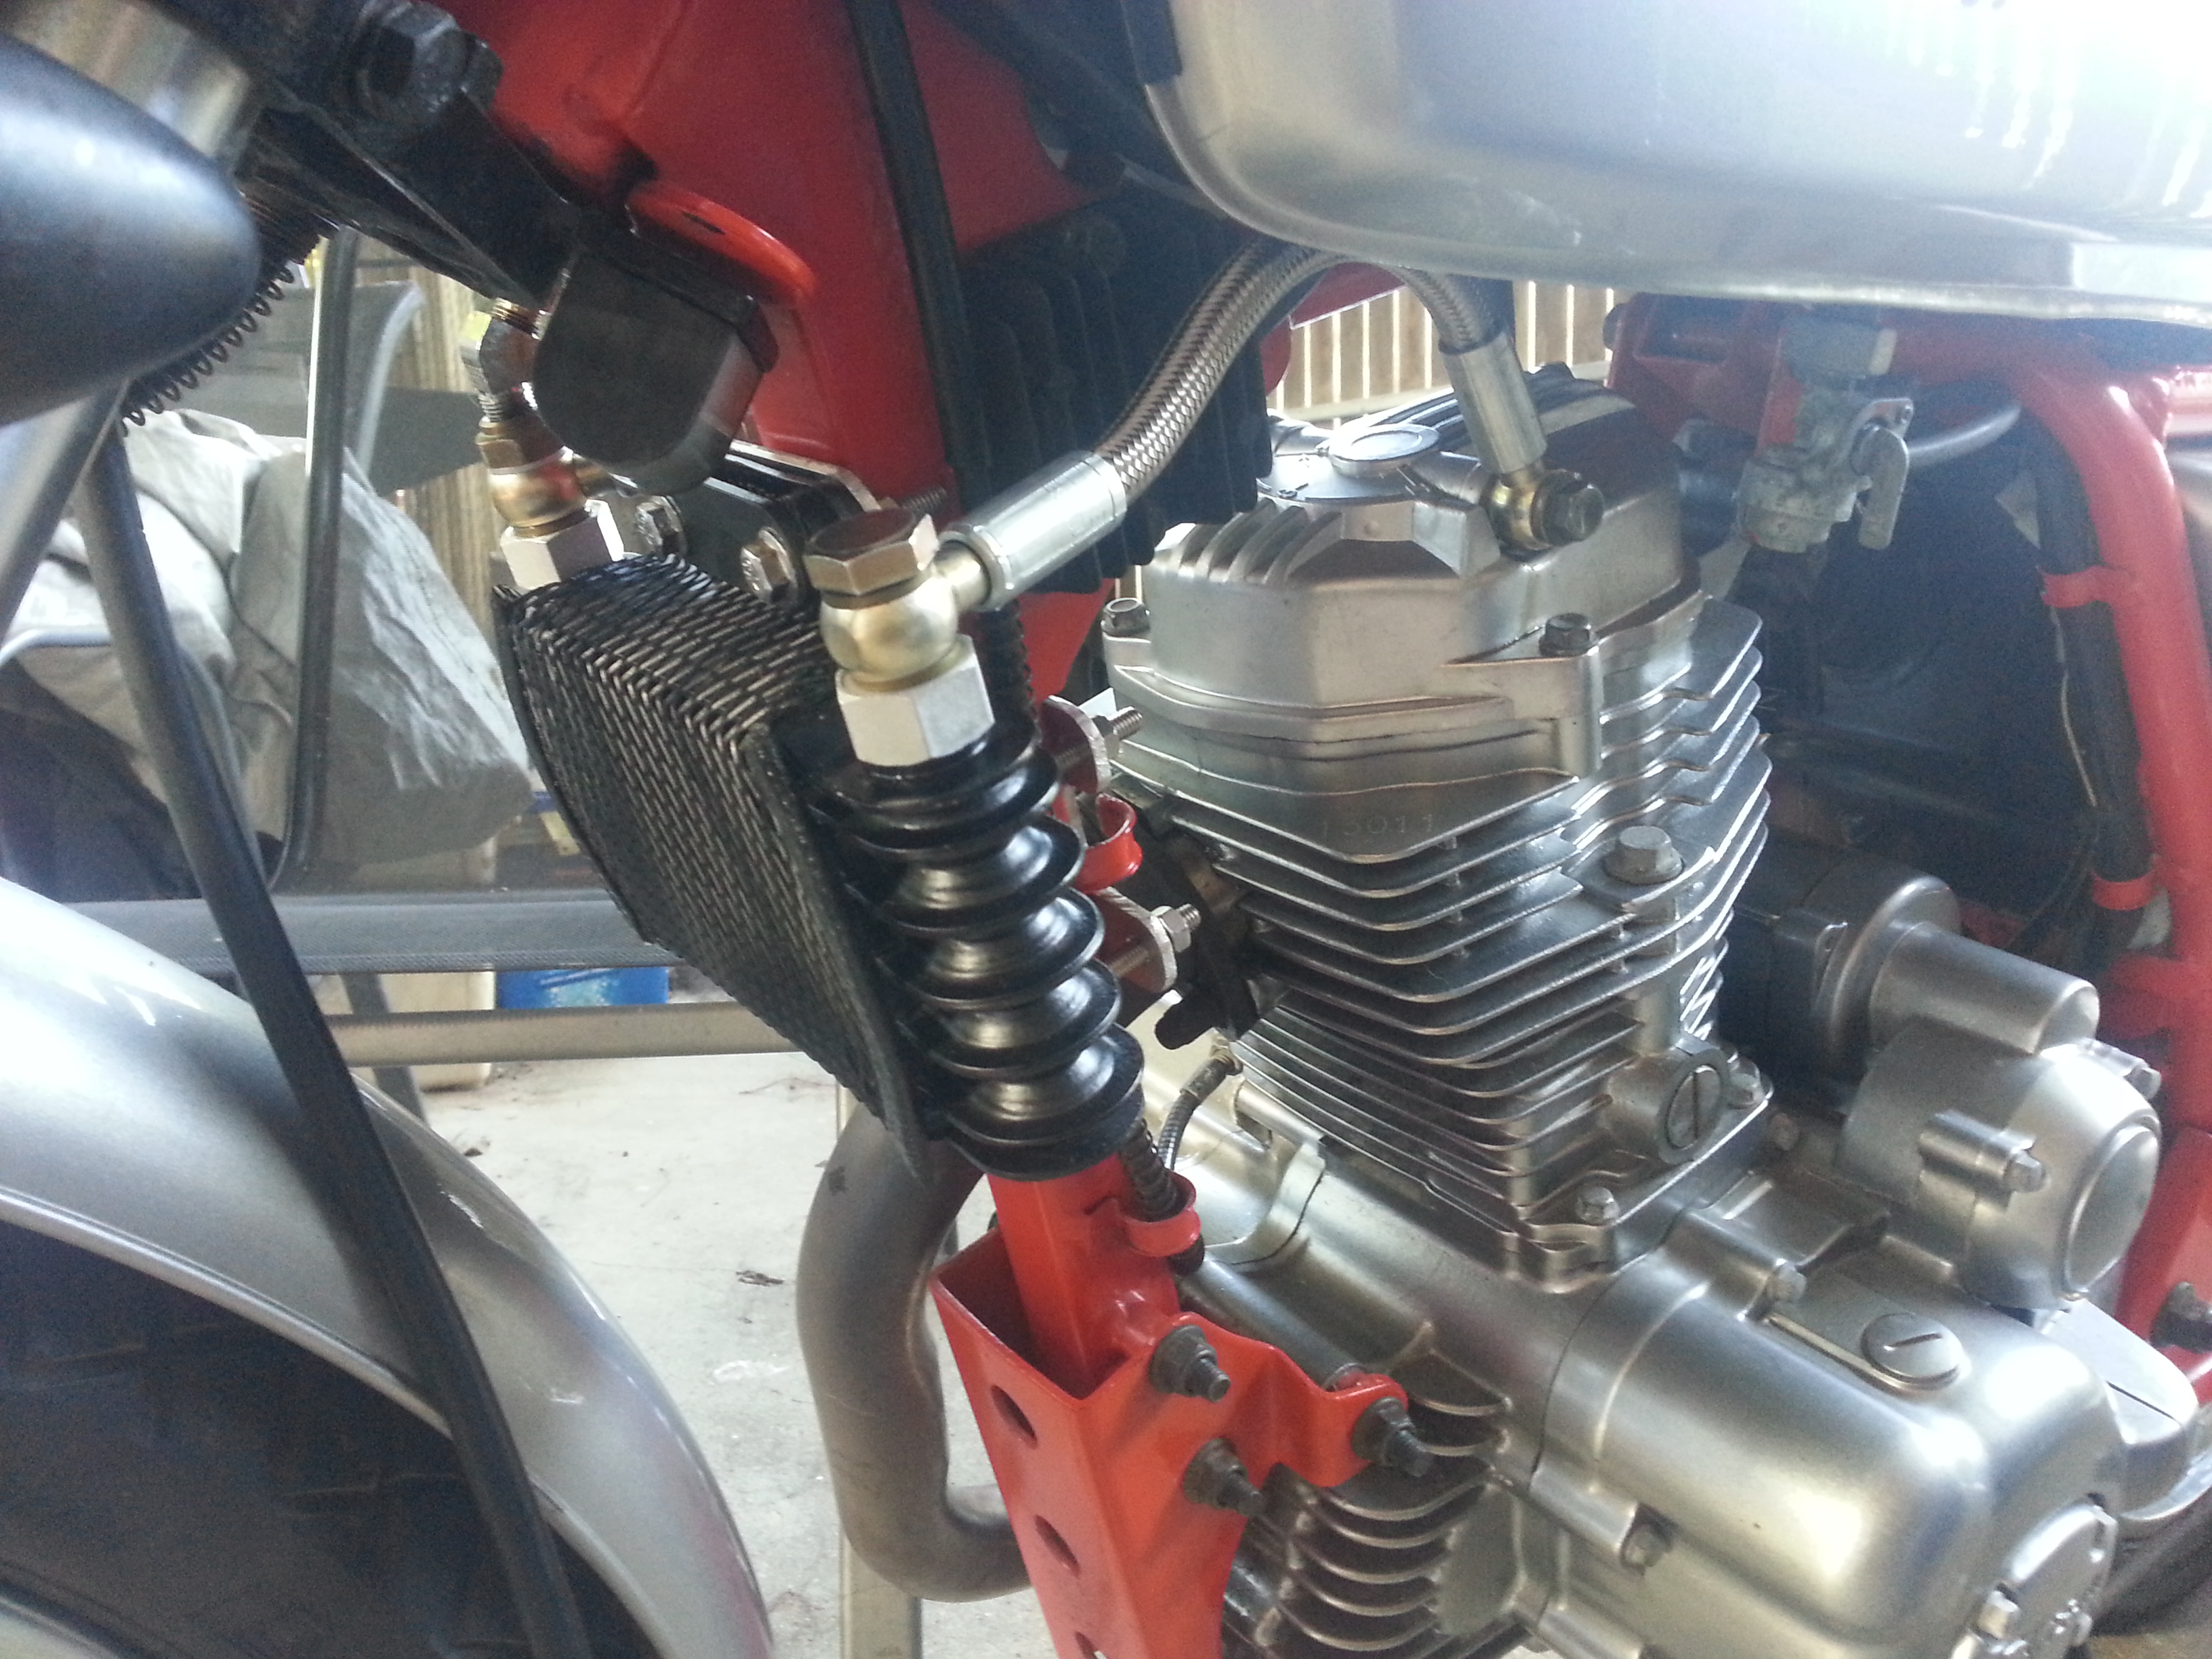
3.mount up the brackets with the taller front bracket lined up to the smaller back bracket. use a strip of thin rubber between the frame and brackets to stop scratches that will rust later.
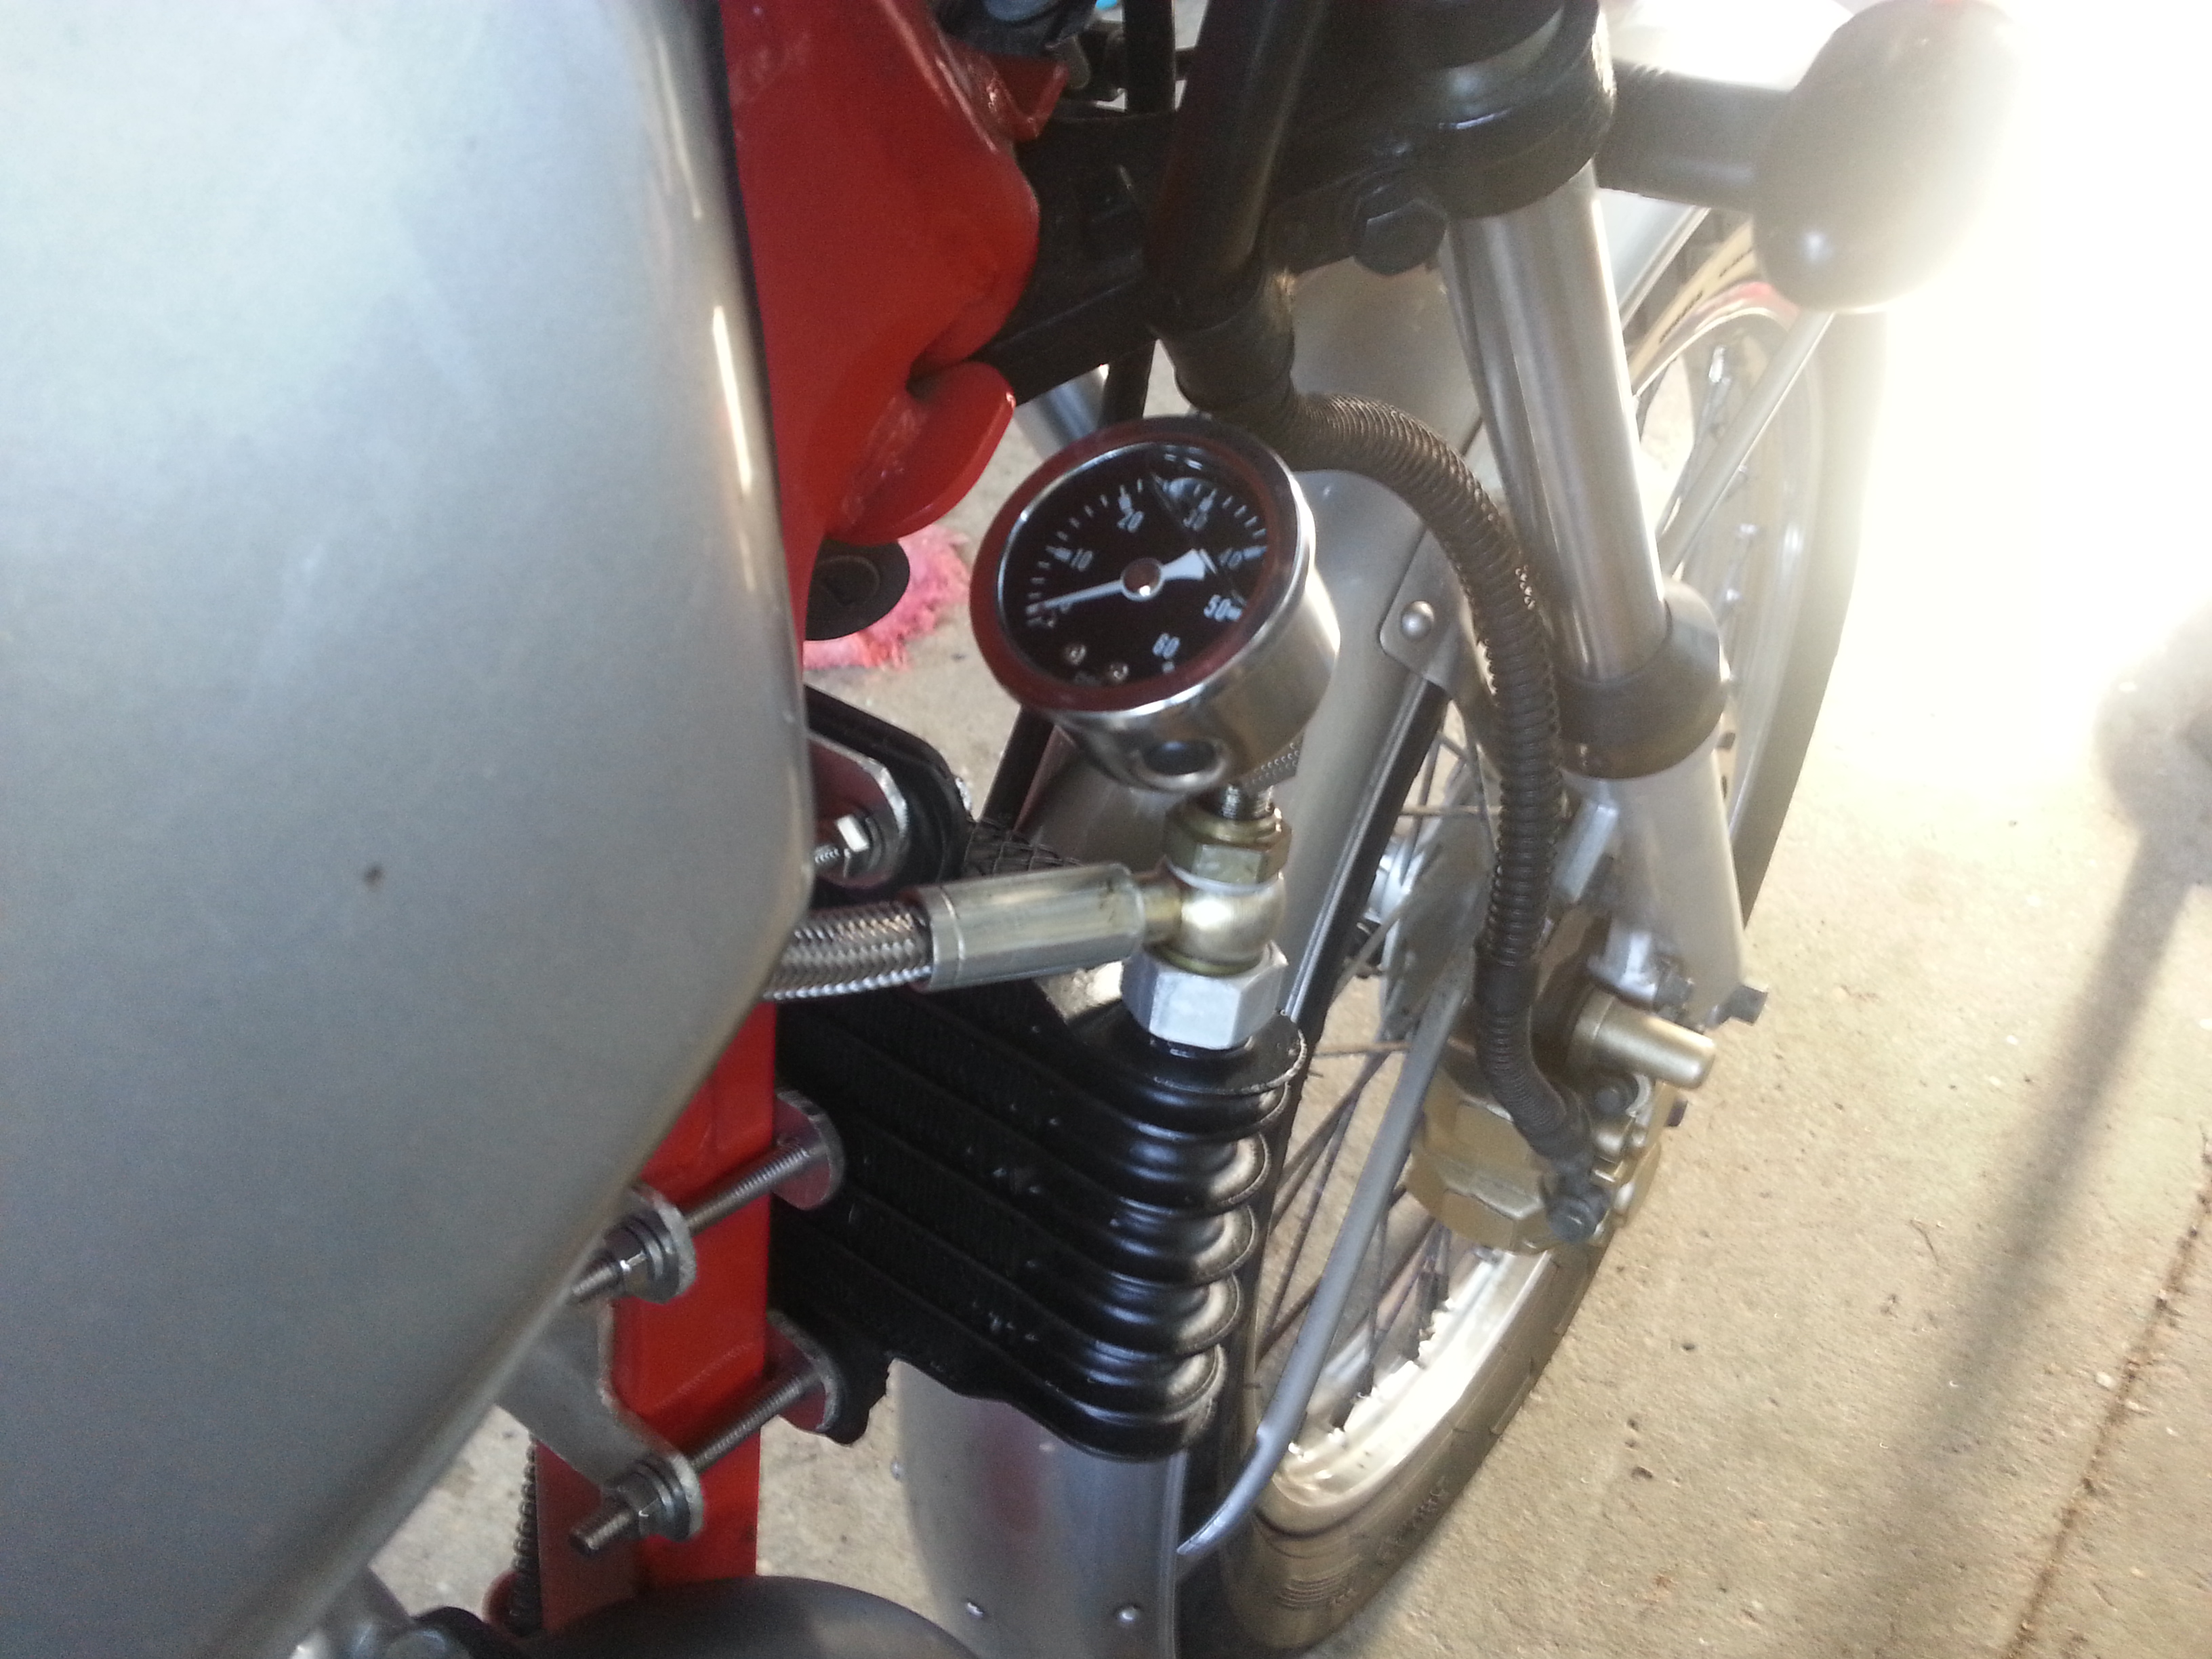
slide it up until it hits the frame like in the picture, but you may have to slide it down a few mm to clear the steering lock once you bolt the radiator on, when you have got it all lined up and test fitted, tighten up the center bolts then put on the radiator and do the other 4 bolts, Take note that you need to free the clutch cable from the top frame clip and make sure it goes behind the lower radiator bolt as in the next image. use spring washers on the back of the bolts and flat washers on the front where the bolts press into the rubber radiator mounts. ( i made flat aluminium plates instead as i also installed a grill over the front)
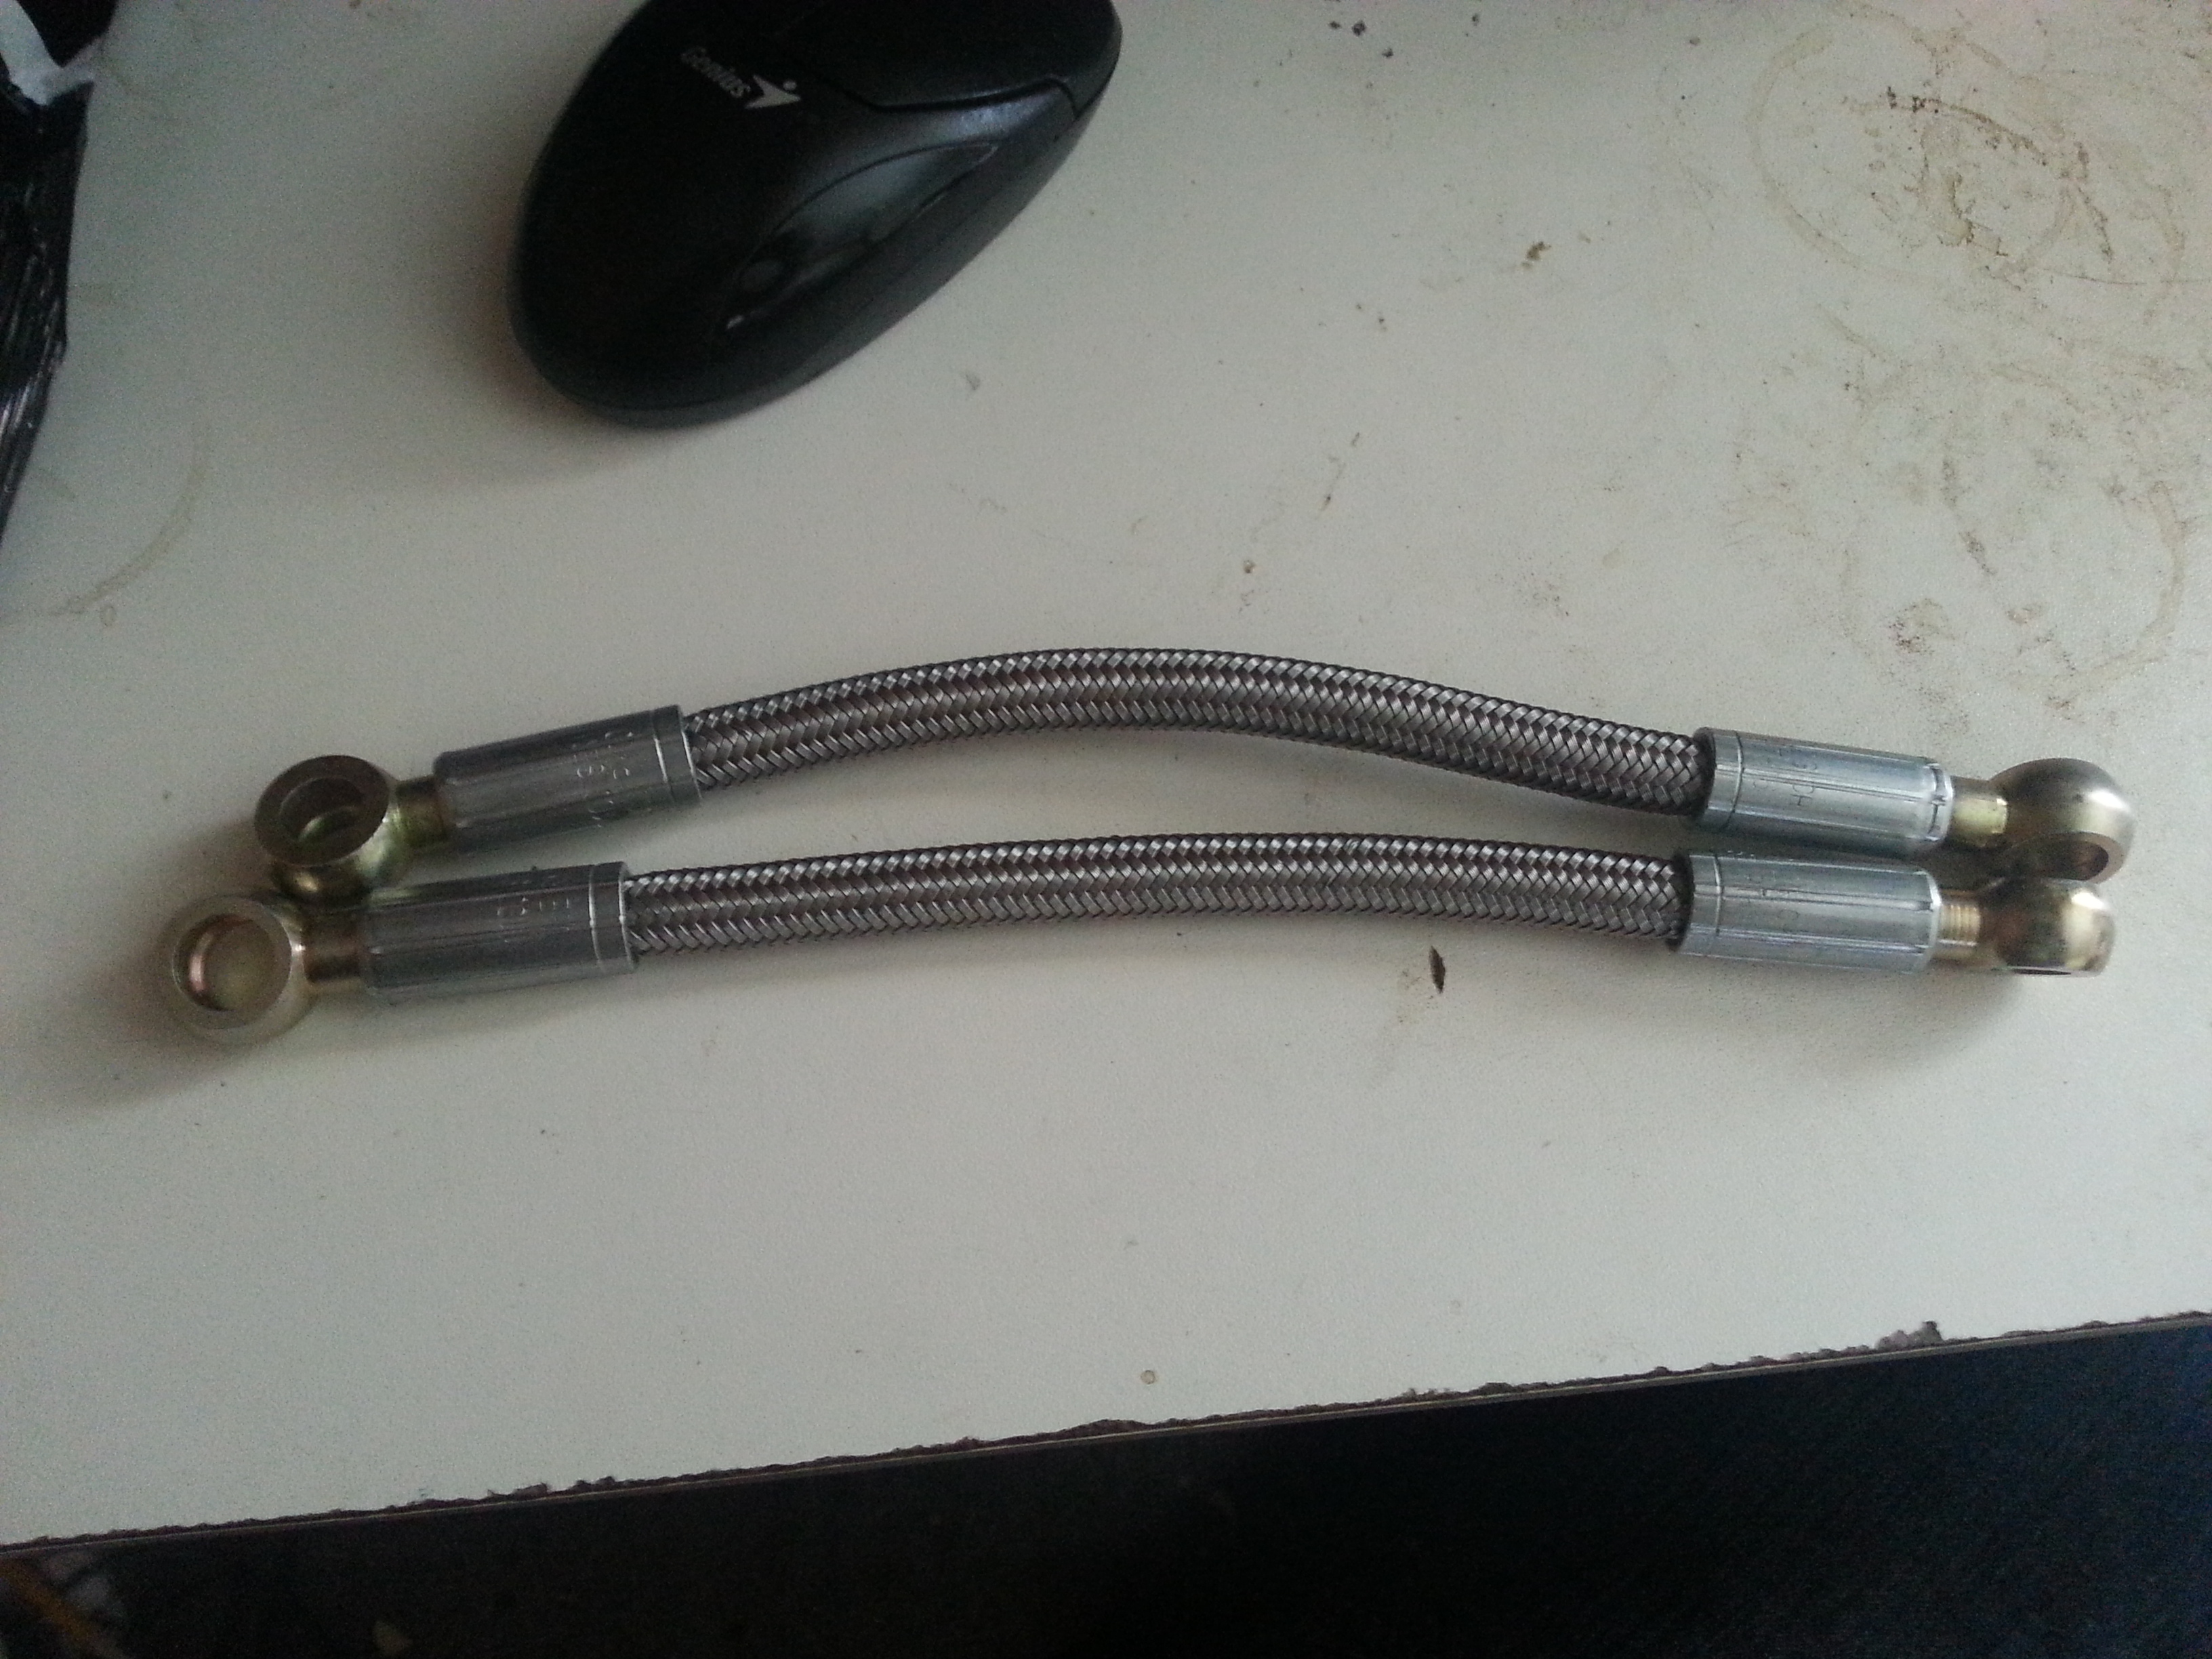
4. get new hoses made up ! dont trust the cheap hose that came with the kit. get rated hose with pressure fitting, you will thank me later when you dont have a hose blow off 100km from home
the hose length is about 255mm eye to eye center and the banjos are rotated at 90 deg offset to each other. (but take the bike with the radiator fitted before you change the rocker cover over .to the local hydraulics store and they will make sure your hoses will fit the first time.
5 undo the rocker cover and remove it from the motor , make sure its not too dusty and windy when you do this to keep junk from getting into the motor while its open.
install the new rocker cover to the bike making sure the gasket is in the rocker cover properly and that you have wiped down the head mating surface. dont over tighten the bolts.
6. install the hoses making sure to keep the pressure off the bolts as you insert them so you dont damage the threads in the aluminium. use a second spanner on the nut part of the radiator when you tighten the radiator banjos so you dont twist the alloy tank apart and cause a leak.
7. Add upgrades ! ,
I installed some wire mesh over the front with some pinch weld striping on the edges to make it look neat to protect it from stones and big bugs taking out the fins.
I also installed a 60psi oil gauge to the right hand side of the radiator using a 1/8npt take off banjo bolt designed for a honda civic under hood fuel pressure gauge.
8. make sure it is working.
I left each hose undone at the radiator end and ran the motor until oil flowed out the first hose, i then bolted that on and fed oil though the radiator till that overflowed. added the last hose at both ends and then undid the bleed bolt on the back of the rocker cover until oil flowed from there.
take it for a 5-10 min ride on the open road and stop to check the oil isnt coming out anywhere, tighten up as needed.
the oil cooler came from china via aliexpress and the oil gauge kit i also fitted came from ebay as well as the aluminium sheet if you cant find 3mm alloy locally.
oil cooler- http://www.aliexpress.com/item/Medium-size-Oil-Cooler-Radiator-Cooling-Parts-Fit-CG125CC-CG150cc-Vertical-Motorcycle-Engine-Dirt-Bike-ATV/1878272075.html
aluminium plate 3mm marine grade http://www.ebay.com.au/itm/Aluminium-Sheet-Plate-Marin-Grade-Pvc-Coated-One-Side-300-X200-3-Mm-/221699467427
oil gauge kit- http://www.ebay.com.au/itm/Oil-Gauge-Kit-Inculdes-Oil-Tank-Black-Face-Oil-Pressure-Fitting-Motorcycle-/191522085336
banjo bolt adaptor for the oil gauge- http://www.ebay.com.au/itm/Russell-640700-M12-x-1-25-Banjo-Bolt-1-8-Fuel-Pressure-Gauge-Take-Off-Honda/231100197078
Materials- you will also need a piece of 3mm thick marine aluminium to fabricate the brackets
2x 25mm, 2x 50mm and 2x 60 M6 bolts, some spring washers and flat washers and a piece of rubber inner tube or similar to protect the frame from scratches.
Tools- i used a flat and round bastard file, a hack saw and coping saw, a center punch and a drill with a pilot drill and a 1/4 inch step drill to ream the holes .
i also used peratex aviation gasket #3 for the npt threads on the oil gauge as it is recommended for thread sealing, but dont use thread sealer on the banjo bolts thats what the crush washers are for.
1- mark out the plan of you aluminium sheet and make sure you have the holes lined up, it pays to experiment with a 3mm plywood template first so you can check it out.
.
2.cut it out and drill out the holes, the holes need to 6.5mm to take 6mm bolts. but 1/4 inch will work fine and give you a little wiggle room to fit it. double check the spacing of the holes in the brackets before you drill.
3.mount up the brackets with the taller front bracket lined up to the smaller back bracket. use a strip of thin rubber between the frame and brackets to stop scratches that will rust later.
slide it up until it hits the frame like in the picture, but you may have to slide it down a few mm to clear the steering lock once you bolt the radiator on, when you have got it all lined up and test fitted, tighten up the center bolts then put on the radiator and do the other 4 bolts, Take note that you need to free the clutch cable from the top frame clip and make sure it goes behind the lower radiator bolt as in the next image. use spring washers on the back of the bolts and flat washers on the front where the bolts press into the rubber radiator mounts. ( i made flat aluminium plates instead as i also installed a grill over the front)
4. get new hoses made up ! dont trust the cheap hose that came with the kit. get rated hose with pressure fitting, you will thank me later when you dont have a hose blow off 100km from home
the hose length is about 255mm eye to eye center and the banjos are rotated at 90 deg offset to each other. (but take the bike with the radiator fitted before you change the rocker cover over .to the local hydraulics store and they will make sure your hoses will fit the first time.
5 undo the rocker cover and remove it from the motor , make sure its not too dusty and windy when you do this to keep junk from getting into the motor while its open.
install the new rocker cover to the bike making sure the gasket is in the rocker cover properly and that you have wiped down the head mating surface. dont over tighten the bolts.
6. install the hoses making sure to keep the pressure off the bolts as you insert them so you dont damage the threads in the aluminium. use a second spanner on the nut part of the radiator when you tighten the radiator banjos so you dont twist the alloy tank apart and cause a leak.
7. Add upgrades ! ,
I installed some wire mesh over the front with some pinch weld striping on the edges to make it look neat to protect it from stones and big bugs taking out the fins.
I also installed a 60psi oil gauge to the right hand side of the radiator using a 1/8npt take off banjo bolt designed for a honda civic under hood fuel pressure gauge.
8. make sure it is working.
I left each hose undone at the radiator end and ran the motor until oil flowed out the first hose, i then bolted that on and fed oil though the radiator till that overflowed. added the last hose at both ends and then undid the bleed bolt on the back of the rocker cover until oil flowed from there.
take it for a 5-10 min ride on the open road and stop to check the oil isnt coming out anywhere, tighten up as needed.


