jay_kent
1979 cb650
A bit of a how-to on how I’ve created my fiberglass parts using auto store brand polyester fiberglass resin.
The Seat pattern
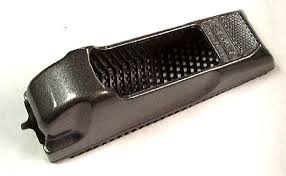
Get the blue or pink insulating foam from Home Depot. Cut and roughly block out the shape of the seat you want. Take a bread knife and a surform (hand held cheese grater, auto section by the bondo) to get it closer to the shape, and then sand it smooth with sandpaper. Florists foam will work okay, but I find that the regular ball type Styrofoam is a PITA to work with and it will never be smooth. The insulating foam you can sand till it's perfect but be careful that you don't slice it with an edge of the sandpaper. Taking your time and getting this pattern perfect now will save you finishing time at the end.
Surform:
Prepping the foam pattern:
Cover with aluminum foil, tin-foil tape or paint it with latex paint. I opted for the latex paint, but brush it on. Don't use a spray bomb, the propellant will eat your foam pattern. A couple of heavy coats should do it. (These procedures prevents the polyester resin from dissolving your pattern)
The fiberglass
I used what was on hand, I had a racing buddy you gave me a huge roll of chopped mat. It's about the weight that you can buy in the auto store. That's all I had, so that's all I used. There are lighter weights of mat and cloth. The lighter ones work well for tighter shapes. Use what you can afford.
The Resin
I used polyester resin found common in auto stores. Epoxy resin is said to be better but for me it all came down to price and availability. I read on a few boat building blogs that you can cut the resin with acetone to thin it out. This helps to wet the glass out quicker and slow the reaction down by a little bit for more working time. Don't go above 10% acetone otherwise it won't kick off. So 300ml of polyester resin = 30 ml of Acetone. Mix the Acetone with the resin first, make sure it's mixed very well. Then add the catalyst to start the reaction. If you don't pre-mix the acetone it won’t mix properly before the reaction kicks off.
Here’s a good run down on materials
http://billsboatworks.webs.com/materials.htm
The process
Prep a flat surface with sheet of waxed paper taped to the surface, get a pack of cheapo brushes, pre-cut pieces of fiberglass and trial fit them to shape on the pattern dry, make sure you know what piece goes on to what part of the pattern. All pieces should have some overlap to them.
Mix your resin, resin+acetone=mix then resin/acetone mixture+catalyst
Lay out a piece of glass on the waxed paper and with a brush, stipple the resin onto the glass and when wetted throughly put on to mold, Repeat. I found that I didn't use as much resin this way as laying the glass dry on the pattern then brushing resin on, it helps to keep the part lighter as well.
Keep doing that till you have as many layers you feel necessary to hold your weight. You can also encapsulate hardware and other things like wood strips as a place to staple you seat cover to during this time.
The final steps
Once the entire mat is laid and the thickness is built up, mix a final batch of resin but don’t use acetone this time. Brush the resin on to your complete part, essentially paint your part with the resin. Here’s why; whatever the material choice, the part will not be perfectly smooth and most often a skim coat of bondo or glazing putty is used to fill in those recesses. Using the un-thinned resin will fill in those voids and self-level so the part is almost glass smooth. Let it harden and cure for a few days to a week.
Your part is now smooth and ultra-shiny, but unfortunately in order to paint, the glossiness has to be knocked out. If there are pin holes from air bubbles or low spots, fill those in with glazing putty. Use a fine grade sandpaper and rough up your part so that primer will adhere properly. Paint as you normally would and voila
The Seat pattern
Get the blue or pink insulating foam from Home Depot. Cut and roughly block out the shape of the seat you want. Take a bread knife and a surform (hand held cheese grater, auto section by the bondo) to get it closer to the shape, and then sand it smooth with sandpaper. Florists foam will work okay, but I find that the regular ball type Styrofoam is a PITA to work with and it will never be smooth. The insulating foam you can sand till it's perfect but be careful that you don't slice it with an edge of the sandpaper. Taking your time and getting this pattern perfect now will save you finishing time at the end.
Surform:
Prepping the foam pattern:
Cover with aluminum foil, tin-foil tape or paint it with latex paint. I opted for the latex paint, but brush it on. Don't use a spray bomb, the propellant will eat your foam pattern. A couple of heavy coats should do it. (These procedures prevents the polyester resin from dissolving your pattern)
The fiberglass
I used what was on hand, I had a racing buddy you gave me a huge roll of chopped mat. It's about the weight that you can buy in the auto store. That's all I had, so that's all I used. There are lighter weights of mat and cloth. The lighter ones work well for tighter shapes. Use what you can afford.
The Resin
I used polyester resin found common in auto stores. Epoxy resin is said to be better but for me it all came down to price and availability. I read on a few boat building blogs that you can cut the resin with acetone to thin it out. This helps to wet the glass out quicker and slow the reaction down by a little bit for more working time. Don't go above 10% acetone otherwise it won't kick off. So 300ml of polyester resin = 30 ml of Acetone. Mix the Acetone with the resin first, make sure it's mixed very well. Then add the catalyst to start the reaction. If you don't pre-mix the acetone it won’t mix properly before the reaction kicks off.
Here’s a good run down on materials
http://billsboatworks.webs.com/materials.htm
The process
Prep a flat surface with sheet of waxed paper taped to the surface, get a pack of cheapo brushes, pre-cut pieces of fiberglass and trial fit them to shape on the pattern dry, make sure you know what piece goes on to what part of the pattern. All pieces should have some overlap to them.
Mix your resin, resin+acetone=mix then resin/acetone mixture+catalyst
Lay out a piece of glass on the waxed paper and with a brush, stipple the resin onto the glass and when wetted throughly put on to mold, Repeat. I found that I didn't use as much resin this way as laying the glass dry on the pattern then brushing resin on, it helps to keep the part lighter as well.
Keep doing that till you have as many layers you feel necessary to hold your weight. You can also encapsulate hardware and other things like wood strips as a place to staple you seat cover to during this time.
The final steps
Once the entire mat is laid and the thickness is built up, mix a final batch of resin but don’t use acetone this time. Brush the resin on to your complete part, essentially paint your part with the resin. Here’s why; whatever the material choice, the part will not be perfectly smooth and most often a skim coat of bondo or glazing putty is used to fill in those recesses. Using the un-thinned resin will fill in those voids and self-level so the part is almost glass smooth. Let it harden and cure for a few days to a week.
Your part is now smooth and ultra-shiny, but unfortunately in order to paint, the glossiness has to be knocked out. If there are pin holes from air bubbles or low spots, fill those in with glazing putty. Use a fine grade sandpaper and rough up your part so that primer will adhere properly. Paint as you normally would and voila
")


