Follow along with the video below to see how to install our site as a web app on your home screen.
Note: This feature may not be available in some browsers.
We noticed you are blocking ads. DO THE TON only works with community supporters. Most are active members of the site with small businesses. Please consider disabling your ad blocking tool and checking out the businesses that help keep our site up and free.
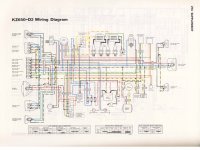
Making my first attempt at custom wiring my bike and it's turning into a nightmare. I've gone thru all kinds of diagrams and can't find one specific to my kz650 d2. Starting to suspect that the "stock" diagram I had been using in the back of the Clymer manual is wrong. A lot of the wires compared to the manual and my bike are totally different colors and no one has messed with the wires since to bike was purchased brand new by my father soooo that doesn't make sense to me. Thanks
What won't stop? the startermotor? Thats strange, but tells me your starter solenoid is fried. The startermotor button on the bars switches a small amount of current, wich then is being transferred to the solenoid. A solenoid is a switch for high current and is controlled by a little current (coming from the starter button).
Now, you've either hooked it up straight (without a solenoid) you're frying your loom and probably melted the handlebar switch shut. It's either that, or a bad solenoid.
Remember, you can not push 14 amps for the starter motor thru such a little wire as the ones going to your starter button. A solenoid is absolutly neccesary. You will damage your electric circuit beyond repair if you do it straight.
reason the killswitch is the only way to stop it, is because the killswitch turns off everything, like turning the key.
could be i'm wrong, please explain your problem better in that way, and upload the diagram you're using.
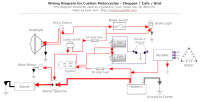
This is becoming a nightmare. Tired to start over again and then had to walk away from bike before I lost my mind today. Going back and forth between these two diagrams. If only there was someone close that could give me a hand
Wiring can be tricky the first few times you tackle it. My advice is to wire one circuit at a time and then test it. Do a second circuit and then test BOTH circuits. Do a third and test all three.
Only by adding things one at a time and verifying after each step can you ensure everything is proceeding as planned.
Also, wire everything in the order you're going to need it. Run your wiring, first, for your alternator and charging system. Then from your battery to your ignition switch. From there, go to kill switch and coils, and then start worrying about things light lights and indicators.
If you're custom wiring the bike, throw the harness in the trash along with the Clymer diagram.
The only 'stock' part of wiring you'll need to match is the charging system. Wires from the rotor/stator to the regulator/rectifier/battery. Aside from that, it's all just basic circuits and switches.
This site uses cookies to help personalise content, tailor your experience and to keep you logged in if you register.
By continuing to use this site, you are consenting to our use of cookies.