Lacing up aftermarket alloy rims. Long winded photo walkthrough.

fang

Metaphysician
Hi All. I have been working on my RD again. I don't post too often, but I thought I would share some pictures of the process. My bike is a 1974 RD350, and over the last few years I have been working on making it look more like an old 1960's Yamaha YCS-1, or something like that.... Basically I love the way the old 1960's Yahamas look, but I also like being able to do third gear wheelies. This bike is my humble attempt to get something of both.

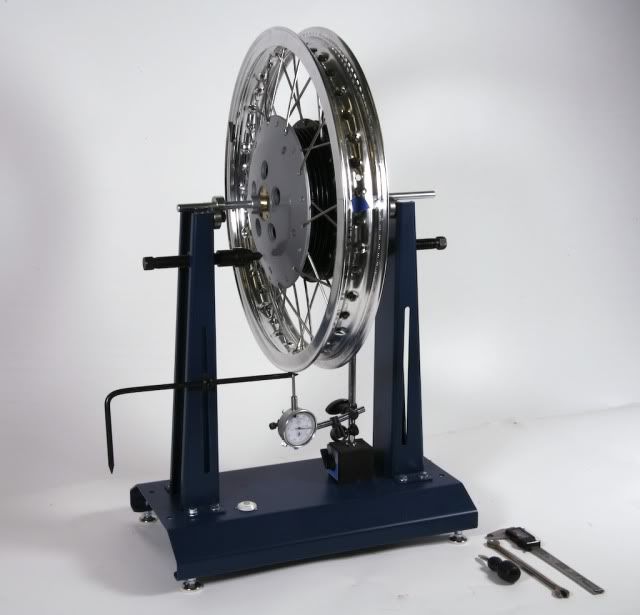
In this round of upgrades I am replacing the rear shocks, rear rim & spokes, along with the sprockets & chain. I kind of did this upgrade in about seven phases. (1)Research and order parts (2)Prep the bike, remove, measure, and disassemble the rear wheel (3)Clean the hub assembly (4)Polish the hub assembly (5)Lace up the hub,spokes and rim (6)True the rim (7) Button it all back together again.

(1) Research and buy crap:
+The rear shocks are a pair of 13" RedWing Hammer Heads, sporting 70/130 springs. 13" is a little longer than stock, but it turns out to be perfect after preload.The shocks were about $200.
+I am replacing the original rear rim and spokes with a stock diameter 2.15 (WM3) Excel 'high shouldered' alloy rim (custom drilled for my RD's rear hub), the rim cost $179.
+It is laced up with a set of Buchanan's spokes (custom cut, stainless, 7-9 gauge, with stainless nipples). Buchanan is a fantastic company and they're a delight to work with. They can match up and produce a custom set of spokes that will fit together ANY rim to ANY hub. Knowledgeable, professional, fast, and fairly priced. My spokes were about $125.
+At the same time I ordered up a chain kit -- I bought a set of 530 to 520 conversion sprockets from Sprocket Specialists. These guys also are 100% on top of their game. I like working with professionals who know what they are doing better than I. It makes things easier, and even if it feels like spending more money in the moment, I can be assured that the quality is the best, and I will not need to spend the money twice because a mistake was made. Remember I said I like third gear wheelies? I ordered a 14 tooth steel front sprocket and a 42 tooth "tough" anodized aluminum rear sprocket, both for a 520 Chain. The sprockets are being custom made in house, and will not arrive for a few weeks. Sprockets are about $130.
+Then I ordered a happy pro-grade D.I.D. "X-ring" racing chain off eBay, $79.
+Other misc expenses included a bottle of degreaser, as well as some sand paper, WD-40, metal, polishing rouges and fresh cloth buffing wheels, totaling about $50.
+All together this job is costing about $763.
Why would I even share the dollar amounts? I think that someone who is thinking about doing the same upgrades will want as much information as possible. This would include pictures, the dollars, as well as other details.
Besides it is funny as hell for me to sit here and say that I just spent more than $700 on my bike, but when I post pics of it, it still looks like a turd. Priceless!


(2)Prep the bike, measure crap, take the rear wheel apart(part one):


My 1974 RD350, before the rear rim replacement. Got to love that suede and duck tape seat and mis-aligned headlight... Like I said this is a work in progress. One thing at at time. I usually prefer to get things mechanically sound before I make them aesthetically appealing. I have done a bit of work on the engine for performance, but not too much. I think it is one of the faster RDs here in Austin. ;) The tank is from a 1967 YCS-1, which I had to stretch and weld back up before it would fit on the frame. The seat obviously is ridiculously horrible, but I'm just not worried. I sew my own bike upholstery, and this seat is just an experiment with using suede as the top material. Sometime in the next month or two I will make a new seat pan and upholster it so it looks pretty good on this bike.


This is a detail of the front wheel. Red arrows indicate direction of travel. I font the front rim at a friend's old junk yard, and laced it up about a year ago. I believe the front drum brake is from a R5. I had a shop make custom lined brake shoes for me. The compound is one designed for some kind of industrial equipment. It seems to perform reasonably well.


The other side. Red arrows indicate direction of travel. Ventilated to resist fade. The holes need some kind of bug screen. I'll get to that eventually.


Soon this will be so slightly different that most people won't even notice. LOL.


Here is me getting excited, envisioning the wheel swap.


White arrow indicates direction of travel. (Would you believe I have accidentally put things together backwards in the past?) This wheel is amazingly dirty. The non o-ring chain I have been running is simply filthy. And I just cleaned it not all that long ago. I mean, I'm sure it is a fine chain and everything, and I bought it because I didn't want a power robbing o-ring chain sucking away my ability to do third gear wheelies.... But I just HATE how it makes my whole freaking bike filthy. This greasy mess was 90% of my motivation to break down and buy 520 conversion sprockets and X-ring chain. Sealed chains are clean, and they don't freaking fling crap everywhere. My old chain also was starting to tightly bind at a few links... that kind of was a reason too.

To Be Continued.

Peace and grease,
Fang
 
Re: Lacing up aftermarket alloy rims. Photo walkthrough.

(2)Prep the bike, measure crap, take the rear wheel apart(part two):
(You can click any pic for a larger view)


Measuring stuff. This is super important. When you are swapping in a new rim, and you want it to go well for you as you are lacing it all together, it is really, really important to do some measuring first. Buchanan's did all the measuring to make sure the spokes will fit for me, but it is up to me to make sure the rim is laced true when I am done. That means ensuring that the center line side-to-side offset for the new wheel is correct. I suspect this is often over looked when folks are lacing up wheels.
I don't have a picture of this, but after I removed the tire from the old rim (along with the brake and sprocket backing plates), I laid the otherwise still assembled wheel assembly on a flat surface (in my case a plate glass window), and I carefully measured the difference between the hub and the rim. In the case of the RD's rear wheel, as the wheel lies flat on the brake side, both the rim and the center of the hub are touching at the same time. This is not always the case on other bikes. The outside edge of my new rim is 3mm wider than the stock one, which means that when I lace up the hub to it, I will need a 1.5mm spacer so that my center line is correct. If the center line is off between the hub and rim you theoretically could always correct it with modifications to your axle wheel spacers. The problem is that if you aren't thinking about it, odds are you would never notice -- after the fact it is almost impossible to see and difficult to measure. The result is that the bike will have an undefinable instability over bumps and in the turns.... Which would completely piss you off after spending a mint trying to make improvements to exactly that same thing. Later I'll show you a picture of the custom made, high-tech, center line alignment spacer I used when lacing up the wheel.


I have a happy little cordless electric screwdriver that really helped when removing all those spokes from their nipples. You could always just cut them off, but mine were not seized and it is occasionally useful to have a complete spare spoke set... I like how the hub looks like some weird kind of prickly animal.


Lining stuff up to envision the next few steps.


(3)Time to clean up that crap:


I hate this kind of filthy mess. It is so grimy that it makes itself dirty again as you clean it. Today I used some ZEP degreaser. I selected it because it smells nice and was cheaper than everything else at Home Depot.


The ZEP actually worked fairly well.


After about an hour it all was mostly clean. However, I needed it a little extra clean because I was going to put a quick polish on these parts, so I went back and cleaned it all again. My little boys helped me with all this. They're great, and they love to 'help' Daddy. But in honesty, they're still too young to do much more than fight about who gets to hold the hose. :)


To Be Continued.

-Fang
 
Re: Lacing up aftermarket alloy rims. Photo walkthrough.

(4)Polish the hub parts:
(You can click any pic for a larger view)

In general, whenever I am trying to make something look pretty, I go by the rule, "it is almost always better to make it 'pretty good' than to try to make it perfect." Why? Perfect ends up taking three times as long, costing at least twice as much, and it is guaranteed to be at least ten times more stressful and frustrating -- both as I am unsuccessfully attempting to procure "perfect," and later after I am trying to protect perfect. In theory, perfect seems like a good idea, but in practice, 'pretty good' usually is a much better idea. I am the kind of guy who, on my drive home, wants to be able to toss a 6-pack up on the tank between my knees and not worry about the paint.... You just can't do that with 'perfect.'
Having said that, what follows is my 'pretty good' hub polishing job. I was moving fast and did not take a lot of pictures. It was probably about 9:00 at night when I did this, and I still had to drive 30 min home form my workshop and put the wheel together before I went to bed. I had plans to drive the bike the next day to a local bike meet up on the other side of town. My goal here was to simply make things look reasonably better because it is hard to clean and polish a hub once the rim is attached. All in all, I spent pretty much one hour polishing the hub.


Here's my technique for polishing aluminum: (1)hand sand the piece with fine to ultra fine sand paper, lubricated with diesel or WD-40, working my way up to about 1500 or 2000 grit paper. If the piece has old clear coat to remove (like this hub did), or gnarly scratches or gouges, more sanding will help. Sometimes I will use those 3" blue 3M discs, and then lightly sand off the swirl marks. Either way, sanding seems to help smooth things out and remove deep oxidation before buffing. This sprocket backing plate was sanded up to a 1500 grit paper with WD-40 as my lube/cutting oil.


I usually will use the cheap, cotton, 6" buffing wheels (usually procured from Harbor Freight) on my bench grinder. I have a tool bag dedicated to storing my buffing and polishing stuff, and I have a bunch of various pads,etc. But I saw some nice 7" wool ones at Lowes and went ahead and used those this time. The wool supposedly buffs better than cotton, but in all honestly, when they say better, I think they really mean faster. I will work my way from hard to medium to soft rouges (red, white, green). This is the backing plate after about 5 minutes of the 'hard' red rouge.


Same plate after 5 min of the 'medium' white buffing rouge


And here we are all done, finished with about 5 minutes with the 'soft' green rouge. I will use a new wheel for each buffing compound, and clean the part with something like carb cleaner or WD-40 between rounds of buffing to clean off any build up. Then I give it a finish buff with a big, clean, soft (or 'loose') wheel.

As I said earlier, I spent a total of about an hour -- definitely less than an hour and fifteen minutes -- buffing the hub. I focused on the areas around the spokes that will be inaccessible once the hub is laced up with spokes. The rest can be touched up later. Nevertheless, it turned out 'pretty good.' In the past I have spent whole days working a show/mirror polish into aluminum parts. This just is not supposed to be that kind of thing. When it is all said and done, my goal here is to get all the parts properly clean and to throw a nice shine on there -- just enough so I wont be embarrassed later. Mission accomplished

peace and grease,
Fang
 
Re: Lacing up aftermarket alloy rims. Photo walkthrough.

(5)Lace up the hub,spokes and rim:
(You can click on any pic for a larger view)

EDIT:
I have had a some good feedback with some extra info, also catching a mistake I made. Wheel building is serious stuff, so I am posting the link here, along with a few others that I have found interesting over the years. My goal here is to help guys do this at home in a safe and successful manner. Please read through these articles, and decided for yourself if you can do this. Google is your friend. If you screw up your wheels, they can fail, and you will die.
;)

Some additional recommended reading:
*John Healy's fine article on Triumph wheel building HERE. This is essential reading. --Thanks Swan for the link--
*How to lace and true a wheel, featuring a very cute girl 'doing all the work'
*A guy truing an Electra Glide Harly wheel PART 1, PART 2.
*WebBikeWorld's vintage BMW wheel building article: HERE.
*An Instructables article for a Royal Enfeild wheel HERE.


We are finally to the main point of the thread, lacing up the wheel. We're also to MY point of the thread: this really is not all that hard.
Lacing wheels is a bit tricky, but only because a lot of attention to detail is required. No individual step of the process is actually difficult. There are just lots of little steps that are tricky, or that can come back and bite you if are real sloppy or you forget to do them, or whatever. This is a 36 spoke wheel, so a 40 spoke wheel will be a little different. Also I am replacing the rim with a different one. Someone who is replacing a rim with an identical rim will do things a little different.
In general, I will start with the all of the hub's inside spokes first, and then the outside. I will do all of the inside spokes for one side, and then all of the inside spokes for the other. One spoke at a time, insert it through the hub, then into the correct hole in the rim, then gently thread on the nipple a few turns to keep it from falling out of place. Sometimes you will need to take out a spoke or back up a little until you get used to how it all works. Give yourself plenty of time, a comfortable work environment, and access to a few beers and everything will be fine. I also will always will have a few good pictures on hand of the original spoke pattern (from before I took the wheel apart), pictured from both sides and from different angles, just in case I get confused. (See 1, 2, 3, 4) Inevitably I will end up referencing one or two of these pics repeatedly through the installation. The template seen in the second picture is a big help too.


Everything is all lined out and ready to get started. The important tools here are the 6mm spoke wrench (nipple wrench) and the assembly lube. Stainless on stainless will bind if not lubricated correctly - I put a big drop of the grease Buchanan's provided into each nipple, and then used a tooth pick to spread the lube evenly inside. I am not sure what the lube was, but it was thick like grease, but smelled like heavy gear oil.


This is the template I made to help me keep the hub and rim centered while working on everything. It also will protect the kitchen table while I work. I traced the inside and outside of the rim onto the card board. Then I carefully measured where the hub needs to go and then traced it to the cardboard. The extra piece of cardboard in the middle is the 'super high tech' spacer I am using under the hub to help me obtain and maintain the 1.5mm of additional offset which is required for this rim. The cardboard spacer is pretty close to exactly 1.5mm thick, and it will help keep everything in place until I am almost done and need to use a more precise method.
This simple cardboard template saves me a LOT of stress as I am working, and it really helped the job go quickly.


Ready to go. I am starting with the sprocket side's inside spokes. Once they are all in place I did not flip over the hub, rather I inserted each spoke, one at a time, and threaded it into place. I can't think of any good reason for this; its just how I like to do it. I think that my brain likes to fix an image of the shape of things from a certain angle, and when I start to flip the rim back and forth it starts to get confusing for me. So I just do most all of it from one side. That seems to help.


It is a little after midnight-fifteen, and I am finally ready to lace up the wheel.


It took about 15 minutes to get all the inside spokes in place. The nipples are only threaded one or two turns on to each spoke so the hub is very floppy in there. Being able to move the hub around is important as you add more and more spokes. I'm sorry the pic is grainy, but if you zoom in and look carefully you can see some nipples sticking all the way through the rim (near 2:00-3:00), and other nipples are not poking through the rim at all (around 8:00-9:00). Floppy at this time is good.


Another twenty minutes and all the spokes are in place. Again, if you look closely, you can see from the nipples that the spokes are all very loose. I finished the assembly phase by laying the wheel flat on my cardboard template, carefully aligning it all to the best of my ability, and then finger tighten all the spokes until none wiggle, while making sure it remains true to the template. This took about two minutes, and it let me start the truing process with everything already 98% true.


(6)True the rim

I'm sorry that I don't have pictures of this part. It was getting late, I was getting tired, and as I got dialed into the work I just sort of forgot about taking pics. Sorry about that. At this point all the spokes are all finger tight, and the hub is not floppy. The hub is about 98% true already from the template -- it has about 0.125" (1/8") in any direction. Not too bad for not even getting started yet.
Now it is time to whip out the wheel truing stand. While I am using a stand now, in the past I have used all kinds of stuff to true wheels. I once used two chairs with the wheel sitting on its axle between them. Got that wheel trued just fine too. Don't let the idea of special equipment get in the way of you trying this job at home. The only necessary special tool is a spoke wrench that correctly fits your nipples. having said all that, I find my homemade template, a truing stand, dial indicator, and straight edge to be very helpful tools when doing it fast and correct the first time.

As I true a wheel I keep telling myself that the hub is just floating there in the middle of the rim, and it is easy to move it around. For some reason, if I think of the truing process as a very fluid experience it is mentally liberating for me. I slowdown and relax, which in turn really speeds things up. Its a Zen thing. I used to think of it as this cold, precise, rigid process that had to bend to my iron grip and steely will, and for whatever reason it made things much more stressful. I know there are other ways to true a wheel, and I imagine that some 'old timers' out there might even offer that my methods are unconventional. But for me the processes needs to be peaceful, straightforward and simple. In my opinion there always needs to be a certain amount of beauty present when doing any kind of precision work. My method works reasonably well, and yields a true wheel relatively quickly and easily.

Back to the job. After each spin on the truing stand, I will mark where it is out of round directly on the rim with a Sharpie marker. I like to mark the high spots, and I have my own funny little short hand for the marks. I don't bother with a dial gauge at the beginning. Any fool can see where the wheel is out of round, and I find that trying to fiddle with precision instruments too early just bogs everything down. After making my marks with the Sharpie I remove the wheel from the stand, lay it back on the template on the table, loosen every spoke until they all wiggle a little, and then re-tighten, according to the little notes I wrote on the rim. I am not using any tools yet. Only fingers, the template and the truing stand, and I am doing my adjusting off of the stand. I will not start using the spoke wrench to tighten and true the spokes until after I am real close to being done.

When all the spokes are all finger tight again, the wheel will go back on the truing stand, and I will test it again. During this build I probably made about a half-dozen adjustments before the rim was properly true. At first a lot of movement happens, but as it gets closer and closer, less and less adjustment is required. This is good because each time the spokes are adjusted everything moves a little. It is kind of like syncing carbs, where adjusting one can knock out the others a little. Meanwhile, as I am truing the rim to the hub, I am also double checking the center line offset. While the cardboard spacer was perfect for the initial assembly, as things progress I use a straight edge to verify that I am maintaining my required 1.5mm of offset.

Once again, my standard of "'pretty good' is better than perfect" comes into play here. I am not trying to get this rim perfect. It might not even be possible.... In the end I settled for 0.015" of out-of-round. That is about 1/64" or 0.40mm -- which is comparable to an industry standard of 0.020" for new installations. The imperfections of my tires will be worse than this. My bike is ridden hard, but rarely above 100mph, and this will be better than what it was with the stock rim, and the stock rim felt just fine, even at high speeds. Also, this is a new aluminum rim that is freshly drilled for my hub. I am expecting to replace the rear tire in about 1000 miles, at which time I will double check the rim as the spokes will have finished bedding into their fresh holes.

I also would like to mention something about tightening spokes. Once the rim tests true (and I think I am more or less finished with the truing), I will tighten each spoke 1/4 turn with the wrench, starting with the spoke adjacent to the tire valve stem hole. I will tighten, then skip eight spokes, then tighten one and skip eight, over and over, all the way around until they are all a full turn tight. This is a delicate time for the rim, and I want to make sure that the spokes are evenly tightened without pulling it out of true. After each full round of tightening I will double check the offset measurement and the true. Once all the spokes are a full turn tight they wont be going anywhere too easily, so I will tighten a cluster of four spokes at a time, skip four clusters (16 spokes), and tighten four spokes, skip four clusters, tighten four spokes, all the way around. I will do this until I have reached my goal of about 50-55 inche/pounds of torque. I don't have a spoke torque wrench, but with a solid little 6" spoke wrench (one that fits the nipples properly snugly so you wont strip them), 50-55"/lbs of torque will feel like pushing pretty hard on that little wrench. You can also ding the spokes with the wrench to listen to whether or not the spokes sound evenly tightened -- looser spokes are a lower pitch, tighter ones are a higher pitch. After everything feels about the same and sounds about the same, and I think all the spokes are evenly tightened to about 50-55"/lbs, I will test it one last time on the truing stand and dial indicator, and double check the offset. Then that's it. I'm done!

I guess it took me an extra beer and about an hour to true the wheel and torque all the spokes.


(7)Button it all back together.


All back together. All in all, it looks pretty good. It only takes a couple minutes to put the wheel back on.


The whole lacing and truing the wheel took me about two hours. The cleaning and polishing and everything else took just as long, if not longer. I don't think I normally move too fast, but I was trying to move more quickly than normal when I was taking pictures of my watch. I figured if I could maybe show how long I took I would move faster, and thus get in bed earlier. All in all I probably have about 6 hours in the whole job.

I did wake up late the next morning, fiddle with it a little more, and then I got to drive the bike 30 miles across town to meet up with some friends. The bike definitely felt really good. Lots of wheelies and tightly held turns. I love the new shocks. The bike definitely is more confidence inspiring as I rip it around the uneven, tightly winding roads throughout down town. I can't wait for the new chain set to arrive. I'll update this thread when I get it installed.


Peace and grease,
-Fang
 
Re: Lacing up aftermarket alloy rims. Photo walkthrough.

Fang, you're alive! Your "turd" is looking good. Call the seat an "anti-theft" device.
 
Re: Lacing up aftermarket alloy rims. Photo walkthrough.

Before and after pics:

Just in case you can't tell, before is on top, after is on bottom:


WOW, and that is what I call a BIG change! NOT.


Here is another:

"Soon this will be so slightly different that most people won't even notice. LOL."


The funny thing here is that there really is barely any difference! Ah, such are the vassitudes of this, our our sub-luminal existence. I guess it is the small, subtle things that end up adding up and meaning the most in the end. Fortunately my end goal was not looks as much as legit performance increases.
 
Great tutorial - I'll have to re-read a few times to convince myself that either:

a) I'm going to lace my own wheels or
b) it's well worth the $45/wheel I pay for lacing/truing ;)

Not sure which side I'll land on, but there's gotta be a ton of satisfaction from doing it yourself.
 
Nice write up! Do you bother with lubrication on the nipple heads or anything on the threads to keep them from loosening? Or do you feel the tension from the spokes is enough to keep the nipples from backing out?

Do you balance your wheel after mounting the rubber? What method?
 
Great write-up, will definitely help me when I get to that point. Thanks for taking the time to post it.
 
Ramrod said:
Nice write up! Do you bother with lubrication on the nipple heads or anything on the threads to keep them from loosening? Or do you feel the tension from the spokes is enough to keep the nipples from backing out?
Do you balance your wheel after mounting the rubber? What method?
Ramrod, With the truing stand it is quick and easy to balance the wheels. I happened to have a couple spoke weights in my tool box, so I went ahead and balanced it. It is not some fancy digital balancer, but the bike felt just fine at 100mph. When I replace the tire in a few months I'll probably use adhesive rim weights and have it digitally balanced.
I only lube the spoke and nipple threads, no lube on the rim-to-nipple contact. As far as using some sort of Loctite on your threads, it should not be used -- the tension alone should be enough.
 
fang, nice work, good write up and the new rim looks great. It is refreshing to see someone take their time to do it right with the proper materials, tools, techniques, measurements and the obligatory beer while lacing and truing. Buchanan Spoke and Rim are great to work with and make the best rims and spokes.

A few very important things to add:

Your spoke tension of 80 lbs is dangerously over tight! In the package from Buchanan you read a note stating "For large displacement cycles, the torque should be in excess of 80 inch pounds. Hub and rim structure will determine the amount of torque that can be exerted." Your little Yamaha is NOT a large displacement vehicle and you are risking your life, risk breaking off part off your hub or pulling a nipple through the rim!!! 30-35 pounds is correct for this rim and hub. Read this article by master Triumph sage and guru John Healey on spoke tension and advice on for new rims.

ALWAYS use a padded blanket, carpet or foam when laying an alloy rim (particularly a flanged/shouldered rim) on its side. You laid yours on cement in one photo and I cringed. If you look at an alloy rim wrong it will be scratched or dented.

It is very important to lubricate the inner side of the nipple hole with the provided oil or anti-seize compound to prevent galling, particularly with stainless nipples on alloy rims.

I assume you installed new sealed bearings before lacing, truing and balancing your wheel.

You did measure your old wheel's offset and calculated the correct offset for the new rim, but you need to consider the rear rim's alignment relative to the front rim as well. They both should be centered to one another, making for a smoother, more stable ride with less tread wear.

Sorry for my longwinded response, but I do not want you or any other forum member to risk damaging their hubs, rims or risk their lives with over tightened spokes.
 
Swan, Thanks for your comments and your concern. Also, thanks for the link you PM'ed me pointing me to the very fine article on wheel building by John Healy, who is the owner of the Triumph Int'l. Owners Club, and presumably is a more knowledgeable and experienced chap than I:
http://www.tioc.org/lacing371007rim.htm

After receiving your message, I placed a quick call to Buchanan's Spokes, and their tech department said that 50-55 inch pounds of torque is ideal for a 1970's RD350.

For me, as I said earlier, I do not have a spoke torque wrench, rather I am using the "press the small six inch wrench pretty hard method." So I do not know what the measured torque is for my bike.

I am not an expert, but I did apprentice in a shop that specialized in restoring vintage Japanese and British street and race bikes for years and years, and eventually became leading tech, and ended up managing the place. I have always done my wheel truing and spoke torquing by feel. That is how I was taught, and I have never had any broken hubs, never had any customer comebacks from my work.

All disclaimers aside, you are exactly correct that when I said to torque the spokes to 80 inch/pounds, that is too tight for vintage hubs. In all honesty, I was perhaps trying to sound smarter than I am by integrating information from a tech sheet I received with the spokes from Buchanan's with my own personal knowledge and experience, assuming from the information they provided that my tired and true method is comparable to the data they provided. And I am glad you called me out on the error, and I will go back and edit the original post with the correction.

Having said all that, I will hold that my method of "push the six inch wrench pretty hard" remains a safe and legit method. I think it would be interesting to obtain a spoke torque wrench to measure what exact torque I am actually applying using my method. If I am able to do this sometime soon, I will come back and post the data.

And when it is all said and done, I will return to my originally intended encouragement: If done carefully and intentionally, many people can replace and lace a rim at home.

Peace and grease,
Fang
 
fang, No worries. I just did not want you or other forum members wrenching their spokes too tight. I use the qualitative rather than the quantitative method too (no torque wrench, but tightening by feel and sound).


Lacing, truing and balancing wheels is one of my favorite part of any build and provides a great sense of satisfaction by doing (right) by myself. Like anything else, it is easy if you know how to do it.
_MG_6193-Version2.jpg
 
This is quite old but... This write up have convinced me to try cleaning my wheels/hubs up, myself. In terms of breaking the wheel down and tying back up.


I figured, worst case scenario, I can at least lace it back up and If i have to, I can take it to a shop just for a truing.


Anything wrong in reusing old spokes/Nipples? Mine are a bit rusty but seem like they won't fight me to hard in comping out.


I see many people just cut their spokes, but I'm not to sure i can afford replacements.
 
You can re-use you original nipples and spokes but new ones look soooo much better and they are not terribly expensive. If you re-use them, soak them well with a penetrating oil before removal.
 
Back
Top Bottom