im will be buying a legendary thruxton seat for my cb 750, does someone have any pics and mounting ideas for mounting the seat on a 1978 cb750, im not using the stock tank as im buying a Manx TT tank also from dime city, im looking for the right way to mount it , any help would be much appreciated
We noticed you are blocking ads. DO THE TON only works with community supporters. Most are active members of the site with small businesses. Please consider disabling your ad blocking tool and checking out the businesses that help keep our site up and free.
You are using an out of date browser. It may not display this or other websites correctly.
You should upgrade or use an alternative browser.
You should upgrade or use an alternative browser.
legendary seat mounting ideas needed
- Thread starter crxnug
- Start date
 Come on now, some pics just might give us a starting point to begin to offer suggestions, but a blank screen is a little rough first thing in the morning.... ;D
cut
New Member
Cut, to the rescue....
Here is textual guidance for a weld free method of mounting a fiberglass tank.
You will need a couple items before tank mounting is started so its a good idea to have these handy to make the job go easy. You will need:
A 2 tube kit of JB Weld (part a + b) Dont get the quick set stuff.
A 1" wide strip of roofing tin, light bendable aluminum or anything that you can use as a template that will hold its shape. I used a piece of corner bead ($1.49) and folded it over to make my template.
A 5/16" (or 8mm) drill.
A 2" (or 52mm) piece of flexible rubber or silicone hose.
A piece of 3/4"-1" (19-25mm) X 1/8" (4mm) mild steel strap iron.
A sheet of 40-80 grit sandpaper.
A felt tip "sharpie" marker or soft lead pencil.
A piece of foam pipe insulation 1/2-3/4" thick wall 24" long.
A roll of 3/4-1" masking tape.
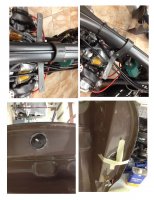
Slit the foam and wrap it around the backbone tube and place the tank in desired position and angle. Inspect the underside and take note of where the front and rear mounting straps will lay. Measure back from the neck or reliable index spot. Take notes...of those measurements and transfer to lines on tank underside.
Remove tank and foam.
Make two strips of tin template material find the middle of each. Now bend to over the backbone and out at a right angle. (visualize the Omega symbol)
Set the foam, then tank back on the frame making sure you leave 1/4-1/2" between the top of the horizontal bracket legs and the bottom of the tank for the hose slices you will be using for vibration isolation spacers.
You may have to repeat this fitting stage to get it right.
Place the tank on when you are comfortable with the position and mark the template horizontal legs in the desired mounting locations opposite flat areas on the tank underside.
Disassemble everything and use the tin templates to make permanent omega brackets from the thick strap iron and drill 5/16" holes in them using the template as a guide.
Reassemble using the permanent brackets. Make adjustments then use your marker to transfer the hole locations to tank bottom. Using a straight edge make a large X intersecting the locations. This will come on handy later to locate the center of the large bolt head when adhering into place.
Make a sanded area making sure you completely remove the shine of the gloss surface and scratch up the head of the bolt insuring a good mechanical bond. Wash bottom area. Well with Acetone before starting the entire procedure (Extremely important)!!!
Mix (well) a small amount of JB WELD or any type of quality industrial epoxy. Dab it on the bolt head and tank bottom. Use masking tape to protect the threads from getting fouled with adhesive and to hold them in position until they cure enough to stand on their own then slather a copious amount to bury the heads insuring to keep it relatively level and low.
Its a good idea to let it cure overnight to insure you will have a permanent mount and the tank doesn't let go in the middle of your racing heat.
When making the final connection use the hose slices as spacers to fine tune the position of the tank. Make sure the tank isn't directly touching any other part of the frame, engine or any other part of the bike that coil eventually wear through or puncture the tank underside in event of a crash. Warning: Not DOT approved for street use.
Here is textual guidance for a weld free method of mounting a fiberglass tank.
You will need a couple items before tank mounting is started so its a good idea to have these handy to make the job go easy. You will need:
A 2 tube kit of JB Weld (part a + b) Dont get the quick set stuff.
A 1" wide strip of roofing tin, light bendable aluminum or anything that you can use as a template that will hold its shape. I used a piece of corner bead ($1.49) and folded it over to make my template.
A 5/16" (or 8mm) drill.
A 2" (or 52mm) piece of flexible rubber or silicone hose.
A piece of 3/4"-1" (19-25mm) X 1/8" (4mm) mild steel strap iron.
A sheet of 40-80 grit sandpaper.
A felt tip "sharpie" marker or soft lead pencil.
A piece of foam pipe insulation 1/2-3/4" thick wall 24" long.
A roll of 3/4-1" masking tape.
Slit the foam and wrap it around the backbone tube and place the tank in desired position and angle. Inspect the underside and take note of where the front and rear mounting straps will lay. Measure back from the neck or reliable index spot. Take notes...of those measurements and transfer to lines on tank underside.
Remove tank and foam.
Make two strips of tin template material find the middle of each. Now bend to over the backbone and out at a right angle. (visualize the Omega symbol)
Set the foam, then tank back on the frame making sure you leave 1/4-1/2" between the top of the horizontal bracket legs and the bottom of the tank for the hose slices you will be using for vibration isolation spacers.
You may have to repeat this fitting stage to get it right.
Place the tank on when you are comfortable with the position and mark the template horizontal legs in the desired mounting locations opposite flat areas on the tank underside.
Disassemble everything and use the tin templates to make permanent omega brackets from the thick strap iron and drill 5/16" holes in them using the template as a guide.
Reassemble using the permanent brackets. Make adjustments then use your marker to transfer the hole locations to tank bottom. Using a straight edge make a large X intersecting the locations. This will come on handy later to locate the center of the large bolt head when adhering into place.
Make a sanded area making sure you completely remove the shine of the gloss surface and scratch up the head of the bolt insuring a good mechanical bond. Wash bottom area. Well with Acetone before starting the entire procedure (Extremely important)!!!
Mix (well) a small amount of JB WELD or any type of quality industrial epoxy. Dab it on the bolt head and tank bottom. Use masking tape to protect the threads from getting fouled with adhesive and to hold them in position until they cure enough to stand on their own then slather a copious amount to bury the heads insuring to keep it relatively level and low.
Its a good idea to let it cure overnight to insure you will have a permanent mount and the tank doesn't let go in the middle of your racing heat.
When making the final connection use the hose slices as spacers to fine tune the position of the tank. Make sure the tank isn't directly touching any other part of the frame, engine or any other part of the bike that coil eventually wear through or puncture the tank underside in event of a crash. Warning: Not DOT approved for street use.