
DesmoDog
Been Around the Block
Ducatis from the mid 60s had a squared off style that I don't find all that attractive. One of my projects is a 1966 Ducati Monza Jr. I replaced all the square looking stuff with earlier rounded stuff - here's what I did with the seat.
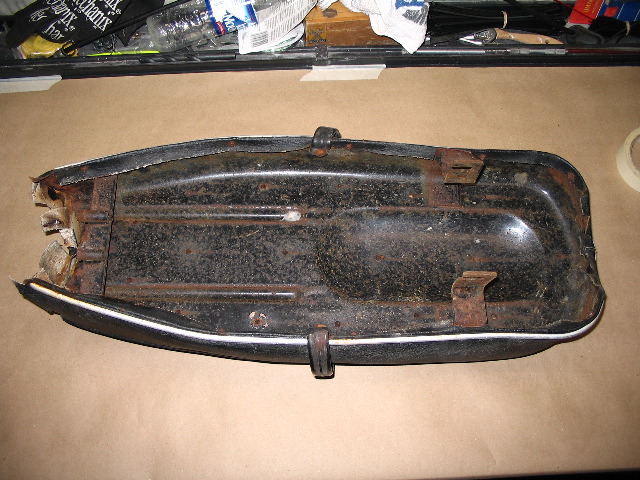
The stock seat pan shape
I spent way too much time deciding if I should get a fiberglass tail or try to reshape the original pan. After devising numerous methods of reforming the radius on the edge of the pan, I decided to cut and paste instead.
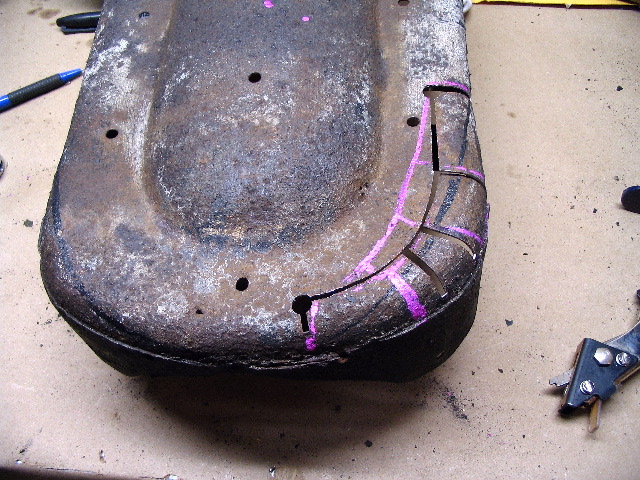
I came up with a template of a shape I thought looked good and laid it out on the pan (black line). While thinking about the best places to cut to get everything to match up so it could be butt welded nice and pretty, I realized there was no need to get perfect joints on this rusty tray that would end up hidden under foam and fabric. I laid out the cut lines (pink) freehand and started cutting. Soon I was just cutting where it looked to make the most sense.
When the time came to form the shape, I ended up eyeballing it, not using the template I had spent so much time drawing. I made a new template from the now modified side and used that to check the shape of the second side.
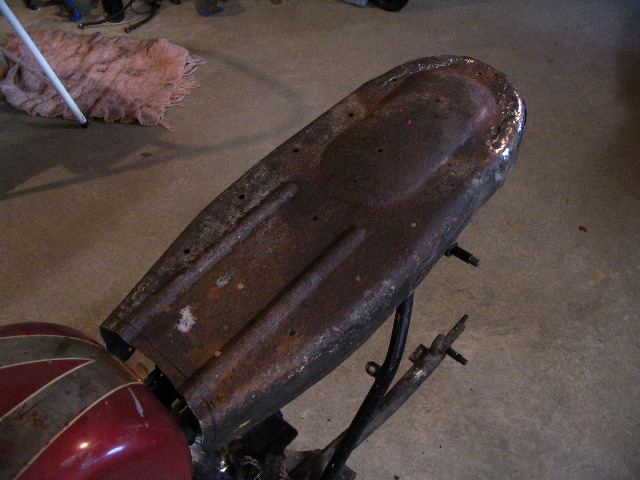
Once the tank arrived I trimmed the front of the seat to fit. I'll still be able to use the stock mounts up front, but I did replace the rear mounts as the base will now sit slightly further back than stock.
With the pan done, I stopped by a local uphostery shop and picked up some foam to create the new seat. It's 1" thick so the seat was built up in layers. I wasn't all that sure this was going to work out well and I didn't take many pictures of the process, but it's not that complicated.
First I cut the bottom layer to shape with an electric carving knife, and sculpted the places where the ridges in the pan were. This worked ok up front, but I got the rear indentation in the wrong spot so I ended up cutting this bottom piece, and working on the front and rear sections seperately.
Next up was the bump stop (or "bum stop" for you Brits!). I laid out a template of the side and front views on some paper. To get the curve, I marked the starting and ending points I needed, and then took some welding wire and flexed it to fit between those points, holding only the ends. This gives a nice smooth curve that can be modified a little by forcing the ends this way or that until it looks right. I only did one half of the front view. Transferred it to a piece of wood to get a stiffer pattern. Flip it over for the other side.
I cut out more horizontal layers of the foam to get a step-shaped block in roughly the shape I needed, then glued the sections together.
The front profile was relatively easy to lay out on the foam with a Sharpie, but the side profile... the shape I had drawn would only occur in the center of the block. I could either cut an outside template and then try to carve by eye and keep checking, or... I could cut the block down the middle and draw the profile on each side. I took it over to the band saw and cut away.
The rough shaping was done on each half seperately. I used the bandsaw again, first cutting the side profile, and then the front, leaving myself some room for the final shaping. The foam is pretty forgiving, if you mess it up too bad you can always cut out the bad spot and glue in some new foam. Luckily it never came to that but it does boost the confidence. Once both halves were roughly the shape I needed, I glued them back together. I should have taken a picture after this step, it was UGLY. At this point I was convinced this wasn't going to work so I hung it up for the night.
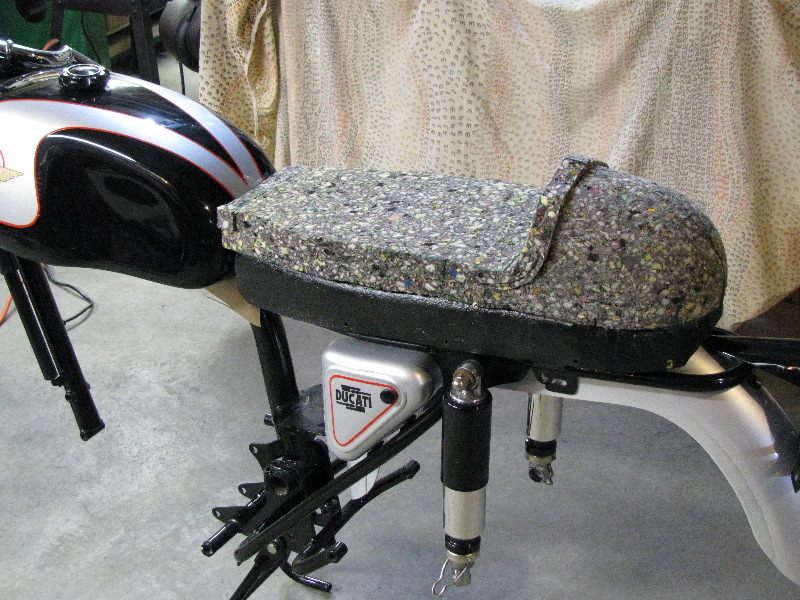
A day or two later I came back to look at it, and decided to keep going. I took the part over to the belt sander and shaped the front edge so it matched the profile I had drawn out. Then I shaped the center section so it looked relatively smooth. That worked out better than I had expected, so I just started sanding away until it was smooth. Once it was close to what I needed, I fit it to the base and glued everything down.

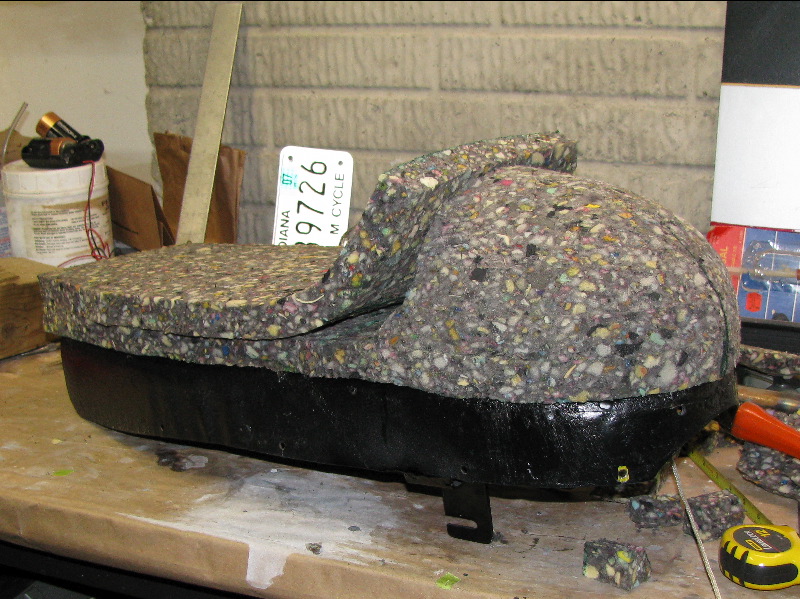
Then came the top layer, which I curved up over the face of the bump to get a nice, flat surface. Once that was fit and glued down, the entire mess was brought over to the belt sander and the final shaping was done. It isn't perfect, but it's close enough! (These pics are from before the final shaping was complete)
Then off to the upholstery shop where it was covered in another thin layer of foam, followed by black vinyl. The recovering worked ok but it revealed a mistake I made in shaping the foam. I put a gradual curve between the seat base and the front of the bum stop. There's no good way to make the vinyl follow this curve - it would have been better to go with a sharp edge. Also, I made the hump too big. The seat looks too massive on the bike and to be honest, I don't like it all that much.
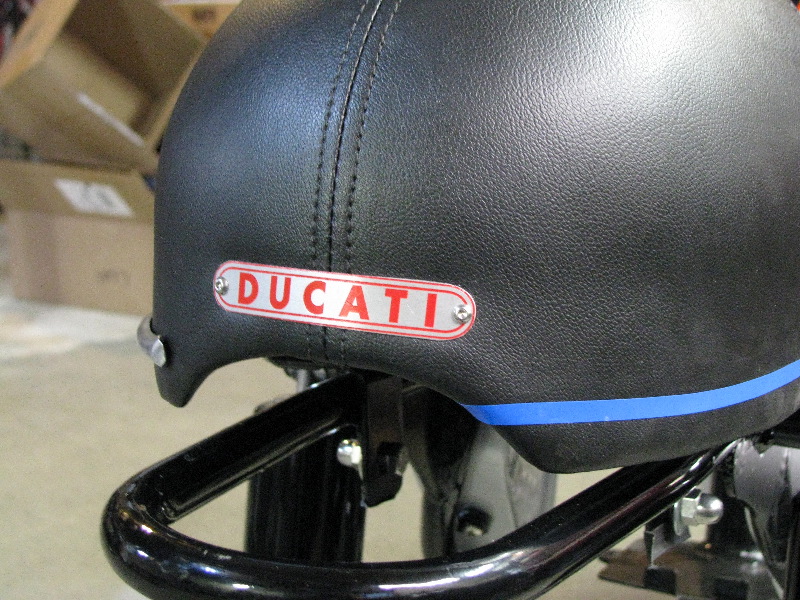
I came very close to tearing off the new cover and shaving off the hump, but decided to follow through on my initial plan and add side trim and a badge on the back. I reused the trim off the old seat, cut and reshaped to fit, then polished. The tape is a guide to show where to punch holes in the cover and then drill through the metal pan. (The trim strip hasn't been tightened down yet in this shot - it compresses the foam under the cover just enough to fit flush with it = no gaps.)
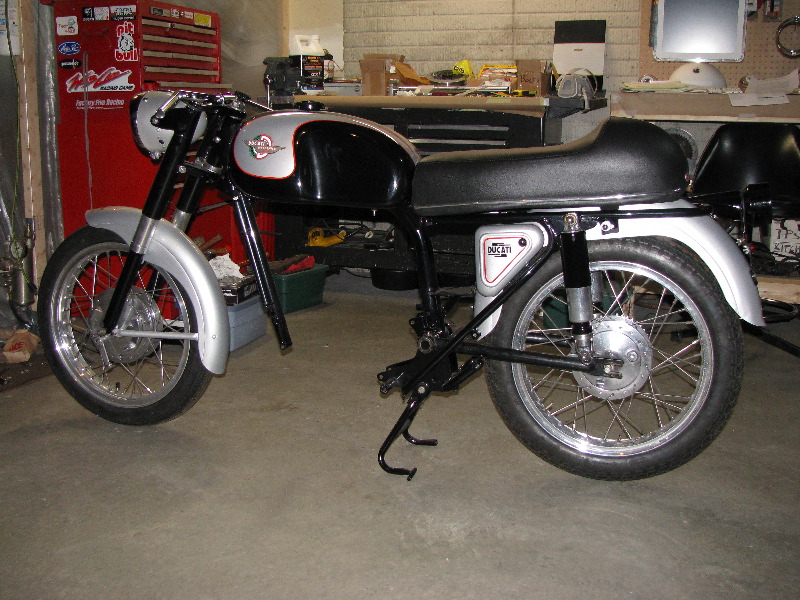
With the trim on the seat and the rear wheel in place, it doesn't look quite so bad anymore, but I think I'll still end up redoing it. I'm going to wait until I've ridden the bike though, I may decide on other changes to make it more comfortable and it makes sense to do all the mods at once. (I also need to raise the back of the tank a touch)
FWIW - this is NOT a cheap way to do things. A fiberglass tail would have almost certainly cost less... especially when you add in the cost of me redoing it next winter! :")
The stock seat pan shape
I spent way too much time deciding if I should get a fiberglass tail or try to reshape the original pan. After devising numerous methods of reforming the radius on the edge of the pan, I decided to cut and paste instead.
I came up with a template of a shape I thought looked good and laid it out on the pan (black line). While thinking about the best places to cut to get everything to match up so it could be butt welded nice and pretty, I realized there was no need to get perfect joints on this rusty tray that would end up hidden under foam and fabric. I laid out the cut lines (pink) freehand and started cutting. Soon I was just cutting where it looked to make the most sense.
When the time came to form the shape, I ended up eyeballing it, not using the template I had spent so much time drawing. I made a new template from the now modified side and used that to check the shape of the second side.
Once the tank arrived I trimmed the front of the seat to fit. I'll still be able to use the stock mounts up front, but I did replace the rear mounts as the base will now sit slightly further back than stock.
With the pan done, I stopped by a local uphostery shop and picked up some foam to create the new seat. It's 1" thick so the seat was built up in layers. I wasn't all that sure this was going to work out well and I didn't take many pictures of the process, but it's not that complicated.
First I cut the bottom layer to shape with an electric carving knife, and sculpted the places where the ridges in the pan were. This worked ok up front, but I got the rear indentation in the wrong spot so I ended up cutting this bottom piece, and working on the front and rear sections seperately.
Next up was the bump stop (or "bum stop" for you Brits!). I laid out a template of the side and front views on some paper. To get the curve, I marked the starting and ending points I needed, and then took some welding wire and flexed it to fit between those points, holding only the ends. This gives a nice smooth curve that can be modified a little by forcing the ends this way or that until it looks right. I only did one half of the front view. Transferred it to a piece of wood to get a stiffer pattern. Flip it over for the other side.
I cut out more horizontal layers of the foam to get a step-shaped block in roughly the shape I needed, then glued the sections together.
The front profile was relatively easy to lay out on the foam with a Sharpie, but the side profile... the shape I had drawn would only occur in the center of the block. I could either cut an outside template and then try to carve by eye and keep checking, or... I could cut the block down the middle and draw the profile on each side. I took it over to the band saw and cut away.
The rough shaping was done on each half seperately. I used the bandsaw again, first cutting the side profile, and then the front, leaving myself some room for the final shaping. The foam is pretty forgiving, if you mess it up too bad you can always cut out the bad spot and glue in some new foam. Luckily it never came to that but it does boost the confidence. Once both halves were roughly the shape I needed, I glued them back together. I should have taken a picture after this step, it was UGLY. At this point I was convinced this wasn't going to work so I hung it up for the night.
A day or two later I came back to look at it, and decided to keep going. I took the part over to the belt sander and shaped the front edge so it matched the profile I had drawn out. Then I shaped the center section so it looked relatively smooth. That worked out better than I had expected, so I just started sanding away until it was smooth. Once it was close to what I needed, I fit it to the base and glued everything down.
Then came the top layer, which I curved up over the face of the bump to get a nice, flat surface. Once that was fit and glued down, the entire mess was brought over to the belt sander and the final shaping was done. It isn't perfect, but it's close enough! (These pics are from before the final shaping was complete)
Then off to the upholstery shop where it was covered in another thin layer of foam, followed by black vinyl. The recovering worked ok but it revealed a mistake I made in shaping the foam. I put a gradual curve between the seat base and the front of the bum stop. There's no good way to make the vinyl follow this curve - it would have been better to go with a sharp edge. Also, I made the hump too big. The seat looks too massive on the bike and to be honest, I don't like it all that much.
I came very close to tearing off the new cover and shaving off the hump, but decided to follow through on my initial plan and add side trim and a badge on the back. I reused the trim off the old seat, cut and reshaped to fit, then polished. The tape is a guide to show where to punch holes in the cover and then drill through the metal pan. (The trim strip hasn't been tightened down yet in this shot - it compresses the foam under the cover just enough to fit flush with it = no gaps.)
With the trim on the seat and the rear wheel in place, it doesn't look quite so bad anymore, but I think I'll still end up redoing it. I'm going to wait until I've ridden the bike though, I may decide on other changes to make it more comfortable and it makes sense to do all the mods at once. (I also need to raise the back of the tank a touch)
FWIW - this is NOT a cheap way to do things. A fiberglass tail would have almost certainly cost less... especially when you add in the cost of me redoing it next winter! :


