Follow along with the video below to see how to install our site as a web app on your home screen.
Note: This feature currently requires accessing the site using the built-in Safari browser.
We noticed you are blocking ads. DO THE TON only works with community supporters. Most are active members of the site with small businesses. Please consider disabling your ad blocking tool and checking out the businesses that help keep our site up and free.
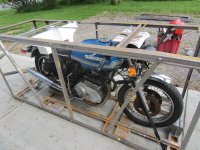
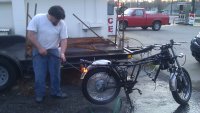
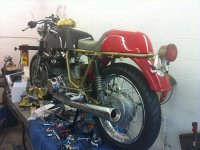
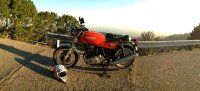
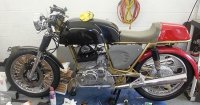
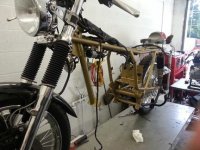
Hi all, For the last 9 Months Ive been working on my 77 Ducati 500GTL. For the longest Time I didn't know the direction I wanted to go with it. Restore it to original, just get it running and use it to beat around or make a cafe racer out of it. I finally decided after pulling it apart and polishing some parts that it needed to be a café racer project. The first thing I did was to make sure the engine was solid. After changing the points and some marvel mystery oil the engine came to life. Though the compression was down It was running. No oil leaks and running I was confident we had a winner. After about 30 min of running I check the compression at it was just about up to spec. I was very happy to see that. So Dis assembly began. Starting with the engine and before I knew it she was down to a bare frame. Lots of cleaning and replacing nuts and bolt was ahead of me. The first pictures are how I got her.
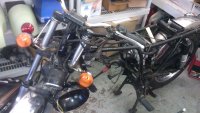
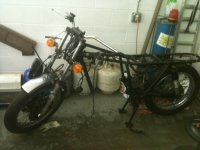
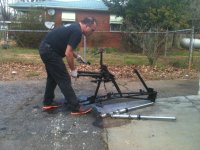
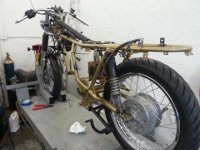
Ok the first day of working on her most of the day. I got the engine out now its time to degrease the roller. 36 years of nasty grease and grime. Its like cement wont come off time for the pressure washer! lol. Someone left this poor bike out in the weather for decades. Lots of cleaning and polishing in my near future.
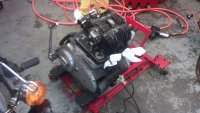
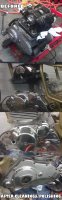
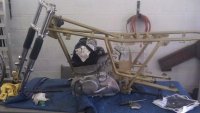
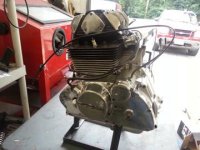
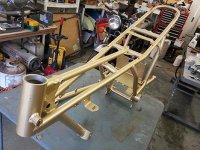
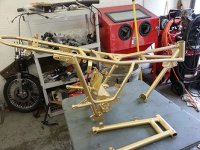
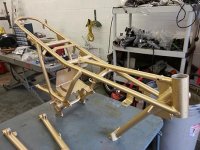
Finally got the frame clean and stripped down. Its off to sandblast and paint. The frame will be metallic gold with black tank and seat. Im not sure what style of tank and seat yet. The engine was the next target. Soda blasting and cleaning is the first thing then panting and polishing.These Ducati 500 Parallel twin engins don't have the best reputation. I found a post on a Ducati forum by a man named Chris Bushell. He is by far in my opinion the master of these engines. Although he is in the UK and Im in thre US we communicated through email. Chris Told me all the things to check and even sent me a workshop manual for the bike. Came to find out the oil filters are no longer made for these bikes Chris custom made me a oil filter bolt to adapt a common filter on the bike. This guy is the best! Chris also gave me the serial numbers of the engines that had problems and lucky for me my engine is a newer one and Ducati had made some changes to fix those early problems. I have about 10 hours into the engine so far including checking all the things Chris told me (everything looked great inside the engine), paint, new gaskets and polishing all the aluminum. The engine came out very nice and just needs a few more thingsto be finished. Next all the small parts need to be blasted and prepped for powder coating. I never thought it would end It felt like I was sandblasting for a week lol Every nut and bolt ,brackets,hubs and rotors etc... More pictures to follow.
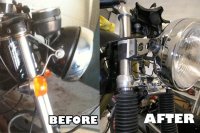
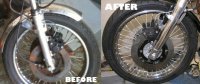
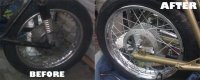
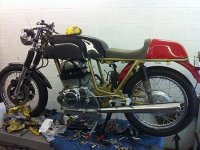
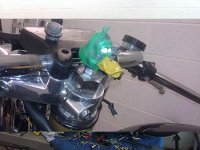
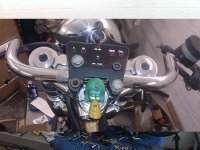
Some Before and After Pictures, I finished detailing my wheels and mounted up some new Avon tires. Its starting to take shape. The next step do I put clip ons or clubman bars. Im leaning toward clubman bars. I've got the LED dash refinished and the bars will go on next. Just started to wire the bike too. Another question do I make a set of rearsets or leave stock pegs? Any input from fello board members on the rear set question. Hopefully I will have the tank and seat choice straitened out soon.
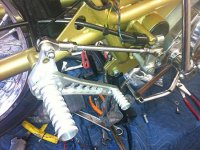
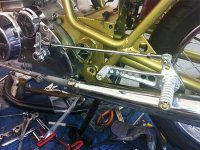
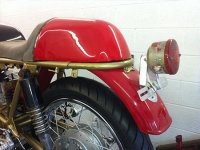
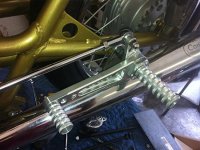
Ok, Been busy at work so I haven't gotten much done in the last month. I did get the tank and seat sorted out. I picked up a Manx TT tank from legendary motorcycles and a replica Ducati 900SS seat. Also got a rear fender from a Ducati 500SD with a little modification it fit right on. The rear taillight is a CEV and bracket is a repot for a 900SS. I really like the combination. I think everything flows very nice. I'm still not sure about the paint yet. I also got the rear sets mounting figured out. I welded a 10mm threaded rod to a coupler so my rear sets could bolt to my frame at the same point as the exhaust does. This seems to be a good riding position. I machined the original shift lever to accept the linkage from the new rear sets and everything lines up perfectly. The brake petal was a different story. I was going to modify the original brake petal but after looking at it for a while I decided to fab a completely new brake lever. I got the wiring in but not hooked up I guess that's the next step.
What are you using for the ignition points? Running new IRC 310's a 90/80-18 front, and just installed a 130/80-18 rear tire that is not on in this picture, but that's about as big as you can go with a fender on the rear.. I have two of these bikes #502437 build date 1/77 and #502525 build date 3/77 the one in the picture is #502525 original color someone took the stripes off which looks better.... Yours looks sweet, I opted for the un-restored look, though a little buffing here and there to make presentable... Using a breaker-less set up from this guy in Germany as below..
I have one of the earlier magnetic trigger set-ups he sold a few years back, the new one uses a light trigger I believe. My early box was about $200.00 cheaper than the almost $500.00 they want now, it just goes to show you how much the US dollar has been devalued in recent years. The spark box works great, the ignition system on these bikes is crazy from the factory, so I rewired my ignition lead with a heavy duty connector at the harness lead so there was less line loss, personally I'm thinking just a on off switch lead right to the coils... The nice thing about the spark box is there are 9 different spark curves to choose from and a 8100rpm rev limiter and a 9100rpm limiter. I'm currently running hottest curve #9 total of about 42 degrees advance #8 heat range NGK plugs super unleaded. I'll be looking for more updates... Video of mine running after the install of the HEI plate
Some unforseen events. Got side covers mounted things were looking great and my powder coating is coming off... peeling. I'm furious. so now the bike had to be broken down again stripped and recoated. I'm pissed off. I won't mention the powder coater name until after I see what he's, s going to do about it.
The Ducati parallel twins are kinda like the Indian verticals. They weren't made long, nobody liked them when new because they had all kinds of gremlins, they're very hard to find in good condition, and parts are mostly unobtainable. But damn, are they good looking bikes.....
OK now that I have to tear this bike down again! I needed to feel like I was getting somewhere with the project. For a split second I thought about pushing into a corner for a while but I decided to layout some graphic designs to get me motivated let me know what you guys think of the concept so far. Nothing is in stone it just a start. The yellow rag isn't part of the design lol
Here we go again I started to dissemble the bike again so that my powder coater can strip the frame and fix his mess. This is so much wasted work but its got to be done. I've got the engine out, rear wheel off I'm going to pull the front end tomorrow and get it back to powder coater. Pictures don't show rear wheel off.
Here we go again I started to dissemble the bike again so that my powder coater can strip the frame and fix his mess. This is so much wasted work but its got to be done. I've got the engine out, rear wheel off I'm going to pull the front end tomorrow and get it back to powder coater. Pictures don't show rear wheel off.
The owner of the powder coating company looked at me with a blank stare when I asked why it was peeling. This company is huge they have an oven that you could drive a truck into and they are just a 1/4 mile from my shop. You would think they would care about the quality of their work. He didn't even offer to re powder coat the frame. I having my painter who is always excellent just paint it. Less durable but I know the final product will be great. Wanted to be riding this weekend but at least two more weeks before it will be ready at the fastest.
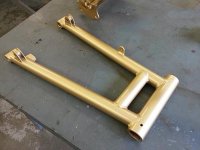
I got my frame and swing arm back from the painter after the powder coater did a horrible job. I stripped the frame and sent it to paint. This is what I should have done from the beginning. The color is perfect and the quality is great! Thanks to Peter from Peters Custom Art in Statesville NC. Now time to get the energy to re assemble this bike one more time. :-\
The owner of the powder coating company looked at me with a blank stare when I asked why it was peeling. This company is huge they have an oven that you could drive a truck into and they are just a 1/4 mile from my shop. You would think they would care about the quality of their work. He didn't even offer to re powder coat the frame. I having my painter who is always excellent just paint it. Less durable but I know the final product will be great. Wanted to be riding this weekend but at least two more weeks before it will be ready at the fastest.
according to others I've talked to apparently the powder coater didn't prep the frame correctly I don't know much about powder coating other than its supposed to be more durable then paint of course my bike was peeling all over. Also the powder coating company refused to redo the frame unless I paid him more $ I told him to F*@K off. Stay away from Race City Powder coating Mooresville NC (my opinion only of course)
This site uses cookies to help personalise content, tailor your experience and to keep you logged in if you register.
By continuing to use this site, you are consenting to our use of cookies.