My lil Sudo Cafe

Crash

Crashing is a way of life
Before anyone else says it, I know my bike is not a traditional Cafe Racer. It's more of an "inspired by design". It won't do a Ton, it's not the prettiest thing, it has some additional pieces to make it more functional in everyday life, but it's mine.

Mine is a 1993 Honda Nighthawk 250. Originaly I wanted a BMW R90S look, but then I lived up to my nickname and went more of the Flat black "Mad Max" style. It is still a work in progress, and I am constantly getting idesa from everywhere.

Newpaint009.jpg


newpaint008.jpg


newpaint006.jpg


newpaint005.jpg


newpaint004.jpg


Eventually I will redo the seat and tail bag to be one unit. I'll remove the stock rear section and french a tail light into the tail bag. I am also going to cut down the side panels to just after the battery cover and leave the rear frame exposed. Will lower it 2 inches all the way around, and fab up some rear sets for it.

Hope you like, and be truthful in your comments. If you don't like it, tell me what it is you don't like.

Crash
 
Crash said:
Before anyone else says it, I know my bike is not a traditional Cafe Racer. It's more of an "inspired by design". It won't do a Ton, it's not the prettiest thing, it has some additional pieces to make it more functional in everyday life, but it's mine....

...Eventually I will redo the seat and tail bag to be one unit. I'll remove the stock rear section and french a tail light into the tail bag. I am also going to cut down the side panels to just after the battery cover and leave the rear frame exposed. Will lower it 2 inches all the way around, and fab up some rear sets for it.

Hope you like, and be truthful in your comments. If you don't like it, tell me what it is you don't like.

That's a cool little bike.
It looks all kinds of arse-heavy but, like you said, it's yours.

If you need a trunk you need a trunk (at least you butched-it-up with the satin black and gnarly skull, hah).
But seriously, that trunk is bigger than your tank hey?

You ever consider putting a fork brace or a smaller front fender on there? I know you don't do the ton, but it helps... Not to mention the dirt and dust you get thrown into your face running fenderless (I ran fenderless for half of last season).

Keep up the good work.
 
This is my daily driver, and the trunk is a Big Help. As for the front fender, I have not even ridden it like that yet. I am still recovering from the wreck (sprained Shoulder) and the front brake lever is broken. Lever is on back order.

I still have the front fender, and if I decide I don't like running fenderless, I'll paint it and put it on. Just thought it looked good without it. :)
 
Go down to Mexico and everyone at the docks has this bike. Not a single one of them is as cool as this little cafe diddy. Don't let people give you shit for making a bike into what you want. As long as you're happy with it, RIGHT ON!
 
eightthirtysixcc said:
As long as you're happy with it, RIGHT ON!

Isn't that the whole point of riding and moding? No one really gives me shit about it, the just think it's different.
 
I do like the scoot, but you need to :
1. Lower the hell outta it
2. Ditch that rear bag/busa tailsection thing all together
 
Hey, Crash...
Let me take back what I said about the trunk, I didn't reallize it was removeable and only strapped on... I kinda want one now for when I have my 2-up seat on... that'd be great for the ride for sight (Much better than a heavy backpack).

However, I'm keeping with the comment on the fork brace.

It's not hard to make one. I just bought a length of roundbar and a strip of steel from Canadian Tire and bent the bar over a piece of wood I cut to form with a Jigsaw (got the shape with wire from bolt to bolt on the forks).
Then I just cut the strip into a \___/ shape and welded the roundbar to it.
Theres a pic of it somewhere on this site (probably under my introduction "Please Allow myself to introduce... Myself").
And there'll be more pics soon, just waiting to get the photos transferred to this computer.

Or you could always just cut the support out of your old fender (if you dont mind / it's damaged) and bolt it in the stock location.

Lots of people think I'm crazy for trying to make a cafe out of a SECA... But I like it, shaft drive or not.
Keep with it.
 
So back to the back - where did you get the fancy tail-bag/trunk whatever? Might look nice on the back end of my R75/6 for longer rides.
 
Cool bike. Don't take crap from anyone. Its yours and you are building it to the way you want. If someone doesn't like it tell them to give you their check book and you'll build just the way they want.
 
OK, project has been on hold for a while, but I have some ideas I want to run past ya'll. I want to change the tanke out to a '78 CB400 tank or similar. I do not like the pre77 petcock, and would like to find a tank on the cheap to see if this might work. i am also going to put a universal cafe seat on it and modify to fit

Also, because my bikes top speed is around 75 MPH, I thought I would name it "3/4 Ton". Paint it olive drab green, and put some nose art on it. Below is the Nose art I have designed for it.

If anyone has any info on the tank, or has a Decent spare lying around they want to sell or trade, let me know.

Crash
 
Crash said:
OK, project has been on hold for a while, but I have some ideas I want to run past ya'll. I want to change the tanke out to a '78 CB400 tank or similar. I do not like the pre77 petcock, and would like to find a tank on the cheap to see if this might work. i am also going to put a universal cafe seat on it and modify to fit

Also, because my bikes top speed is around 75 MPH, I thought I would name it "3/4 Ton". Paint it olive drab green, and put some nose art on it. Below is the Nose art I have designed for it.

If anyone has any info on the tank, or has a Decent spare lying around they want to sell or trade, let me know.

Crash

Brilliant.

Definately dig the name, and the color scheme.
Here's a bike I'm just about finished up with (well... some of it) in that olive drab color. It will be recieving a dark red star on the tank:
Bike-Mockup1.jpg


The grenade was a last-minute idea I had - it's just a stencil I sketched and sprayed with some white rust paint.
I was inspired to name the bike "the grenade" because
A) the seat cover I used looks like a seat from a (well used) old army jeep; and
B) the cb400T it's going on may explode at any moment, LOL.
 
I like it. Come to think of it, a 400 hawk tank might do me better than the 400F tank that I want.
 
How to Build a Cafe Racer from a CB 250 Nighthawk


Turning the CB 250 Nighthawk into a Cafe Racer


Converting The CB250 Nighthawk into a Cafe Racer! (Or at least how I did it)

This is not a project for the faint of heart. You will destroy your resale value, and frame cutting is required.

These instructions are for those with working knowledge of a motorcycle. Details on how to do certain standard modifications and removals are not given. With that said, lets get started


Parts Needed:

Older Model (Mid to late 70's) CB Fuel tank with left side petcock and NPT threading.

7/8" Clubman or 32mm clipon handlebars.

Cafe Seat (purchased or made)

Tail light and License Plate bracket

Bar end Mirrors (optional but adds to the look)

Two Shorty Mufflers or mufflers of your choice.

Two Vinyl Flooring Tiles (Explained Later)

Paint and Graphics if Wanted

Universal Headlight Ears (optional)

Universal Cafe 1/4 Fairing (optional)

Custom Made rearsets (Very Pricey Option)

Various Nuts, Bolts, Sheet Metal Screws and Spacers

Zip Ties

Shorty Shocks (11" Eye to Clevis)

New Chain and Sprockets of your choice (optional)

#38 Pilot Jet and a #115 Main Jet for carb

40mm Pod Filter (optional but great for rejet)

Construction paper and marker


Tools Needed:

Metric Socket Set

Metric Wrench Set

Screwdriver Set

Hack Saw (I told you we would be cutting)

Drill and bits

Sandpaper

Wire Cutters and Strippers

Motorcycle lift

Muffler Wrap (Optional)

Nerves of Steel :)


Instructions:

Start by Placing the bike on the lift and remove the Battery, handlebars, tank, seat, Plastic Body, exhaust system, turn signals, headlight and bracket (if replacing these), Rear Tire, Front and rear sprockets with chain (if replacing these), taillight, shocks, plastic fender, Carburetor and air box. With all of these removed, we can see that the potential actually is there to make this a sweet little Cafe, despite any ridicule we may have gotten.

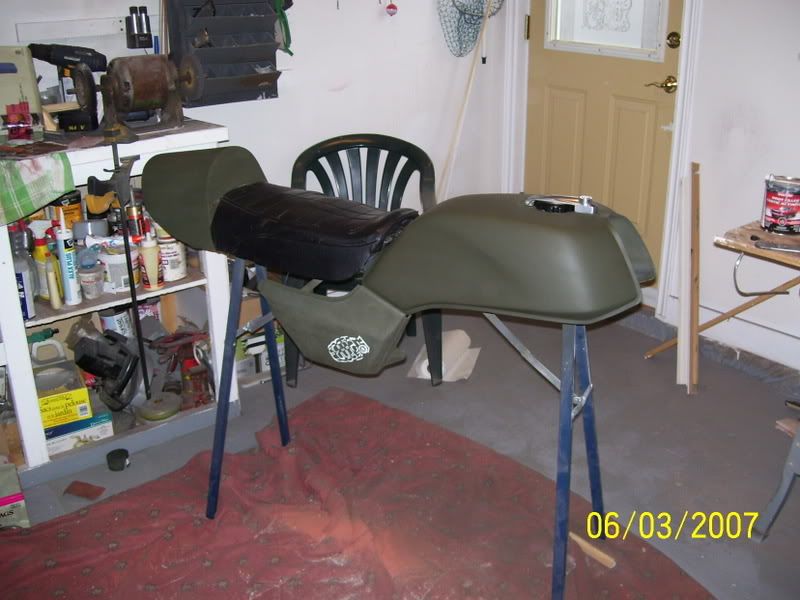
Paint the tank and seat to desired color and graphics.

Next, cut the tail section just behind the upper shock mount weld and the front portion of the grab bar on both sides to leave a flat top frame. While we have the saw out, cut the exhaust just forward of the crossover pipe.

With the battery and air box out of the way, Use the construction paper and marker to make a template for new side covers. Place the construction paper behind the frame where the side covers are to go, and trace a line onto the paper to the shape wanted. Cut out the template, and transfer the design to the flooring tiles (told you I'd explain this). Using a box cutter, cut out the design on the flooring tile. Paint to match. Set aside for now.

Replace the front and rear sprocket (if replacing these), and reinstall the rear tire and chain. Install the 11" shocks.

Mount the new mufflers to the shortened exhaust. BTW, I painted my down tubes with high temperature exhaust paint. Replace the exhaust. Some brackets may need to be made Depending on your application so the exhaust does not rattle.

Remove the petcock from the stock tank and reinstall it on to the new tank. Slide the new tank in to place. Depending on your application, you may need to level the tank and make brackets or tie downs.

Install the Cafe Seat. Again, Depending on your application, Brackets may need to be made. (Told you this was not for the faint of heart!).

Loosen the bolts on the triple trees and push the forks up 1 1/2" to 2" making sure that they are they same level. WARNING! This will make your steering quicker and you will loose some give in you front suspension. This is necessary to level the bike after installing the shorter rear shocks. Tighten the bolts back down.

Install the new handlebars of your choice. Reroute the clutch, brake and throttle cables so that they do not bind. Install the bar end mirrors if you decided to go with this option.

If using the new headlight ears, install them on the forks but leave the a little loose for adjustments. Bolt the headlight to the ears and slide the headlight up and down the forks to the level that you want it. If installing the quarter Cafe fairing, leave room for it to clear you gauges. Install fairing.

Bolt the taillight of your choice to the tail section of the new seat and wire it up. Install turn signals in desired locations.

Install rearsets if you have them.

Rejet carburetor and reinstall. Place pod filter on carb if using this option. If not, reinstall air box.

Reinstall battery and check for power at all systems. Start the bike to ensure everything is set properly. Adjust accordingly. Zip tie anything that is hanging down (IE solenoids etc...) to the frame.

Using self drilling sheet metal screws and spacers, install the new side covers.

Another option is to relocate the battery so that it is under the hump of the new seat. This will required a base to be fabricated and welded to the frame and longer cables. If you do this, side covers are not required and gives a very clean look to the bike.

Another option is to use fuel cell foam to prevent to fuel from sloshing around in the tank. This is great for high speed turns.

Put on your best leathers and helmet, fire it up, and TON UP! Yes, with these mods, the 250 Nighthawk will do 100mph. With the new jets, air pod, more open exhaust, and different sprockets, it is more than possible. These mods removed 22lbs of weight from my bike and increased the HP to 31bhp (dynoed). Pretty trick, Huh?

Total cost of parts:

Tank: $50 - $100

Bars: $25 - $100

Seat: ? - $150 Depending on if you make or buy.

Taillight: $25 - $75 Depending on style used.

Mirrors: $25 - $150 Depending on style used.

Mufflers: $60 - $250 Depending on style used.

Flooring Tile :$1

Paint and Graphics: $25 - ? Depending on rattle can or professional and details of graphics.

Headlight Ears: $15

Fairing: $60 - $150 Depending on style used.

Rearsets: $$$$$$$$$$$$$

Shorty Shocks: $90

Chain and Sprockets: $130

Carb Jets: $7

Pod Filter: $10

Total Cost as I did mine : $668 for parts + $500 For bike = $1168.
More than half the cost of a new one, and three times as much fun!
 
Still got a lot of work to do, but I thought I'd show these pics. Got the flash card back from mom, but all the pics were deleted :mad:

Still want to lower the front some more, repaint the seat pan, weld on the mufflers, add my side panels, reinstall my bar end mirror, redo the seat, etc...


Picture018.jpg


Picture017.jpg


Picture016.jpg
 
Back
Top Bottom