My name's Scott and I have a problem

Keep it comin, good work so far mate.

Loving all these little scoots on here lately, making me want to pick one up.
 
I'm glad you decided on black tyres! ;D

Not the cleanest starting point in the world but looking forward to seeing what you can do to it!
 
adventurco Cheers! I enjoyed your build thread. A lot of info there. Strangely two things stayed with me... Gold marker on the cover and a early sixties bug.

Green199 I don't want anyone to think I'm short of original ideas, but when it comes to the colour of tyres, I am a stickler for tradition. I'm impressed by what you've achieved. Hopefully I can do the same.
 
Before I start, I'd like to coin a term from Ichiban and just say that electrolysis is BADASS! It's like some weird addiction. I blame all those years I've wasted scrubbing individual nuts and bolts with wire wool. I can't imagine I'll ever run out of things to blast, but I'm already walking about and noticing rusty bits of crap lying on the floor and thinking, "That could use some electrolysis. Maybe I should take that home with me?"

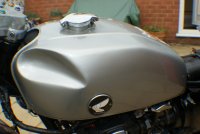
So this is my current situation regarding the tank. I flattened back the cellulose primer, then laid a good few coats of high build primer to sort out the little pinholes that remained.

honda-cg125-build-12.jpg


Next I gave it a light coat of matt black and used some 800 and 1500 grit and lots of water to make it flatter than a witch's tit.

I spent some time deciding which shade of orange to choose and ended up going back to what I know best, old VW and Porsche colours. I went for L21E Signal Orange, a colour that beetles, campers, 911 and 914's all rocked in the early seventies. I ordered up some 2K Spraymax paint, as I was impressed by the results of the cellulose primer.

I am cursed with a lack of space. I live in what was designed as a retirement home, and it has this strange extra room which I can only describe as a half greenhouse half store room in the rear garden. It is boiling in the summer and freezing in the winter. It is 10ft by 6ft. In it I have the house dryer, tools, my welder and gas bottle, a couple of bicycles and a whole load of ply and mdf, to name just a few. I could swing a cat in it, if what you wanted was a smashed cat at the end of it.

Photo%2012-07-2015%2016%2004%2048.jpg


Painting anything with 2K in that space is a no no on so many levels. I am rather fond of my lungs for starters. This means I have to paint on the balcony and risk getting bits of garden stuck to it. The first run I did worked well but it was a tad windy and I ended up with some of mother nature integrated into the colour scheme. I flattened it back again with a lot of clean water and some 1500 grit and noticed one or two spots where the primer was rearing its head again. So I gave it a another shot with a few more coats. In total I think it's had 6-8 coats of the orange.

honda-cg125-build-10.jpeg


The orange peel isn't that bad at all. Maybe because the tank is orange that there's something almost natural to it?

honda-cg125-build-12.jpeg


This is where I am at with the tank right now, and I could use some sage words of wisdom as to what my next steps should be. There are two tiny spots where something has stuck to paint when drying. They're pretty small, but one is on the top of the tank, and I know for sure I will be staring at it every time I'm stuck at a red light. Also, I don't know if I need to put a clear coat on (I'm a messy bugger and fuel will inevitably be spilt)? Do I...

1 - Sand and polish the two little spots, leave the peel and add the decals. Job done?
2 - Flatten the peel allover, polish the whole tank and add the decals??
3 - Do the same as 2... BUT THEN.... spray it with some 2K clear coat, flatten and polish???

Any advice would be greatly received.
 
Tank's looking good. Are you using spray cans?

I found the "Rattle Can Bling" topic to be absolutely invaluable for all painting stuff - check it out... so much info:

http://www.dotheton.com/forum/index.php?topic=10993.0
 
Thanks el barto. It's all rattle cans. I used Spraymax products, apart from the high-build primer, as they had been recommended on the welding forum I use.

honda-cg125-build-13.jpeg


The red part in the lid gets pushed into the bottom which mixes the two parts. The spray was relatively even and consistent with each coat. It's not cheap but then you get what you pay for.

Thanks for the link. That thread looks great. It would appear that certain parts I did right and other parts I either rushed or neglected to include. It's early days but I've been happy with results so far.
 
Ah sweet. Which primer did you go for? Did you get the colour made up by Spraymax specially? I've only used their clear coat so far...
 
Yeah it's good! The business really...

Thanks for the link - I can't find gunmetal 2k anywhere - very annoying!!! I'm gunna scour their eBay listings...
 
Well... so much has happened since my last update, which was only last week, but it looks like my chances of getting this build completed are already on the ropes. Firstly, my two month old son is not well. He is having breathing issues which means he is in need of constant attention. We're all patiently waiting for him to recover but in the meantime it's rather like trying to cuddle an angry turtle that screams constantly.

AND to top it all, this happened....

Photo%2019-10-2015%2017%2039%2034.jpg
Photo%2019-10-2015%2017%2040%2006.jpg


The missus and both the kids were out of the house for an hour and I decided that it was enough time to get the wheels, handlebars and tank on the frame in order to get some pics and measure up the rear mudguard and tail loop position, as well as play about with which Honda decal I'd like for the tank. I pushed the frame around the front of the house as there's a nice bricked wall to use a backdrop.

Photo%2019-10-2015%2011%2011%2046.jpg

Photo%2019-10-2015%2011%2012%2008.jpg


I managed to get the bike back into my workshop before the family and associated chaos returned, but was in a bit of a rush. I put the tank up on a shelf on top of a box. I did what I have done all of my life, I didn't respond to a gut feeling. I told myself that it was a crap place to put the tank, but rather than listen to my own advice I thought I'd come back and sort it once I had helped the missus and the kids. Anyway, only a couple of minutes had passed when I heard that horrible sound. It must've fell and hit the bike frame first, before hitting the tiled floor.

So, I'm not sure what to do next. In the hour or so after it happened I was certain that I shouldn't have even contemplated the idea that I could build a bike on my own in my spare time. It took three months to get that tank painted, and I haven't got the time to go through the process again. Today's a different day, and I guess what doesn't hurt you makes you stronger? I wanted to end this project having done all the work myself. The tank was supposed to be the centrepiece. Anyway, Mrs Jangers has reassured me that we can afford to get it repaired and painted and I'm currently getting quotes. If it's too much money, I may just have to sand it back again and do the whole thing again.

Anyway, I hope the next time I post it will be with some good news.
 
Shit mate :( 
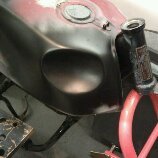
when it happens its always big time, sure hope ya son gets on the mend as we all do here as for ya tank yeah its a bummer but its only the tank ,look how much you have learnt and done yup its a start again time but believe me it wont take as much as ya think after doin it once ya kinda in the zone except ya gotta put ya hand in ya pocket for materials wot about changing style by put hand dents in the front of tank a bit more old school cos ya half way there on the left side (kinda) ;) keep ya spirits up get ya son sorted mate the tank will still be there when he's better
 

Attachments

  • 620.jpg
    620.jpg
    13.4 KB · Views: 546
  • DSC06605.JPG
    DSC06605.JPG
    2.6 MB · Views: 282
  • DSC06606.JPG
    DSC06606.JPG
    2.4 MB · Views: 279
  • DSC06608.JPG
    DSC06608.JPG
    2.6 MB · Views: 293
+1

I often ride them for a bit with no paint or just primer only before I disassemble for paint. It looks like that tank had a lot of filler anyway. Maybe there's a more perfect tank out there to be had.
 
Hang in there. That's why we're all here, to buoy each other up.

I had a screaming turtle too. She's 12 now. She still has low a tolerance for frustration, but she did get better. Hang in there; with the boy, and the bike.

Phil
 
Chin up bruv.

With my build, honestly it's been one step forward and two steps back since I started it. I make a bit of a progress, find another problem etc etc. You'll get there in the end and it'll all be worth it.
 
“You can reduce your anxiety somewhat by facing the fact that there isn't a mechanic alive who doesn't louse up a job once in a while. The main difference between you and the commercial mechanics is that when they do it you don't hear about it—just pay for it, in additional costs prorated through all your bills. When you make the mistakes yourself, you at least get the benefit of some education.” Zen & The Art of Motorcycle Maintenance.

Thanks for all the kind words. The little boy's a trooper. He looks like my old man so he's probably gonna end up being invincible anyway. Malaria, the Gulf War, Bi-Polar Disorder, the man's gonna be alive still when I'm long gone.

As for the tank, well it's more to do with me still being a f*ckwit, than the damage caused. I will take the advice and leave the tank and any other painting to the end, and focus solely on the fabricating that needs doing. It's not like there's a shortage of jobs. I've been teaching myself to MIG weld, so at some point I'm going to have man up and sort the frame mods out.
 
That's the way fella ;) soon get ya mojo back when ya start sparking up n melting metal haha :eek: its an art in itself that welding shit :p but I learnt the hard way with that finally getting metal to stick together ( in a fashion haha) still got a pile of junk n burns to prove it LOL 8)
 
Back
Top Bottom