Follow along with the video below to see how to install our site as a web app on your home screen.
Note: This feature currently requires accessing the site using the built-in Safari browser.
We noticed you are blocking ads. DO THE TON only works with community supporters. Most are active members of the site with small businesses. Please consider disabling your ad blocking tool and checking out the businesses that help keep our site up and free.
Gary, I think it will likely be better to put the filler hole in after welding and straightening, probably less chance of the hole distorting that way. I will just be using a bolt in filler as you suggested earlier. I would love to have a TIG at the very least for the ease of tacking parts together!
Did some more work to the tank but I will be now making another one! I like the shape on the bike it looks great. Problem is everyone told me to use 14ga alloy but I decided I wanted it to be light so I used 16ga.... big mistake! Distortion is out of control and very difficult to try and straighten, also it will dent easy for sure. So out to pick up half a sheet of 14ga.
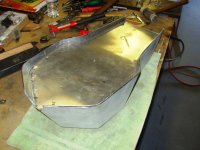
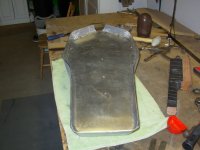
Well I got the bottom of the tank made and it fits really well, I am pleased with how it looks so far. I had to build the tank like this with the flange around the edge because I don't want to see the frame rails. Now I have to source a petcock and aluminum bung to braze in the bottom before I weld it to the tank top. Lots of practicing with edge welding first anyway!!
Looking good John, very nice. I have never built an alloy tank, I'm kinda tanking notes. I have used Pingle petcocks and like them. Nice quality and smooth action.
Cheers, 50gary
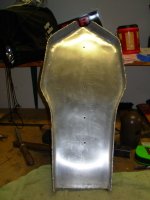
Well I am moving forward with the tank. Sides and top ar made and ready for welding. As it sits right now it will have about 20mm removed from the bottom edge of the tank so it will look a bit more streamline than it does right now. First practice weld with the oxy-acetylene also shown.
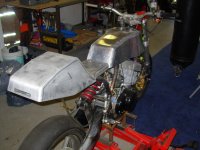
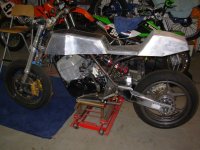
I only ran it to check the electrical system, it won't be ridden like this. I should be getting 34mm carbs soon and I am going to use Swarbricks pipes.
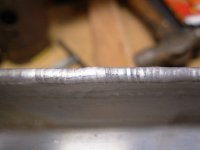
I got the bottom welded in the tank today which went pretty smoothly. As you can see in the pic my welds with the o/a are getting better. Next job is the tunnel and mounting brackets.
Johnu, excellent work, that has got to be so satisfying. How long of a bead can you run like that without getting too much heat and distortion? What filler rod did you use, would it be different for TIG vs. the O/A?
Cheers, 50gary
Yes I am really enjoying making this tank now, I was expecting it to be a chore in the begining. I am totally surprised at how little distortion I have had to deal with although I have had tons of experience with welded structures so I can determine fairly well how to sequence the welding. And I did sections of about 3" long welds. The big thing is getting the flame set exactly right, well that and having a good eye and feel for when to move the flame a little to reduce the heat momentarily. I am using 1100 TIG rod with the 3003 alloy sheet.
My new goal now is to have the bike done before Christmas.
This site uses cookies to help personalise content, tailor your experience and to keep you logged in if you register.
By continuing to use this site, you are consenting to our use of cookies.


")


