This is my last Brit bike bike, a Triumph Bonny. Too damned expensive now. All work: mechanicals, balancing, paint, polishing, spoking, electrical, sheet metal work and so on I did myself.
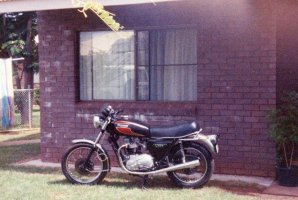
The gray is the first version of the Bonny I did when stationed in the NT. The bin received the seat and base, exhaust, engine spacers and brackets, foot pegs, tail light bracket, side covers, air cleaner, triple zener pack, tacho, Instrument cluster, battery holder and clutch plates.
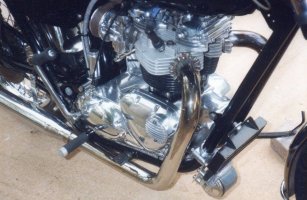
They were replaced with a hand beaten aluminium seat base, 2” drag pipes, aluminium engine spacers and brackets, aluminium foot pegs, tail light bracket, aluminium side covers, single zener, speedo bracket, battery holder, side covers, an earlier model single Zener and a set Barnets.
The frame had all excess tabs removed, a couple of extra tabs were added to the rear frame members for side cover mounts, I removed the air cleaner bracket welded to the 3” frame tube/oil tank. Once finished I filed all the welds smooth and bogged them.
I added an oil cooler mounted on an aluminium bracket I bent up. The rear guard was shortened and to that I mounted the tail light bracket I beat up, new steel seat hinges were also made up along with a couple of baffles I made up and slipped into the drag pipes.
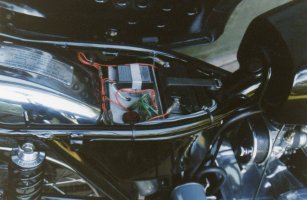
The electrics were redone, replacing the rectifier with a Tandy unit and the triple pack zeners with a single zener mounted on the heat sink I bent up. Ignition was now via the handlebar switch block with another two master switches to fool thieves: One on the left side cover, the other mounted on the heatsink.
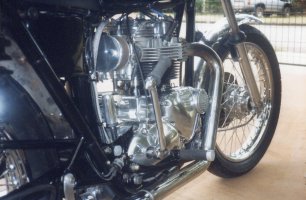
The engine was stripped and a new barrel and pistons and rings were purchased along with a set of big end shells. Gaskets were all hand formed except for the head gasket, for that I binned the solid copper one and replaced it with a composite. Combustion chamber, piston crown, cons and ports were mirror polished along with valve heads - face and backs. Gearbox cam plate was re-shaped a little and the edge along with the fork slots were polished.
I balanced the crank using knife edge straights, turned up a couple of stainless push rod tubes, mirror polished the engine side covers, and rocker covers, sand blasted the crankcase halves and cylinder head, polished the alternator rotor, why? because I could and it looked smick!
The rear brake bracket and hubs were polished, and the wheels laced with stainless spokes. The cylinder head was also reshaped a little to get nice square edges on the fins.
Frame, tank, side covers, speedo, tail light bracket, foot brake lever, kick stand and centre stand and rear brake rod were all painted in metallic charcoal gray.
The side covers, tail light and battery holder were all mounted using grommets and positive stop nuts I turned up from aluminium. Also turned up were two stainless brake cylinders on my Hafco AL-50 I had just bought. Boy, was that fun. This was my first lathe and the first time I’d ever used one. The cylinders had a 26 TPI thread cut on one end. The lathe didn’t come with a threading chart so I had to get out my calculator and put the brain to work. The bore was 5/8” from memory for which I turned up a couple of pistons to suit. I had to drill two tiny holes, .07mm from memory through the cylinders into the bore, the stainless was 316 and I think I went through something like half a dozen drills – no feel when drilling holes this small.
To each cylinder I welded a 1/4” threaded spigot with which to mount the reservoir and rear take off. To feed the cylinders I tuned up a 2” round aluminium reservoir and cap. To fit them together I machined a course acme thread in both cap and reservoir, talk about jumping in at the deep end: 2” internal and external acme threads and a 26 TPI thread on 316 stainless. Both came out brilliant though, the piston and cylinder having better tolerances than the originals.
I used this bike going to and from work in Katherine, it was so loud you couldn’t hear a brace of Harleys on full song through the din this thing made.
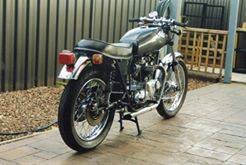
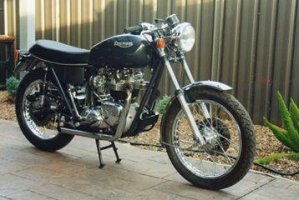
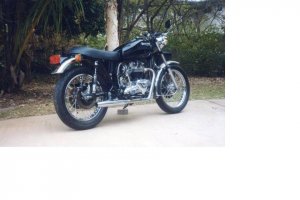
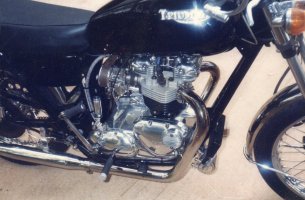
Posted south to Adelaide I knew it wouldn’t get past the pits so once settled I stripped the Bonny again painted it gloss black, polished everything again but this time also polished the lower sliders, switch blocks, turned up a tall 1” round aluminium reservoir and polished that, fitted an oil filter using a floor polisher bracket and polished the crankcase halves. Lots of difficult to get at areas here so it took a while; and a few handmade mops. I bought a couple of ugly mufflers and fitted them and then stuck it over the pits. It passed first time and I rode it too and from work every day for a couple of years.
I was posted north again, this time to Darwin, so the bike was again stripped and then re-assembled once we’d settled in. I only made one mod this time, replaced the speedo with a digital one. I never registered the bike in Darwin as our house was within walking distance to work; but, I did enter the Bonny in the Darwin European Bike Show and won best Triumph.
The Bonny stood around under the house for a couple of years until the RAAF kicked me out. Once out we settled in Port Kennedy in Perth. My body was pretty much spent by this time, I couldn’t kick it anymore so never bothered reassembling. It sat around in a couple of steel trunks for a while and then I sold it as a basket case.
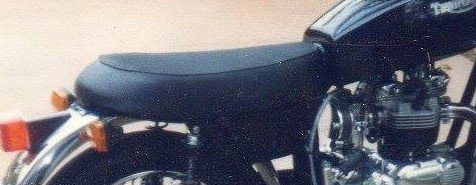
Amazing the difference one little item makes: On the gray there is a chrome strip around the base of the seat, that's missing on the black - makes all the difference: the rear end on the black just looks unfinished. Looking at the pics now the gray had nice lines and looked mean, but could have benefited greatly by the addition of more shiny bits. There’s probably a heap of other bits and pieces I made, or polished, or modded but this all I can remember.
I tried to keep the Bonny looking as much like a Bonny as I could, only a Triumph enthusiast could probably pick the differences. Here’s a few pictures:
The gray is the first version of the Bonny I did when stationed in the NT. The bin received the seat and base, exhaust, engine spacers and brackets, foot pegs, tail light bracket, side covers, air cleaner, triple zener pack, tacho, Instrument cluster, battery holder and clutch plates.
They were replaced with a hand beaten aluminium seat base, 2” drag pipes, aluminium engine spacers and brackets, aluminium foot pegs, tail light bracket, aluminium side covers, single zener, speedo bracket, battery holder, side covers, an earlier model single Zener and a set Barnets.
The frame had all excess tabs removed, a couple of extra tabs were added to the rear frame members for side cover mounts, I removed the air cleaner bracket welded to the 3” frame tube/oil tank. Once finished I filed all the welds smooth and bogged them.
I added an oil cooler mounted on an aluminium bracket I bent up. The rear guard was shortened and to that I mounted the tail light bracket I beat up, new steel seat hinges were also made up along with a couple of baffles I made up and slipped into the drag pipes.
The electrics were redone, replacing the rectifier with a Tandy unit and the triple pack zeners with a single zener mounted on the heat sink I bent up. Ignition was now via the handlebar switch block with another two master switches to fool thieves: One on the left side cover, the other mounted on the heatsink.
The engine was stripped and a new barrel and pistons and rings were purchased along with a set of big end shells. Gaskets were all hand formed except for the head gasket, for that I binned the solid copper one and replaced it with a composite. Combustion chamber, piston crown, cons and ports were mirror polished along with valve heads - face and backs. Gearbox cam plate was re-shaped a little and the edge along with the fork slots were polished.
I balanced the crank using knife edge straights, turned up a couple of stainless push rod tubes, mirror polished the engine side covers, and rocker covers, sand blasted the crankcase halves and cylinder head, polished the alternator rotor, why? because I could and it looked smick!
The rear brake bracket and hubs were polished, and the wheels laced with stainless spokes. The cylinder head was also reshaped a little to get nice square edges on the fins.
Frame, tank, side covers, speedo, tail light bracket, foot brake lever, kick stand and centre stand and rear brake rod were all painted in metallic charcoal gray.
The side covers, tail light and battery holder were all mounted using grommets and positive stop nuts I turned up from aluminium. Also turned up were two stainless brake cylinders on my Hafco AL-50 I had just bought. Boy, was that fun. This was my first lathe and the first time I’d ever used one. The cylinders had a 26 TPI thread cut on one end. The lathe didn’t come with a threading chart so I had to get out my calculator and put the brain to work. The bore was 5/8” from memory for which I turned up a couple of pistons to suit. I had to drill two tiny holes, .07mm from memory through the cylinders into the bore, the stainless was 316 and I think I went through something like half a dozen drills – no feel when drilling holes this small.
To each cylinder I welded a 1/4” threaded spigot with which to mount the reservoir and rear take off. To feed the cylinders I tuned up a 2” round aluminium reservoir and cap. To fit them together I machined a course acme thread in both cap and reservoir, talk about jumping in at the deep end: 2” internal and external acme threads and a 26 TPI thread on 316 stainless. Both came out brilliant though, the piston and cylinder having better tolerances than the originals.
I used this bike going to and from work in Katherine, it was so loud you couldn’t hear a brace of Harleys on full song through the din this thing made.
Posted south to Adelaide I knew it wouldn’t get past the pits so once settled I stripped the Bonny again painted it gloss black, polished everything again but this time also polished the lower sliders, switch blocks, turned up a tall 1” round aluminium reservoir and polished that, fitted an oil filter using a floor polisher bracket and polished the crankcase halves. Lots of difficult to get at areas here so it took a while; and a few handmade mops. I bought a couple of ugly mufflers and fitted them and then stuck it over the pits. It passed first time and I rode it too and from work every day for a couple of years.
I was posted north again, this time to Darwin, so the bike was again stripped and then re-assembled once we’d settled in. I only made one mod this time, replaced the speedo with a digital one. I never registered the bike in Darwin as our house was within walking distance to work; but, I did enter the Bonny in the Darwin European Bike Show and won best Triumph.
The Bonny stood around under the house for a couple of years until the RAAF kicked me out. Once out we settled in Port Kennedy in Perth. My body was pretty much spent by this time, I couldn’t kick it anymore so never bothered reassembling. It sat around in a couple of steel trunks for a while and then I sold it as a basket case.
Amazing the difference one little item makes: On the gray there is a chrome strip around the base of the seat, that's missing on the black - makes all the difference: the rear end on the black just looks unfinished. Looking at the pics now the gray had nice lines and looked mean, but could have benefited greatly by the addition of more shiny bits. There’s probably a heap of other bits and pieces I made, or polished, or modded but this all I can remember.
I tried to keep the Bonny looking as much like a Bonny as I could, only a Triumph enthusiast could probably pick the differences. Here’s a few pictures: