midnightcafe
Been Around the Block
Ok, so you want shiny metal parts but don't know a thing about polishing? Check this guide out HERE. It will explain the technical details of polishing as well as cover basic buffing techniques.
Here are a few more guides you can study to familiarize yourself with the process:
http://www.dimecitycycles.com/blog/cat/tech/post/aluminumpolishing101/
http://www.poleringsguide.se/english/
http://www.slickschoppers.com/TechArticles/polishing_aluminum.html
http://www.horseapple.com/Valkyrie/Tech_Tips/Metal_Polishing/metal_polishing.html
http://www.finishing.com/109/17.shtml
If you read all of these guides, you would notice that they provide different methods and techniques. Expensive equipment can make the job easier, but if you're on a tight budget you can get the same results if you're willing to put more time and hand labor into the work. The following lists the basic necessities to begin polishing:
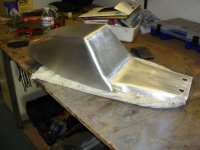
 ) Polishing begins with sanding, and the most time will be spent at the lower grits. If the part has pitting and gouges, you will need to pull out the 80 grit, otherwise 120 is a good start. MAKE SURE that the surface has been sanded uniformly with no remaining imperfections, low or high spots. Laziness in the beginning WILL ruin a polish job, so be patient! It will be hard to determine when you are done especially for beginners, so it might be worth the time to overkill sanding at a lower grit (so long as you don't damage the part!) You should substitute a sanding tool over handwork for the low-grit, dry sanding steps when possible.
After you finish with one grit, clean and degrease the part to remove the sandpaper residue. If you are wetsanding, wash your hands. It may not seem that important, but it can affect the finish. As you transition to the next higher grit size, first look at the type of grain left behind from the previous sanding. Your goal is to completely remove that grain with the new grain of the finer grit sandpaper. One technique that proves this is when attaining a mirror finish, one should sand over the previous grain in a cross-hatch pattern to ensure the piece is completely sanded to the finer grit (works well for flat surfaces but is a difficult technique, not recommended for beginners). You will also notice that every incremental grit takes less time than the previous grit to complete. Continue this process up to 600. 1000+ can be used for those unfamiliar with using a buffing wheel.
The following method can* achieve a mirror polish (depending on the amount of time spent and experience polishing). Using your buffer, begin with emery cake on a sisal wheel. Make certain that your wheels are labeled according to the compound used, mixing compounds on a wheel is a big NO-NO! Wear gloves, goggles, and especially a mask/respirator while buffing- aluminum oxide is a carcinogen that will also blacken your snot for days. Check the polishing guide at the intro for buffing techniques. After emery, clean and degrease the part to remove the polishing compound residue. Use a new pair of gloves every time you switch compounds. Polish with tripoli on a sisal wheel. Degrease. Finish with white rouge on a spiral sewn (or softer) buffing wheel. Realize that the first two compounds are cutting compounds, and the white rouge is a coloring compound. Cutting compound smooths the surface, requiring a cutting polish motion (move the part away from spinning direction of the buffing wheel) and a cutting wheel (sisal). Coloring compound leaves a bright, shiny surface in conjunction with a softer buffing wheel (spiral sewn) and a coloring polish technique (pushing the part into the direction of the buffing wheel, using less force than you would with a cutting motion. Be careful, as it's much easier to send a part flying in a coloring motion).
Practice on a small part first, like a carburetor float bowl. Soon, you should get results like this:

Before
 After
After

Notice the grain in the reflection. This is typical, a true mirror finish would be overkill. In fact, a grainy mirror polish will more closely resemble factory polished cases on motorcycles.
The following will achieve a satin polish:
After wet sanding up to 600 grit, degrease and take out your steel wool and WD40. Start with #00 using the WD40 as cutting oil. Clean and degrease, then move up to #0000 and repeat. Clean and degrease. Keep in mind that you should be sanding in the same direction throughout to achieve a uniform grain. And for the MidnightCafe satin polish treatment, finish with #0000 and Mother's Aluminum polishing compound. Wipe away the residue buildup between applications and replace the steel wool if it gets too dirtied. Here's an example of a satin polish:

Both the fork legs and rim are satin finished.
So that's the most I can pull out of my head after spending so much time polishing some time ago. These are the methods I found worked best for me-don't hesitate to input your own suggestions regarding aluminum polishing. Cheers.

Here are a few more guides you can study to familiarize yourself with the process:
http://www.dimecitycycles.com/blog/cat/tech/post/aluminumpolishing101/
http://www.poleringsguide.se/english/
http://www.slickschoppers.com/TechArticles/polishing_aluminum.html
http://www.horseapple.com/Valkyrie/Tech_Tips/Metal_Polishing/metal_polishing.html
http://www.finishing.com/109/17.shtml
If you read all of these guides, you would notice that they provide different methods and techniques. Expensive equipment can make the job easier, but if you're on a tight budget you can get the same results if you're willing to put more time and hand labor into the work. The following lists the basic necessities to begin polishing:
- 3/4hp bench grinder with 8" wheel attachment
- shaft extensions (standoffs) so that the buffing wheel isn't close to the motor, allowing a freer range for polishing large cases, etc.
- buffing compound sticks: emery cake, tripoli, and white rouge
- isopropyl alcohol or equivalent
- Sisal buffing wheel (8")
- Spiral Sewn wheel (8")
- Sandpaper in the following grits: 80, 120, 180, 220, 400, 600, 1000, 1500 2000
- #00 and #0000 steel wool
- sanding block
- Mother's Aluminum Polish
) Polishing begins with sanding, and the most time will be spent at the lower grits. If the part has pitting and gouges, you will need to pull out the 80 grit, otherwise 120 is a good start. MAKE SURE that the surface has been sanded uniformly with no remaining imperfections, low or high spots. Laziness in the beginning WILL ruin a polish job, so be patient! It will be hard to determine when you are done especially for beginners, so it might be worth the time to overkill sanding at a lower grit (so long as you don't damage the part!) You should substitute a sanding tool over handwork for the low-grit, dry sanding steps when possible. After you finish with one grit, clean and degrease the part to remove the sandpaper residue. If you are wetsanding, wash your hands. It may not seem that important, but it can affect the finish. As you transition to the next higher grit size, first look at the type of grain left behind from the previous sanding. Your goal is to completely remove that grain with the new grain of the finer grit sandpaper. One technique that proves this is when attaining a mirror finish, one should sand over the previous grain in a cross-hatch pattern to ensure the piece is completely sanded to the finer grit (works well for flat surfaces but is a difficult technique, not recommended for beginners). You will also notice that every incremental grit takes less time than the previous grit to complete. Continue this process up to 600. 1000+ can be used for those unfamiliar with using a buffing wheel.
The following method can* achieve a mirror polish (depending on the amount of time spent and experience polishing). Using your buffer, begin with emery cake on a sisal wheel. Make certain that your wheels are labeled according to the compound used, mixing compounds on a wheel is a big NO-NO! Wear gloves, goggles, and especially a mask/respirator while buffing- aluminum oxide is a carcinogen that will also blacken your snot for days. Check the polishing guide at the intro for buffing techniques. After emery, clean and degrease the part to remove the polishing compound residue. Use a new pair of gloves every time you switch compounds. Polish with tripoli on a sisal wheel. Degrease. Finish with white rouge on a spiral sewn (or softer) buffing wheel. Realize that the first two compounds are cutting compounds, and the white rouge is a coloring compound. Cutting compound smooths the surface, requiring a cutting polish motion (move the part away from spinning direction of the buffing wheel) and a cutting wheel (sisal). Coloring compound leaves a bright, shiny surface in conjunction with a softer buffing wheel (spiral sewn) and a coloring polish technique (pushing the part into the direction of the buffing wheel, using less force than you would with a cutting motion. Be careful, as it's much easier to send a part flying in a coloring motion).
Practice on a small part first, like a carburetor float bowl. Soon, you should get results like this:
Before
Notice the grain in the reflection. This is typical, a true mirror finish would be overkill. In fact, a grainy mirror polish will more closely resemble factory polished cases on motorcycles.
The following will achieve a satin polish:
After wet sanding up to 600 grit, degrease and take out your steel wool and WD40. Start with #00 using the WD40 as cutting oil. Clean and degrease, then move up to #0000 and repeat. Clean and degrease. Keep in mind that you should be sanding in the same direction throughout to achieve a uniform grain. And for the MidnightCafe satin polish treatment, finish with #0000 and Mother's Aluminum polishing compound. Wipe away the residue buildup between applications and replace the steel wool if it gets too dirtied. Here's an example of a satin polish:
Both the fork legs and rim are satin finished.
So that's the most I can pull out of my head after spending so much time polishing some time ago. These are the methods I found worked best for me-don't hesitate to input your own suggestions regarding aluminum polishing. Cheers.