
Thanks Maritime. It's my first build, but I always wanted to try to make one after watching all those shows on TV. I am reasonable with an acetylene torch... But everything else I am learning as I go. I guess this is a good way for my obsessive compulsive butt to pass the winter months rather than counting the flowers on the living room wallpaper. LOL! I still haven't gotten to what I will consider the biggest challenge... wiring. If I can't build a harness... I guess I'll have a 495 pound paperweight. On the bright side... I do have a tow rope and can ask my friends to pull me around behind their cars. Ha ha ha !
We noticed you are blocking ads. DO THE TON only works with community supporters. Most are active members of the site with small businesses. Please consider disabling your ad blocking tool and checking out the businesses that help keep our site up and free.
You are using an out of date browser. It may not display this or other websites correctly.
You should upgrade or use an alternative browser.
You should upgrade or use an alternative browser.
Project xs750 lowrider
- Thread starter Markie-V
- Start date

Maritime
Over 10,000 Posts
Markie-V if the M-gadget is too pricey, which it was for me, Sonrier (Matt) is a member and owns Spark Moto (Sponsor) and has a fuse block FB11 that makes wiring way easier. I have a prototype of it on my GL1000 and I had to rewire it almost completely from scratch after a deer decided to take it and me out a few summers ago. Made the job sooo much easier. He also does full harnesses or you can get him to do a sub harness for your main circuits like charging and use the FB11 to do all the other like lights, ignition, etc. He also now owns vintage connections so you can get all the connectors you need at the same place. Also he will help you out with a diagram for it and answer any questions on like "How do I wire up my LED signals and idiot light?" etc
Link:
http://www.dotheton.com/forum/index.php?topic=74475.0
Link:
http://www.dotheton.com/forum/index.php?topic=74475.0
Looks good for a first build mate. Very impressive. Don't forget when you are carving the seat shape to allow for a bit of extra room for the seat foam.
Wiring is not so bad. Just break each part down into different sections. Do the charging circuit, then ignition, then indicators ect ect. At least that is how I work it out. Or hit up Sparck moto and have them build you a custom loom with everything you need.
Wiring is not so bad. Just break each part down into different sections. Do the charging circuit, then ignition, then indicators ect ect. At least that is how I work it out. Or hit up Sparck moto and have them build you a custom loom with everything you need.
Thanks guys! Great advice.... I really appreciate it. I'm thinking that the wiring will have to be done on the completed bike because I am running the harness through the inside of the backbone and I have serious doubts that the harness with all its connectors will fit through the 1 1/2 inch holes in the front and back of the backbone. I'm not there quite there yet anyway... but it is coming up soon so I am thinking about it a lot right now. Maybe I will be forced to go under and alongside the gas tank. Right now, I'm estimating 2 3/4 - 3 1/4 gallon tank capacity... every little bit carved from under the tank takes away from fuel capacity
Hmmm... thinking about this is giving me a headache. Ha ha ha!
Hmmm... thinking about this is giving me a headache. Ha ha ha!
45 days in with relatively no problems... then today .... first major FAIL. The spray on material that was suppose to protect the foam mold from the poly fiberglass resin was completely worthless. The foam mold for the gas tank began melting within two minutes of the fiberglass process. No pictures. Just going to quietly lick my wounds.
d9canada
Just keep pluggin' every day and it'll get done!
Markie, I've done a lot of fiberglass and epoxy glass, including mold making, mainly marine stuff, but I don't recall ever trying to lay up over raw foam. We have used the blue foam as reinforcement in epoxy layups and it reacted well and bonded perfectly.
And I'm not sure,
1 Is your plan is to make a shell on the foam and then dissolve the foam? I don't recommend this, only because I've never done it, only read about it. If you know you can get the foam out and leave a clean fiberglass shell that you can epoxy, that's up to you. Write a book")
2 Or you could make an exterior mold if your "plug" is really nice, so you can then lay up a final part in the mold.
3 Or just make an exterior shell in halves, or top & bottom, remove from the mold and then finish the outside and bond the sections together. This would allow you to epoxy the interior by hand and use the same epoxy to bond the base/tunnel into the shell, come to think of it, then do a "pour in & roll around" second coat just for safety sake.
So I have to guess a little. All methods will work. Making a mold (2) is a bit wasteful for a one-off, but that's my strong suit, and a modification of this process would give you (3) a good shell to work from.
I don't know what spray you used, perhaps Polyvinyl Alcohol (PVA)? But here's the deal about parting agents - as you may know a lot of "old timers" rely on wax as a parting agent. But wax is NOT a parting agent really, not even a specific fiberglass molding wax like Part-All green wax. How do I know? Because their rep told me after I investigated a disaster at a friend's business.
Wax only reduces the surface porosity but it is not a chemical barrier. In fact, the wax can actually melt when the layup goes on because the layup exotherms (produces heat) as it cures. But if the wax is trapped, it sort of does a job, to some extent of keeping the surface slick, but success in that area depends on a number of factors. Sorry but you can tell there's more.
Two things are at work at the barrier, chemistry that can cause crosslinking (causing a fiberglass part to stick to a fiberglass mold) or otherwise attack the mold (as you experienced) and heat which can damage the mold release barrier or even the plug/mold material, which may have initiated the problem you experienced. So what to do?
I'd suggest you make a new tank plug as you had before except reduce it's exterior dimension about 1/8" to allow for a complete, all-encompassing Bondo coating. If the part you layup on the plug will be your finished tank, then this Bondo'd plug will allow you to shape and sand so your real tank's interior is smooth. If you're making a mold from the plug, you'll have a mold that will produce a great exterior and with care, the interior will follow suit.
After ensuring you've got Bondo all over the plug, paint the thing with any fiberglass friendly paint. The objective here is to seal the thing. Throw on several good coats and let it cure well. If you do have any exposed foam (and I hope you took seriously that I said cover the thing entirely with Bondo), the paint will most likely seal those areas without substantial damage to the foam. And remember Bondo is somewhat porous. OK? So now you've got a slick looking plug, with a paint finish of some sort. Give it 3 coats of paste wax, Johnsons floor wax, any good quality paste wax, buff each, let it sit 20 minutes and repeat.
NOW, hit it with PVA. As you may know, you don't try to flood coat it like paint. Just use a touchup gun with about 35 psi and when you spray, the stuff goes on looking like paint sprayed with excessive air pressure - you get a sugar-like appearance. This is OK. Do at least 4 coats, giving each one about 15 minutes to flash. After all this, the darned thing should be just about bullet-proof.
If you need reassurance about PVA, take a scrap of Arborite and spray it as you do the actual plug. When the last coat is done and dry, take the Arborite and a sharp knife, cut a line along one edge and peel up the green PVA material and you'll have a glossy green film like very thin plastic bag film. Now take that and put it in warm water and it will dissolve in moments. But expose it to fiberglass (polyester, vinylester or epoxy resin) and it will be a perfect barrier provided the base it's on is not compromised by pinholes or vulnerable to heat damage. The cool thing with PVA when used properly, is that it makes a true chemical barrier with one wonderful exception - it's water solubility makes part separation so easy, just add running water or throw small molds in a tub of warm water
I literally floated my beautiful cedar strip kayak out of the mold I made from it. And thank God because smearing black tooling gelcoat all over my gleaming woodwork had me nearly vomiting with fear that I might screw up!
You can lay up your part any time after the PVA has dried, even days after - just don't let a lot of dust and crap get on the thing or that will end up stuck to the interior of your part.
In your case, if your layup will be your final part, maybe do the bottom/tunnel first and wrap the edges so they create bonding surfaces to meet the body of the tank. Then layup the tank body. So long as you're happy with everything, you could cut into the foam to break some chunks out of it, which you may have to do in order to get the foam out, depending on the tank shape, then let the PVA and water release the remaining foam and you should be OK.
Epoxy and bond your parts, finish the outside and you're done. Easy-peasy! 8)
So Markie, and anyone else tackling fiberglass, I hope this helps. I apologize for the verbose reply, but it's like writing a guide for "how to change a car tire" when you don't know for sure that the reader knows where to find the spare, the tools, the jack or how to operate those things. If you assume too much, the reader doesn't understand and if you dwell on everything it comes off sounding pretty condescending which is certainly not my intention.
While I'm at it, I might as well prove I practice what I preach:
Attached, are pics of a mold I made recently of an original 70s vintage Tracy Eliminator body for CB750. This was a rush job in March with no warm place to work. I just picked about the only two sunny days with half a$$ed temps and had a shot at it. I managed with only 55 F air temp because the black plug absorbed heat and I rolled the thing around to keep it in the sun. A handheld heat sensing gun is indispensable so you can gauge mold and resin temps and adjust catalyst amounts if needed for each successive mix. For jobs like this, I prefer to use small mixes, catalyze them to gel pretty fast, so you can't have a big pot full or it will be a steaming bubbling mess before you get the layup done. This also gives the solo DYI guy a chance to grab a coffee, take a break to cut more material, etc.
I used black tooling gelcoat which helps absorb heat from the sun for the while that it's exposed. I poured off all my resin in small dark colored tin cans, again sat them in the sun to warm them as I worked. I even laid the glass material in the sun, doing everything I could to get stuff warmed up. The potato chip box cardboard flange was laid in with hot glue and masking tape to give me something to form a mold flange against. I just knew eating all those potato chips would pay off! ;D
The only parting agents used were Part All green wax - 3 coats buffed on the body itself, then 4 coats of PVA on the body and cardboard flanges. When the first half was done and cured overnight (exotherm kept it warm) then I stripped the cardboard, waxed and PVA'd the other side and did side 2. Day 3 it rained, no problem, I stuffed a few plastic wedges into the mold flange and clamped the hose there, pouring water into the mold, just through a small gap opened along the top. And this was cold tap water too. An hour later, with some begging, pleading, careful wedging on the flanges and maybe some salty talk, the things separated.
Knowing some folks in business, I tend to be too timid about yanking on things. With complex shapes, warm water will help because it causes some expansion, enough to allow water to sneak in. But also some deliberate flexing of the part will help get the water in where it's got to go.
Just think, the part has basically adhered to the mold because there's not a bit of air between them and it's dry as a bone too. That's why some commercial molds have strategically placed air buds, to just force some air in here and there.
The crude flanges are very useful because they match perfectly together. They are not perfectly uniform but that's fine because you can certainly tell when they match up. Otherwise on a real pro job with flanges formed on long plywood backing that's dead straight, you'd put in locating pins or blocks to ensure alignment. Also on bigger parts, you'd install mounts for stiffening and shape alignment. In this case I will be making a horseshoe type bridge to keep the sides spaced out appropriately. for anyone who knows the history of Tracy Fiberglass, Tracy and Friends, and know something about molding, his crew did some very state-of-the-art work back in the 70s.
In this case I didn't bother with a bottom/tunnel as I intend to make an aluminum tank to go under the f/g body. Next, I have a genuine Dunstall tank and seat for CB750 to make molds from. I have no intentions of selling parts at this time, by the way. I'm 66 with back injuries and too many great bike projects, not enough time ;D
And I'm not sure,
1 Is your plan is to make a shell on the foam and then dissolve the foam? I don't recommend this, only because I've never done it, only read about it. If you know you can get the foam out and leave a clean fiberglass shell that you can epoxy, that's up to you. Write a book
2 Or you could make an exterior mold if your "plug" is really nice, so you can then lay up a final part in the mold.
3 Or just make an exterior shell in halves, or top & bottom, remove from the mold and then finish the outside and bond the sections together. This would allow you to epoxy the interior by hand and use the same epoxy to bond the base/tunnel into the shell, come to think of it, then do a "pour in & roll around" second coat just for safety sake.
So I have to guess a little. All methods will work. Making a mold (2) is a bit wasteful for a one-off, but that's my strong suit, and a modification of this process would give you (3) a good shell to work from.
I don't know what spray you used, perhaps Polyvinyl Alcohol (PVA)? But here's the deal about parting agents - as you may know a lot of "old timers" rely on wax as a parting agent. But wax is NOT a parting agent really, not even a specific fiberglass molding wax like Part-All green wax. How do I know? Because their rep told me after I investigated a disaster at a friend's business.
Wax only reduces the surface porosity but it is not a chemical barrier. In fact, the wax can actually melt when the layup goes on because the layup exotherms (produces heat) as it cures. But if the wax is trapped, it sort of does a job, to some extent of keeping the surface slick, but success in that area depends on a number of factors. Sorry but you can tell there's more.
Two things are at work at the barrier, chemistry that can cause crosslinking (causing a fiberglass part to stick to a fiberglass mold) or otherwise attack the mold (as you experienced) and heat which can damage the mold release barrier or even the plug/mold material, which may have initiated the problem you experienced. So what to do?
I'd suggest you make a new tank plug as you had before except reduce it's exterior dimension about 1/8" to allow for a complete, all-encompassing Bondo coating. If the part you layup on the plug will be your finished tank, then this Bondo'd plug will allow you to shape and sand so your real tank's interior is smooth. If you're making a mold from the plug, you'll have a mold that will produce a great exterior and with care, the interior will follow suit.
After ensuring you've got Bondo all over the plug, paint the thing with any fiberglass friendly paint. The objective here is to seal the thing. Throw on several good coats and let it cure well. If you do have any exposed foam (and I hope you took seriously that I said cover the thing entirely with Bondo), the paint will most likely seal those areas without substantial damage to the foam. And remember Bondo is somewhat porous. OK? So now you've got a slick looking plug, with a paint finish of some sort. Give it 3 coats of paste wax, Johnsons floor wax, any good quality paste wax, buff each, let it sit 20 minutes and repeat.
NOW, hit it with PVA. As you may know, you don't try to flood coat it like paint. Just use a touchup gun with about 35 psi and when you spray, the stuff goes on looking like paint sprayed with excessive air pressure - you get a sugar-like appearance. This is OK. Do at least 4 coats, giving each one about 15 minutes to flash. After all this, the darned thing should be just about bullet-proof.
If you need reassurance about PVA, take a scrap of Arborite and spray it as you do the actual plug. When the last coat is done and dry, take the Arborite and a sharp knife, cut a line along one edge and peel up the green PVA material and you'll have a glossy green film like very thin plastic bag film. Now take that and put it in warm water and it will dissolve in moments. But expose it to fiberglass (polyester, vinylester or epoxy resin) and it will be a perfect barrier provided the base it's on is not compromised by pinholes or vulnerable to heat damage. The cool thing with PVA when used properly, is that it makes a true chemical barrier with one wonderful exception - it's water solubility makes part separation so easy, just add running water or throw small molds in a tub of warm water
I literally floated my beautiful cedar strip kayak out of the mold I made from it.
And thank God because smearing black tooling gelcoat all over my gleaming woodwork had me nearly vomiting with fear that I might screw up!You can lay up your part any time after the PVA has dried, even days after - just don't let a lot of dust and crap get on the thing or that will end up stuck to the interior of your part.
In your case, if your layup will be your final part, maybe do the bottom/tunnel first and wrap the edges so they create bonding surfaces to meet the body of the tank. Then layup the tank body. So long as you're happy with everything, you could cut into the foam to break some chunks out of it, which you may have to do in order to get the foam out, depending on the tank shape, then let the PVA and water release the remaining foam and you should be OK.
Epoxy and bond your parts, finish the outside and you're done. Easy-peasy! 8)
So Markie, and anyone else tackling fiberglass, I hope this helps. I apologize for the verbose reply, but it's like writing a guide for "how to change a car tire" when you don't know for sure that the reader knows where to find the spare, the tools, the jack or how to operate those things. If you assume too much, the reader doesn't understand and if you dwell on everything it comes off sounding pretty condescending which is certainly not my intention.
While I'm at it, I might as well prove I practice what I preach:
Attached, are pics of a mold I made recently of an original 70s vintage Tracy Eliminator body for CB750. This was a rush job in March with no warm place to work. I just picked about the only two sunny days with half a$$ed temps and had a shot at it. I managed with only 55 F air temp because the black plug absorbed heat and I rolled the thing around to keep it in the sun. A handheld heat sensing gun is indispensable so you can gauge mold and resin temps and adjust catalyst amounts if needed for each successive mix. For jobs like this, I prefer to use small mixes, catalyze them to gel pretty fast, so you can't have a big pot full or it will be a steaming bubbling mess before you get the layup done. This also gives the solo DYI guy a chance to grab a coffee, take a break to cut more material, etc.
I used black tooling gelcoat which helps absorb heat from the sun for the while that it's exposed. I poured off all my resin in small dark colored tin cans, again sat them in the sun to warm them as I worked. I even laid the glass material in the sun, doing everything I could to get stuff warmed up. The potato chip box cardboard flange was laid in with hot glue and masking tape to give me something to form a mold flange against. I just knew eating all those potato chips would pay off! ;D
The only parting agents used were Part All green wax - 3 coats buffed on the body itself, then 4 coats of PVA on the body and cardboard flanges. When the first half was done and cured overnight (exotherm kept it warm
) then I stripped the cardboard, waxed and PVA'd the other side and did side 2. Day 3 it rained, no problem, I stuffed a few plastic wedges into the mold flange and clamped the hose there, pouring water into the mold, just through a small gap opened along the top. And this was cold tap water too. An hour later, with some begging, pleading, careful wedging on the flanges and maybe some salty talk, the things separated. Knowing some folks in business, I tend to be too timid about yanking on things. With complex shapes, warm water will help because it causes some expansion, enough to allow water to sneak in. But also some deliberate flexing of the part will help get the water in where it's got to go.
Just think, the part has basically adhered to the mold because there's not a bit of air between them and it's dry as a bone too. That's why some commercial molds have strategically placed air buds, to just force some air in here and there.
The crude flanges are very useful because they match perfectly together. They are not perfectly uniform but that's fine because you can certainly tell when they match up. Otherwise on a real pro job with flanges formed on long plywood backing that's dead straight, you'd put in locating pins or blocks to ensure alignment. Also on bigger parts, you'd install mounts for stiffening and shape alignment. In this case I will be making a horseshoe type bridge to keep the sides spaced out appropriately. for anyone who knows the history of Tracy Fiberglass, Tracy and Friends, and know something about molding, his crew did some very state-of-the-art work back in the 70s.
In this case I didn't bother with a bottom/tunnel as I intend to make an aluminum tank to go under the f/g body. Next, I have a genuine Dunstall tank and seat for CB750 to make molds from. I have no intentions of selling parts at this time, by the way. I'm 66 with back injuries and too many great bike projects, not enough time ;D
Attachments

pacomotorstuff
Coast to Coast
What D9canada said, right down to the age (66) and the bad back LOL.
Follow the above, you'll get a part.
Regards,
Pat Cowan,
Pacomotorstuff
Follow the above, you'll get a part.
Regards,
Pat Cowan,
Pacomotorstuff
D9Canada...
Thank you.
Thank you.
Thank you.
Thank you.
Thank you.
Thank you. (Repeating into infinity)
Yesterday... seeing the loss of my firstborn foam gas tank mold... I felt a strange anger, denial, and grief. As I stood there, watching... it seemed as if I was like watching a cancer spread through my beloved. Startingsmall, then quickly spreading until all that remained was a wrinkled, pot marked, and shriveled remnant of the once proud gas tank. A single pea inside a gourd of fiberglass as if it were some alien maraca. It was painful to watch. I am still trying to cope.
I can't begin to tell you how much that I deeply appreciate that you took the time out of your day to share with me, a total stranger, your knowledge and experience in this area. Believe me, I need knowledge and experience in this area
If you don't mind... I'd like to consult with you by email here on this site as I go through the process again... just a few questions as I go. Would that be okay? Feel free to say no... I won't be offended. You obviously know your way around this by experience. Your CB 750 bodywork pics look AWESOME.
Thank you again for taking the time to go through this with me step by step. It will be a big help moving forward.
Regards,
Markie
Thank you.
Thank you.
Thank you.
Thank you.
Thank you.
Thank you. (Repeating into infinity)
Yesterday... seeing the loss of my firstborn foam gas tank mold... I felt a strange anger, denial, and grief. As I stood there, watching... it seemed as if I was like watching a cancer spread through my beloved. Startingsmall, then quickly spreading until all that remained was a wrinkled, pot marked, and shriveled remnant of the once proud gas tank. A single pea inside a gourd of fiberglass as if it were some alien maraca. It was painful to watch. I am still trying to cope.
I can't begin to tell you how much that I deeply appreciate that you took the time out of your day to share with me, a total stranger, your knowledge and experience in this area. Believe me, I need knowledge and experience in this area
If you don't mind... I'd like to consult with you by email here on this site as I go through the process again... just a few questions as I go. Would that be okay? Feel free to say no... I won't be offended. You obviously know your way around this by experience. Your CB 750 bodywork pics look AWESOME.
Thank you again for taking the time to go through this with me step by step. It will be a big help moving forward.
Regards,
Markie
d9canada
Just keep pluggin' every day and it'll get done!
By all means, I'm no expert, just experienced, and I'll help if I can.
And don't beat yourself up. I've seen more than once at boatyards where guys were pounding on molds with rubber hammers and stuffing thin strips of cedar between the part and the mold, trying desperately to get the boat part out of the mold. This sort of thing has literally sunk some small companies. It's a humbling thing. After I witnessed some of this crap, I thought "not me!" and immediately contacted the Part All guys and asked if there wasn't a fairly assured way of getting it right. So if I can save someone else some grief, I'm happy to help
And don't beat yourself up. I've seen more than once at boatyards where guys were pounding on molds with rubber hammers and stuffing thin strips of cedar between the part and the mold, trying desperately to get the boat part out of the mold. This sort of thing has literally sunk some small companies. It's a humbling thing. After I witnessed some of this crap, I thought "not me!" and immediately contacted the Part All guys and asked if there wasn't a fairly assured way of getting it right. So if I can save someone else some grief, I'm happy to help
pacomotorstuff
Coast to Coast
Built tanks for a number of years, never had a failure except for a tank that a painter blasted through with his 40 grit sanding disc when he was prepping the part (he did a lot of Corvette parts which were about a quarter of a inch thick), then tried to fix it with bondo and claimed the leakage and dust in the tank were my fault .
Stopped building them due to the "litigatous" society we find ourselves in these days; example - the wife of a customer was looking at 2 really nice tanks I had just built for his racebikes and commented, "Nice tanks and if anything happens, I'll know who to sue" - and then finished up with a lame little laugh. The customer solved the problem though - he divorced her.
The last tank I built for a friend, used isophthalic polyester resin, veil as the last ply on the build, a good coat of Caswell's tank sealer on the insides, glued it together with Caswells and gave it what we aerospace people call a "slosh coat" of Caswell's after the marry up of top and tunnel, to give additional sealing along the bond lines.
I also have a tank on one of my project bikes, built along the lines of a composite aircraft project I was working on at the time, much the same construction materials as noted above, heavier than I would like but you can stand on it if you wish and nothing is going to break.
I tell customers to drain their tanks if the bike is going to be sitting for any length of time and for a street bike, use gasoline without ethanol.
Up here in Canada, we have a couple of different choices of ethanol free gasoline, usually 94 octane at one of the local stations, kind of a joke when one of my motors is a flathead and could probably run on 80 octane if you could find it these days.
Love your lowrider project, sorry you had a GFU with your first go at making a tank but don't give up.
If it was easy, everybody would do it.
Pat
Well... I just want to again offer thanks to those who offered encouragement during the last day and a half. I have looked at the bikes that others here have built, and I must say that I am always impressed with the creativity and passion I see here for the love of building bikes and other unique things. What surprised me the most was not all the great advice that was offered (which I must say will be invaluable to me), but it is just the quiet encouragements from others here... willing to reach out just to offer an encouraging word on the thread as well as some very humbling emails I received here.
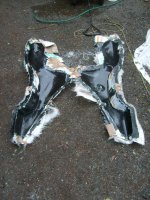
Today... with the salve fresh in the wounds of my fiberglass fail... I am going to begin again on tank two. I learned a little bit from carving and shaping the first tank... and I think I can do this one in less time. This tank shape will be different than the first... wider over the cylinders... longer in the front and a more rounded, sweeping arc from the top of the tank to the seat base. I'll post step by step pics, hoping that my resident experts like D9Canada, and all will chime in if any of you all see me making a bonehead mistake. I included a picture of the tank fail. The fiberglass resin I used but ate right through the epoxy paint I applied to the first plug
It looks like one of those cocoons from the horror film "Alien "
Thanks again guys.!!
Attachments
D9Canada... I am going to take your advice and build the next tank from a mold of the plug. I'll shape the tank today and tomorrow and try to follow your instructions to a tee.
I think you are right... a mold would be a good thing in case there is a future problem... then I can just break out the mold again. Trying to figure out how to split the molds. Maybe three molds.. left side, right side, and tunnel. My foam block is drying. So I am taking measurement right now. Thinking that I will carve the the foam tank plug... follow your "bondo/fiberglass friendly paint technique, and once the tank is fiberglassed over the plug... cut it into the three sections i need. This would give me the three molds i would need to build the tank with such an extreme backbone cutout.
Thanks again... I'll get back on it. Keep plugging
We have had the same skid loader around the farm since I was a kid. Made for John deere buy owatana I believe? Grandpa replaced the original Wisconsin engine with a Subaru robin lump. It's due for a little hydraulic tlc as well.Markie-V said:Had a detour.... needed to do a little work on my skid loader... postponed the low rider for a day.LOL
Either way, love the bike man, looks like a very well executed project.
Sent from my SM-G920V using Tapatalk
d9canada
Just keep pluggin' every day and it'll get done!
Yeah, I never got around to saying "Kudos on the metal work" on your project. Very nicely done!
As for a mold, yeah that's my comfort zone but it is not a requirement.
If you go that way, look at the Tracy body mold I made and you'll see that making a part and cutting it up may not be the greatest idea. If you put a strip of masking tape on one side of the center line, you could do as I did, use hot glue, cardboard and masking tape to make a "fence" that you can use as you build up your first mold section layup, so you get a flange - so you might put a flange at the bottom all around and one right down the center line. Make sure you do a pretty solid job of the flanges, not allowing air entrapment at the base of the flange and make the flanges pretty strong so you can wedge them apart to pull the mold apart. Flanges make mold parts harder to move off a plug because their shape resists twisting and so on. But it's all "fun".
In this scenario, you'd wax and PVA one "third" so to speak, or half of the body, lay it up and let it set. Don't move it, just strip the cardboard off the back side of the flange of the first piece then wax and PVA it and the rest of the next section, lay it up, then do repeat the process to get that last part, probably the bottom/tunnel, of the mold made.
Finally, you have three pieces with perfectly matching flanges, even if they are not perfectly straight. But it's a lot off work if you're not intending to use it again. Throw the thing in a bathtub full of warm water with some plastic wedges (like bondo squeegies) stuffed into the flanges to spread them apart a bit to let water in.
You see, this is a fair bit of work when you might otherwise just be getting the tank done. I'd be inclined to layup the bottom tunnel and maybe make a relief around the bottom edge of the sides about 1/8" deep and extending 1" from the bottom edge, so you lay up the bottom/tunnel and wrap around the bottom onto that relief along the sides. Let that set and leave it in place then wax and PVA the body of the plug, including that little "flange" along the bottom. Do your layup. Then trim/sand carefully along the bottom edge to expose the seam between the body and bottom.
Get some wedges in there, throw it in a bathtub of warm water and let the snarling begin. You'll have some wrestling to get water to seep into the thing. Patience is a virtue on things like this. So what if it sits there, weighted down to hold it underwater, for three or four hours? So don't think "Darn, I've been pissing around with this for twenty minutes and it still hasn't budged!" My Tracy half molds hardly moved for the first couple hours. :'(
Important - If you know for sure where your filler neck and petcock will go, especially from the filler hole, you can drill in and destroy some of the plug, allowing water to get into the inside. Even if you don't get to the bondo layer except at the filler hole, removing foam behind the bondo will weaken the plug. So give that some thought, it may be messy but it could be a real ticket to that magic moment when you see the parts move.
Finally, you should be able to separate the body part from the plug, then the bottom/tunnel off the plug. And don't be worried about destroying the plug to get the complex shaped bottom/tunnel removed. So long as the plug was waxed and PVA'd, you may have to chop some foam/bondo to get some movement in there but in the final analysis, you should have a good part. 8)
It's a real toss-up I guess, make a mold or make a finished part. I know guys who've made custom cars whose bodies were originally intended to be the mold or the plug for a final mold
Then again, looking at your metal work skills, you might consider getting some 16 gauge steel, make a leather sandbag and get some simple tools and beat one out of steel. I have to throw that out there. ;D
Keep pluggin' - there's no rest for the wicked!
Maritime
Over 10,000 Posts
Check out CCriders CB450 build. that tank is gong on 5 or more years and I have seen it in person 3-4 times and it is great looking. Also Ringo built an amazing CB550(I think) in gulf livery and documented it well too.
CCriders build. unfortunately you need the photobucket fix to see the pics.
http://www.dotheton.com/forum/index.php?topic=9125.0
Ringo's build is the same:
http://www.dotheton.com/forum/index.php?topic=19771.0
If you can make the pics work these are both really good fiberglass tank bikes.
CCriders build. unfortunately you need the photobucket fix to see the pics.
http://www.dotheton.com/forum/index.php?topic=9125.0
Ringo's build is the same:
http://www.dotheton.com/forum/index.php?topic=19771.0
If you can make the pics work these are both really good fiberglass tank bikes.
Just throwing this in for a think. I've done a fair bit of scratch built composite parts, and have settled on mold-less construction as my mostly preferred choice as I seldom intend to make more than one of anything, so maybe some of this will apply to you. I have done molds, gelcoat, and polyester resins, but for me that is a frightful amount of work compared to simply making what I want straight away. I haven't ever had the melting foam issue, but that's probably because of aircraft experience and been lucky to have never used incompatible materials by accident. For what it's worth, I generally use urethane foam - mostly the type sold as building insulation like for freezers. In fact, I have rather a large supply I got for free from a commercial building I chanced to see being torn down, but it is very affordable bought commercially. All that I have ever seen is tan in color. You can also buy it from a specialty supplier for modeling and casting work, but it is much denser and fine grained and very expensive. At any rate, it is immune to epoxy, which I use exclusively and very highly recommend over polyester resin despite the significantly higher cost. I use epoxy mainly because I find it much more stable than polyester (I've done a lot of boat repairs with polyester, but am in no way any sort of expert). What I mean here by stable is that, whether mold or moldless construction, I have had issues with bodywork retaining its shape perfectly until vast amounts of time (year+) go by. In other words, dead straight flawless parts are no longer perfect 6 months later. Granted I am REALLY picky to be sure, but I don't have this issue with epoxies. I've also used green florists foam with fine results though it is very soft. I do not attempt to dissolve foam (tried it ONCE!!!). If the part has to be hollow, like a tank, I make what I want and than simply cut it in half, or whatever, and manually dig out the foam which I find quite easy. Then simply glass the parts back together. Epoxies as a rule are vastly more alcohol resistant (and gasoline resistant), and some formulations are in a practical sense actually fuel proof. At any rate, epoxies are very considerably stronger and are vastly more tenacious than polyester, so for me, on bike parts which are quite small, the extra cost is well worth it especially considering the huge labor (time) involved. Lastly, for the record, I'd like to suggest that you avoid Kevlar and carbon fiber. Unless you are swapping your steel chassis for a composite one, there isn't much application for carbon on anything motorcycle (aside from purely aesthetic goals), and Kevlar is much harder to deal with (as well as really having no application). If you want to improve the strength of your parts, use S-glass. I almost always use plain 'ol regular fiberglass cloth myself, very light weight woven (finishing cloth) for most parts. There are some pics of a seat made on green florists foam on page 7 (might be different on your system) in my build thread below if you want to see a result - sorry. it's just the unpainted part, no in process.
d9canada
Just keep pluggin' every day and it'll get done!
Thanks to JPMobius and others for your thoughts on this. I didn't want to be the only voice because despite my experiences, like many of you, I am no expert.
I do agree generally, for this project, making a mold is an overkill, certainly, much more expensive. There's one thing we did not discuss, that being making a female mold instead of a male - just a thought. And with reference to my suggestion of making a metal tank, a male plug could still serve well to ensure the parts are shaped well before tacking or TIGing begins.
On the subject of epoxy, something like West Systems or System 3 epoxy is great, very durable and much stronger than polyester resin. And though those epoxies are more fuel resistant, I would not use such a tank without either Caswells or POR15 coating inside.
But there's stuff about epoxy you need to know (why can't I write a short post??) There's an expression in boat building about epoxy "It goes on like honey and runs like water." This is very important. Epoxy laid on, let's say a cedar strip kayak, will tend to run even though the wood may be wet out first then cloth laid on and more epoxy carefully applied.
You can't go for a "flood coat" finish all at once or you will get runs. Even in molds, if you have vertical surfaces, the darned stuff tends to sag badly. And the really frustrating thing is that the sagging begins to sag at max exotherm (heat generation) which occurs as the stuff begins to get too sticky to brush out! It's crazy stuff. You can get catalysts for slow, medium and fast set, and you have to monitor mold and air temps to choose the right one as well as consider what you're going to do and how.
So it's not hard to understand that manufacturers like West System make a variety of filler products which help to bulk up and stabilize epoxy a bit with very little sacrifice in strength. Lots of times, people just use talcum power - (that's good for patching chips in white appliances too) - but in boat yards, for convenience and also cost reduction, often sawdust is used. Of course, you can screen it to keep it consistently sized. But here's a "trick" - commercial fillers are not absorbent, so you can add your filler to the epoxy and then catalyze - however, if you use sawdust or any other absorbent material, you don't want it absorbing uncatalyzed epoxy because it won't set up well. So you have to catalyze first, then thicken. In that situation, remember that your pot-life will be reduced as you mess around adding an absorbent filler after catalyzing.
For a tank, you should be able to mix a small amount of epoxy and wet the mold, (male or female), let that sit until it or the mix can is getting warm (hand held heat gun is great but otherwise check the stir stick in your mix can to see if it's getting sticky). You can use thickened material if you have hard corners where you expect some "resistance" for the glass materials to lay in well. (Oh there's another subject, I'll hit with another post. Groan!)
You should have your materials already cut. "No scissors at the wet side!" Lay your first glass (should be mat especially in a female mold because mat doesn't "print" through), wet that and get a layer of cloth laid in and wet out. Then stop.
Don't try to "fill up" the mat to a smooth finish, just get that layup wet out. Let that flash for a few hours and then hit it with another mat/cloth layer, and repeat once more and you should have a very tough shell. Certainly, when bonding parts together, thicken the epoxy to the consistency of peanut butter. Again, from boat building, there's "ketchup or peanut butter" consistencies discussed when talking about fillers.
And last of all is a safety warning. Do some Googling about this and you will cringe. The sanding dust from epoxy is extremely dangerous. If you possibly can, use a sander with shop vac connector. Cover your entire body and immediately take that clothing off and put it in the wash, go shower thoroughly. People have had to quit working in boat yards and furniture shops because they get "epoxy rash". Once they get it, just the slightest contact later can cause them to develop horrific rashes. Working outside is a good idea and try to stay upwind of the work surface. I'll shut up now :


