
We noticed you are blocking ads. DO THE TON only works with community supporters. Most are active members of the site with small businesses. Please consider disabling your ad blocking tool and checking out the businesses that help keep our site up and free.
You are using an out of date browser. It may not display this or other websites correctly.
You should upgrade or use an alternative browser.
You should upgrade or use an alternative browser.
Sin City 400-CR *FINISHED PICS!!!!!!! VIDEO *****PAGE 9
BigKev
Been Around the Block
Re: Sin City CM400 Cafe Racer
+1 That paint looks tits. Nice build, Im following.
YogiBear said:man, the paint looks great!
+1 That paint looks tits. Nice build, Im following.
S
Sin City Cafe Racer
Guest
Re: Sin City CM400 Cafe Racer
Thanks guys, Wait till I post some pics of the motor. Looks really good and its still apart..lol Should be done with that by friday.
Thanks guys, Wait till I post some pics of the motor. Looks really good and its still apart..lol Should be done with that by friday.
LandricsCustoms
New Member
Re: Sin City CM400 Cafe Racer
Hey Folks!! My name is Rich. Owner at Landrics Customs up here in Southbridge MA... I am SOOO happy to be on board with Sin City Vintage Cycles as their Body and Paint shop! As a fellow bike builder we really take pride in what we do. Bill hit us with a great one with this bike and gave me FULL creative freedom for the paint scheme ( though loosely based on his sketch).. And considering there were a couple hugs involved at the drop off I'm Thrilled to know he is happy ( not to mention his kids sayin how much they love it!!) I really hope he posts some close ups of the work we did cleaning up the frame on the bike before paint.. that thing is smooth as glass!! I really look forward to doing more bikes with Sin City! If anyone is looking for paint work I can do mail order work. call me to discuss any ideas. 774-200-6395 Thanks!!!!
Hey Folks!! My name is Rich. Owner at Landrics Customs up here in Southbridge MA... I am SOOO happy to be on board with Sin City Vintage Cycles as their Body and Paint shop! As a fellow bike builder we really take pride in what we do. Bill hit us with a great one with this bike and gave me FULL creative freedom for the paint scheme ( though loosely based on his sketch).. And considering there were a couple hugs involved at the drop off I'm Thrilled to know he is happy ( not to mention his kids sayin how much they love it!!) I really hope he posts some close ups of the work we did cleaning up the frame on the bike before paint.. that thing is smooth as glass!! I really look forward to doing more bikes with Sin City! If anyone is looking for paint work I can do mail order work. call me to discuss any ideas. 774-200-6395 Thanks!!!!
S
Sin City Cafe Racer
Guest
Re: Sin City CM400 Cafe Racer
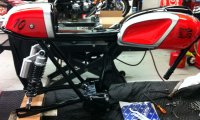
So this week the bike has come along nicely. I was able to finally spread out all of the powder coating and paint and start re-assembling everything.
So this week the bike has come along nicely. I was able to finally spread out all of the powder coating and paint and start re-assembling everything.
Attachments
S
Sin City Cafe Racer
Guest
Re: Sin City CM400 Cafe Racer
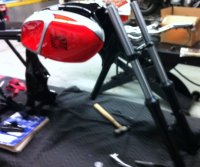
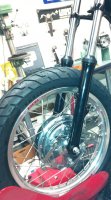
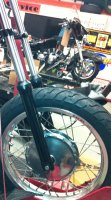
My first priority was to get the bike into a rolling chassis. So I went ahead and installed the front forks and lower triple trees. The neck bearings in this bike are not cage style so I had to individually clean, inspect, and measure 18 lower and 19 upper ball bearings. It was tedious at times but had to be done. I did not install the custom upper tree I made out of aluminum yet, because I want to add 45 degree cuts to the edge and still drill the hole for the speedometer, and also powder coat. I still have a couple misc parts that will need powder coating so the plan is to assemble everything as far as I can and then send out one more box for powder coating. Its should only be a week turn around so that shouldn't be too long of a wait.
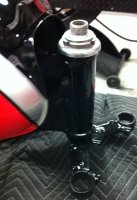
The swing arm is an easy install on this bike. The powder on the swing arm itself looks great, so most of the time spent on this was on cleaning the bushings, and polishing the pivot bolt and refreshing the plastic chain guide which fits around the swing arm pivot on the left side. The shocks are temporarily installed. I still need to make aluminum bushings for the shock top mounting. Also when I do get the rear wheel and tire installed I need to set the final shock length.
My first priority was to get the bike into a rolling chassis. So I went ahead and installed the front forks and lower triple trees. The neck bearings in this bike are not cage style so I had to individually clean, inspect, and measure 18 lower and 19 upper ball bearings. It was tedious at times but had to be done. I did not install the custom upper tree I made out of aluminum yet, because I want to add 45 degree cuts to the edge and still drill the hole for the speedometer, and also powder coat. I still have a couple misc parts that will need powder coating so the plan is to assemble everything as far as I can and then send out one more box for powder coating. Its should only be a week turn around so that shouldn't be too long of a wait.
The swing arm is an easy install on this bike. The powder on the swing arm itself looks great, so most of the time spent on this was on cleaning the bushings, and polishing the pivot bolt and refreshing the plastic chain guide which fits around the swing arm pivot on the left side. The shocks are temporarily installed. I still need to make aluminum bushings for the shock top mounting. Also when I do get the rear wheel and tire installed I need to set the final shock length.
Attachments

S
Sin City Cafe Racer
Guest
Re: Sin City CM400 Cafe Racer
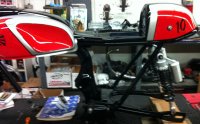
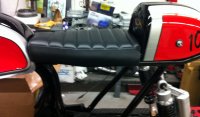
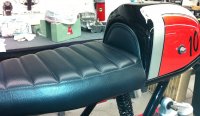
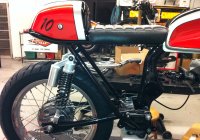
I was also able to get the seat pan squared away and upholstered. I think the pics speak for themselves and I am happy with the simple and clean look of the seat. All the edges are good and it lines up perfectly with the tail section and the gas tank.
I was also able to get the seat pan squared away and upholstered. I think the pics speak for themselves and I am happy with the simple and clean look of the seat. All the edges are good and it lines up perfectly with the tail section and the gas tank.
Attachments

S
Sin City Cafe Racer
Guest
Re: Sin City CM400 Cafe Racer
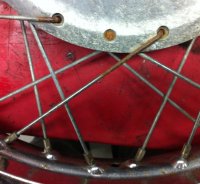
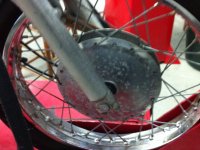
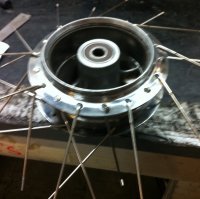
Next up was the wheels and a lot of polishing I do not like polishing at all. One good thing for this particular bike and the aluminum hubs and backing plates is that I am not looking for a mirror finish or a chrome like finish. I was going for a dull look because I think that is more period correct and fits better with a bike like this. Also there is so much black on this bike that any shine at all will look chrome like. Unfortunately I still ended up spending hours sanding and polishing. Apparently Honda put on some sort of clear coat to protect the bare aluminum on the hubs and backing plates. First I had to sand this protective coat off and then begin wet sanding in steps with 600, 800, 1000, 1200, and 1500 grit paper. Not fun!
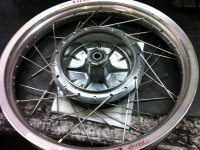
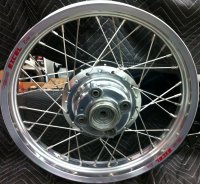
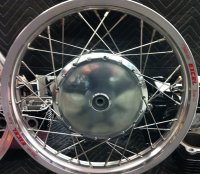
For the wheels I decided I wanted stainless spokes and excel rims with no dimples on the rims. I was able to get the spokes and rims from Buchanans. One of my favorite things to do is spoke and true wheels. When I was a little kid hanging around my Dads bike shop he used to spoke wheels all the time. In fact he used to make spool hubs for choppers on the lathe and make custom spokes and spoke and true for the choppers of the early 70's. So I probably watched him make thousands of these different wheels. Eventually I took over these duties and it always would get a laugh when someone would show up with a rare wheel to be spoked an trued and there was this 12 year old kid in the back room doing the work. lol
Anyways the hours polishing and work was worth it
A couple before pics
Next up was the wheels and a lot of polishing
I do not like polishing at all. One good thing for this particular bike and the aluminum hubs and backing plates is that I am not looking for a mirror finish or a chrome like finish. I was going for a dull look because I think that is more period correct and fits better with a bike like this. Also there is so much black on this bike that any shine at all will look chrome like. Unfortunately I still ended up spending hours sanding and polishing. Apparently Honda put on some sort of clear coat to protect the bare aluminum on the hubs and backing plates. First I had to sand this protective coat off and then begin wet sanding in steps with 600, 800, 1000, 1200, and 1500 grit paper. Not fun!For the wheels I decided I wanted stainless spokes and excel rims with no dimples on the rims. I was able to get the spokes and rims from Buchanans. One of my favorite things to do is spoke and true wheels. When I was a little kid hanging around my Dads bike shop he used to spoke wheels all the time. In fact he used to make spool hubs for choppers on the lathe and make custom spokes and spoke and true for the choppers of the early 70's. So I probably watched him make thousands of these different wheels. Eventually I took over these duties and it always would get a laugh when someone would show up with a rare wheel to be spoked an trued and there was this 12 year old kid in the back room doing the work. lol
Anyways the hours polishing and work was worth it
A couple before pics
Attachments
S
Sin City Cafe Racer
Guest
S
Sin City Cafe Racer
Guest
Re: Sin City CM400 Cafe Racer
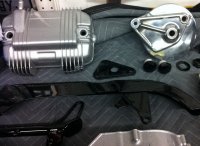
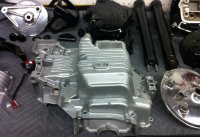
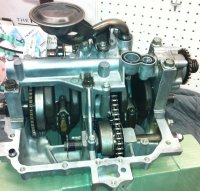
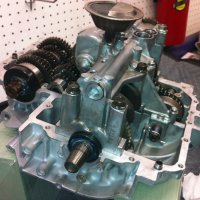
The motor is well on its way to being assembled. I had ordered a complete motor gasket kit a couple months ago and while it has all the gaskets it does not have all the orings and oil seals. Luckily I realized that, so I went through the parts book and ordered all the internal orings and oil seals. So just a warning to anyone thinking a complete gasket kit will cover everything you need because most likely thats not the case.
The internals of the motor looked very good. As expected the bike only has approx 9000 miles. My motor guy and myself measured all the internals and everything is well within tolerances. The only thing we did as a precaution was to hone the cylinders just to give them some fresh cross hatches. Bottom end is together and the top end should be finished tomorrow.
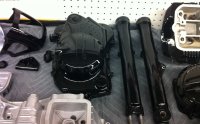
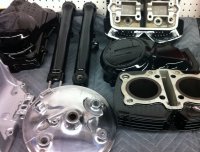
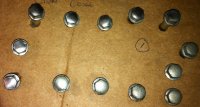
And of course I had plenty of bolts to refurbish. I have a vibratory tumbler. The usual process is running the hardware through ceramic media for about 10hrs, then through a polishing media (walnut shells) for another 10hrs. This results in a nice clean hardware with somewhat of a polish. For this bike as a last step I have been hitting the hardware with the wire wheel for a darker finish. I think the result looks more authentic.
In the bolt picture there are some unfinished bolts so you can see the difference
The motor is well on its way to being assembled. I had ordered a complete motor gasket kit a couple months ago and while it has all the gaskets it does not have all the orings and oil seals. Luckily I realized that, so I went through the parts book and ordered all the internal orings and oil seals. So just a warning to anyone thinking a complete gasket kit will cover everything you need because most likely thats not the case.
The internals of the motor looked very good. As expected the bike only has approx 9000 miles. My motor guy and myself measured all the internals and everything is well within tolerances. The only thing we did as a precaution was to hone the cylinders just to give them some fresh cross hatches. Bottom end is together and the top end should be finished tomorrow.
And of course I had plenty of bolts to refurbish. I have a vibratory tumbler. The usual process is running the hardware through ceramic media for about 10hrs, then through a polishing media (walnut shells) for another 10hrs. This results in a nice clean hardware with somewhat of a polish. For this bike as a last step I have been hitting the hardware with the wire wheel for a darker finish. I think the result looks more authentic.
In the bolt picture there are some unfinished bolts so you can see the difference
Attachments
S
Sin City Cafe Racer
Guest
Re: Sin City CM400 Cafe Racer
For the upcoming week I hope to finish assembling the motor, Installing the motor in the frame, Mounting the tires, assembling the brakes and mounting the wheels, installing the gators on the forks, headlight mounting brackets, Getting the speedometer hole drilled and getting the upper tree ready for powder. Fingers crossed
For the upcoming week I hope to finish assembling the motor, Installing the motor in the frame, Mounting the tires, assembling the brakes and mounting the wheels, installing the gators on the forks, headlight mounting brackets, Getting the speedometer hole drilled and getting the upper tree ready for powder. Fingers crossed
LandricsCustoms
New Member
Re: Sin City CM400 Cafe Racer
Bill... the bike is looking GREAT!!. I am so happy to be a part of this build buddy. EXCELLENT Job man!! We make a good team!
Bill... the bike is looking GREAT!!. I am so happy to be a part of this build buddy. EXCELLENT Job man!! We make a good team!
S
Sin City Cafe Racer
Guest
Re: Sin City CM400 Cafe Racer
Thanks Bro, we do make a good team. The 1966 Honda Scrambler is next up... hopefully I can get the paint to you soon!
LandricsCustoms said:Bill... the bike is looking GREAT!!. I am so happy to be a part of this build buddy. EXCELLENT Job man!! We make a good team!
Thanks Bro, we do make a good team. The 1966 Honda Scrambler is next up... hopefully I can get the paint to you soon!
S
Sin City Cafe Racer
Guest
Re: Sin City CM400 Cafe Racer
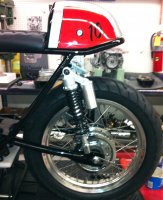
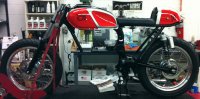
Progress has been made. Although the motor is still being assembled and hopefully finished by tomorrow...fingers crossed. The bike is now a roller. New tires and the brakes have been assembled. Gators installed. Finally got around to figuring out what to do with the upper triple tree. I am mounting the speedometer directly to the tree and it will be recessed into the tree, still machining it but the plan is in place and its going to look slick. I got to get this motor into the frame so that I can work on the linkage for the shifter and brake arms. Should have done that before i removed the motor but I am going to need to powder coat a couple small parts still anyways so it wont cause any delays.
Progress has been made. Although the motor is still being assembled and hopefully finished by tomorrow...fingers crossed. The bike is now a roller. New tires and the brakes have been assembled. Gators installed. Finally got around to figuring out what to do with the upper triple tree. I am mounting the speedometer directly to the tree and it will be recessed into the tree, still machining it but the plan is in place and its going to look slick. I got to get this motor into the frame so that I can work on the linkage for the shifter and brake arms. Should have done that before i removed the motor but I am going to need to powder coat a couple small parts still anyways so it wont cause any delays.
Attachments
S
Sin City Cafe Racer
Guest

S
Sin City Cafe Racer
Guest
Re: Sin City CM400 Cafe Racer
No I haven't done a mock up with the chain. There shouldn't be any problems with that because I didn't change any of the dimensions in that area of the frame. Also its a stock rear hub and sprocket and the motor sits in the stock place so it should all line up just like stock. Although you have me second guessing myself now....lol. No, its the angle of the pic. Also the rear axle isnt tightened yet so I'm sure the rear wheel isn't straight in the swingarm.
On a side note, one problem I did find, err forgot to mock up was because of the new shock angle the stock chain guard notches for the shocks doesn't line up with the shocks. I had been debating wether or not to use the chain guard anyways but I had it powder coated so I could use it if I decided to. I'm going to leave the chain guard off for now and at the end of the build see what looks better, If I decide I want a chain guard at that point I will make a new one.
cmo27 said:Looking really nice!
Have you done a mock-up with the chain on the sprockets? The rear looks like it might hit the swingarm
. Or are you using some kind of chain guide? Or maybe its just the angle of the pic? Lol
No I haven't done a mock up with the chain. There shouldn't be any problems with that because I didn't change any of the dimensions in that area of the frame. Also its a stock rear hub and sprocket and the motor sits in the stock place so it should all line up just like stock. Although you have me second guessing myself now....lol. No, its the angle of the pic. Also the rear axle isnt tightened yet so I'm sure the rear wheel isn't straight in the swingarm.
On a side note, one problem I did find, err forgot to mock up was because of the new shock angle the stock chain guard notches for the shocks doesn't line up with the shocks. I had been debating wether or not to use the chain guard anyways but I had it powder coated so I could use it if I decided to. I'm going to leave the chain guard off for now and at the end of the build see what looks better, If I decide I want a chain guard at that point I will make a new one.
S
Sin City Cafe Racer
Guest
Re: Sin City CM400 Cafe Racer
Thanks Doc
Doc_coM85 said:Bike looks absolutely amazing! Impressive how easy you make it look! Inspiring, but possibly misleading to say the least! (In a good way =P). Cant wait to see her all together!
Thanks Doc


