This is a build thread for a 1975 Honda CB400F Super Sport. This is my 5th CB400F rebuild and I decided to make this one a 100% factory stock restoration that runs and functions perfectly and sell it this spring. I absolutely love building and riding these bikes, but I do not have room in my stable for a third bike. Our shop (the Winona Riders) is full and I am slowly completing and selling my project bikes so I can make room in our workshop and patiently wait for my next future British bike project to come along.
An interesting thing happened when I sold my fourth CB400F Super Sport build last spring. That bike was cafed with British styling (lower bars, black cylinder paint, manx seat, no signals etc) and it took quite a while for the bike to sell. There was a lot of interest from younger poeple but they simply could not afford it. Many of the inquiries I got were people interested in a stock version of the bike, not a cafe racer (even though it was marketed as a Cafe Racer in 1975 and 1976). Older people were trying buy back the bike of their youth or buy the bike they wanted when they were younger but could not afford to back then. A few women wanted a smaller, reliable stock bike. So fighting all desire to modify this one to my tastes, I am leaving this bike 100% bone stock. A really nice low mileage stock CB400F sold recently on Ebay for $8600. The restoration was straightforward and by the book (Honda factory Service and Haynes manuals), and I will include many images so other CB400F owners can use them for reference on their builds.
The Buy:
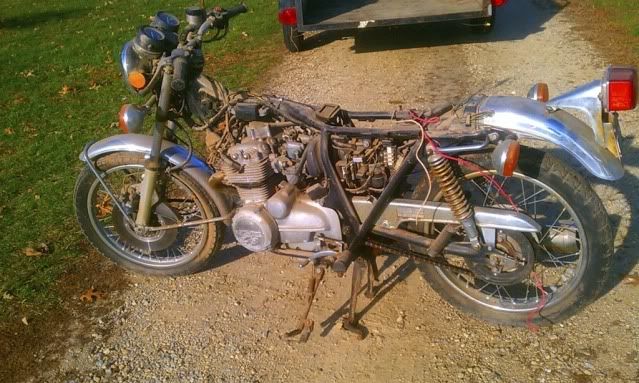
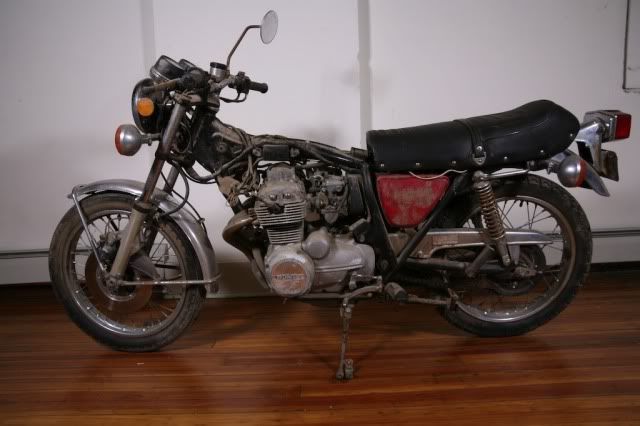
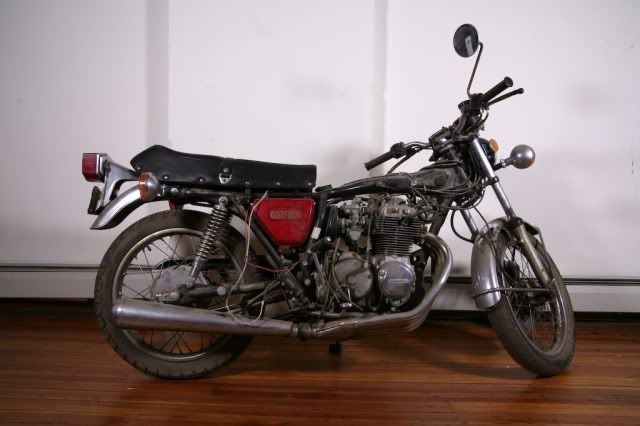
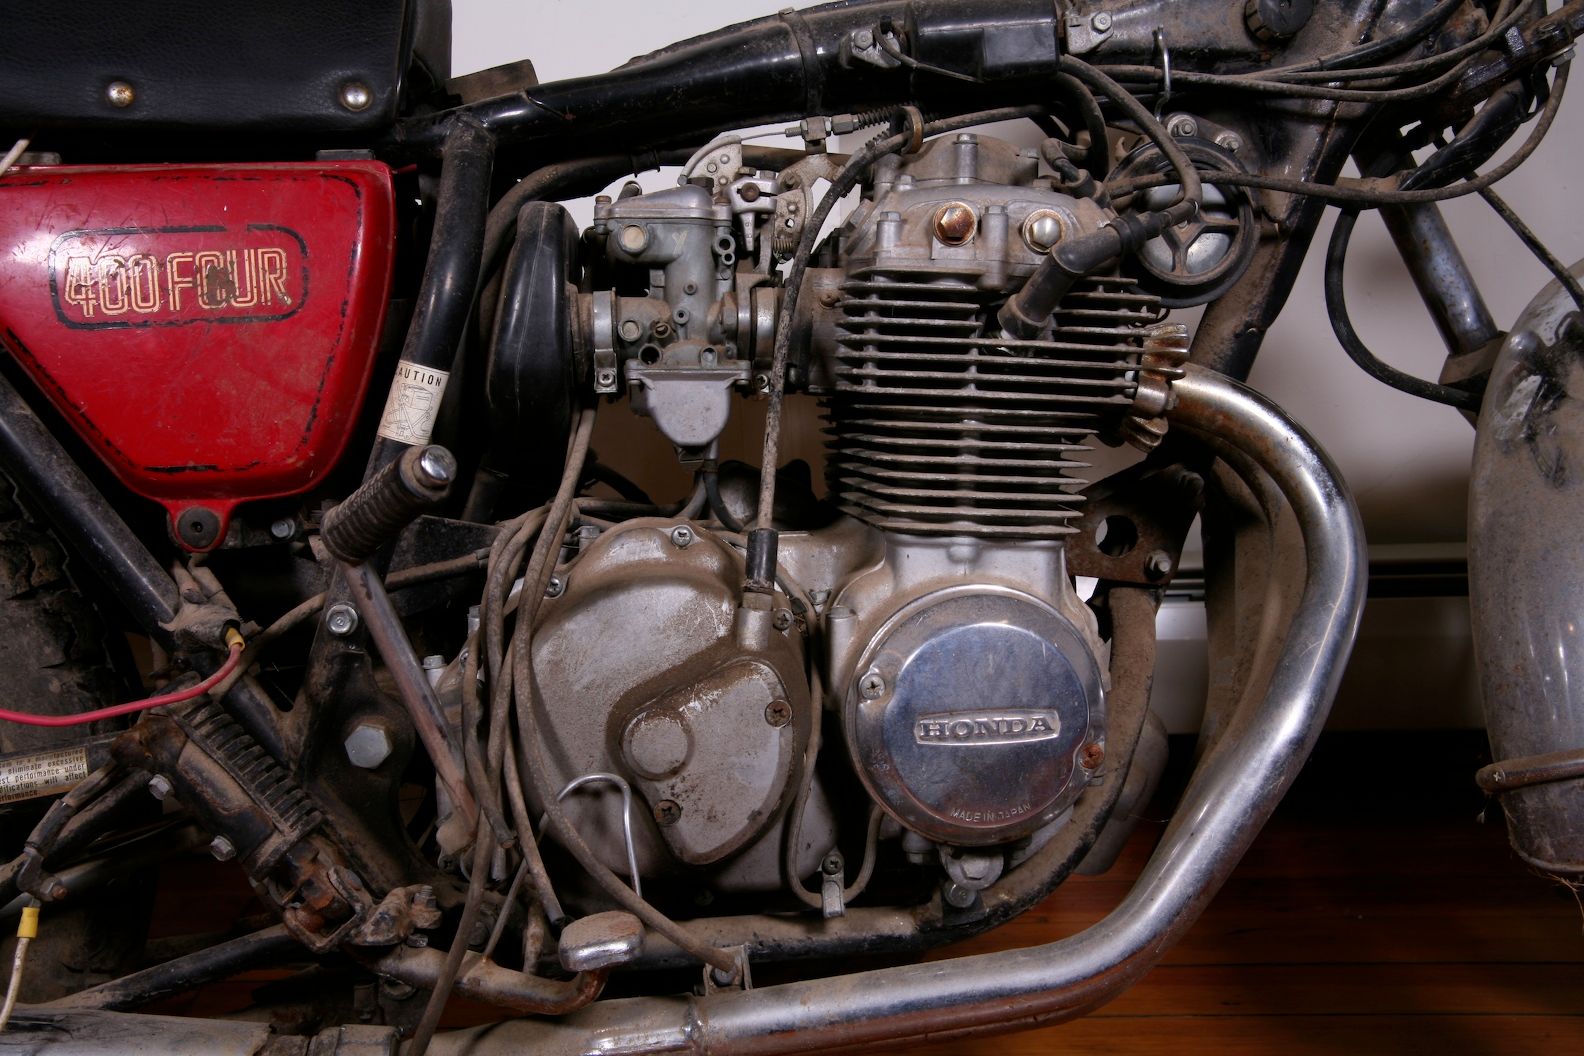
I found this 1975 CB400F on Craigslist last spring, could not pass it up and drove 7 hours roundtrip to pick it up from a nice guy in southeastern Wisconsin who had a barn full of old Japanese bikes. The price was fair, it was nearly complete (no tank), unmolsested and was titled, so I snapped it up knowing I would not have time to touch it until winter. My empty trailer had a blown tire on the way to pick up the bike, so it made for a 1 hour delay and a $100 replacement tire and rim. Along with the bike, I bought a few spare parts from him which I cleaned up and sold on Ebay to offset the cost of my trailer repair. The bike had 16152 some miles, turned over with even compression across all 4 cylinders. The tank, tool box and lid and air filter lid were missing but everything else was there. I got her back to the shop, completely cleaned the carbs, changed the oil and installed the battery and tank from another CB400F and got her running. She ran very well and I took her out for a short ride until the front brake cylinder froze up (typical bad caliper seal after sitting for years). I pulled the motor, broke her down to the frame and put her into storage. I had a couple days off over X-mas so started the restoration and have been working on it since. It is nearly done with the exception of the graphics on the freshly painted tank. Again, this 100% stock and wanted to rebuild her from the frame and crank up. Here we go:
Motor
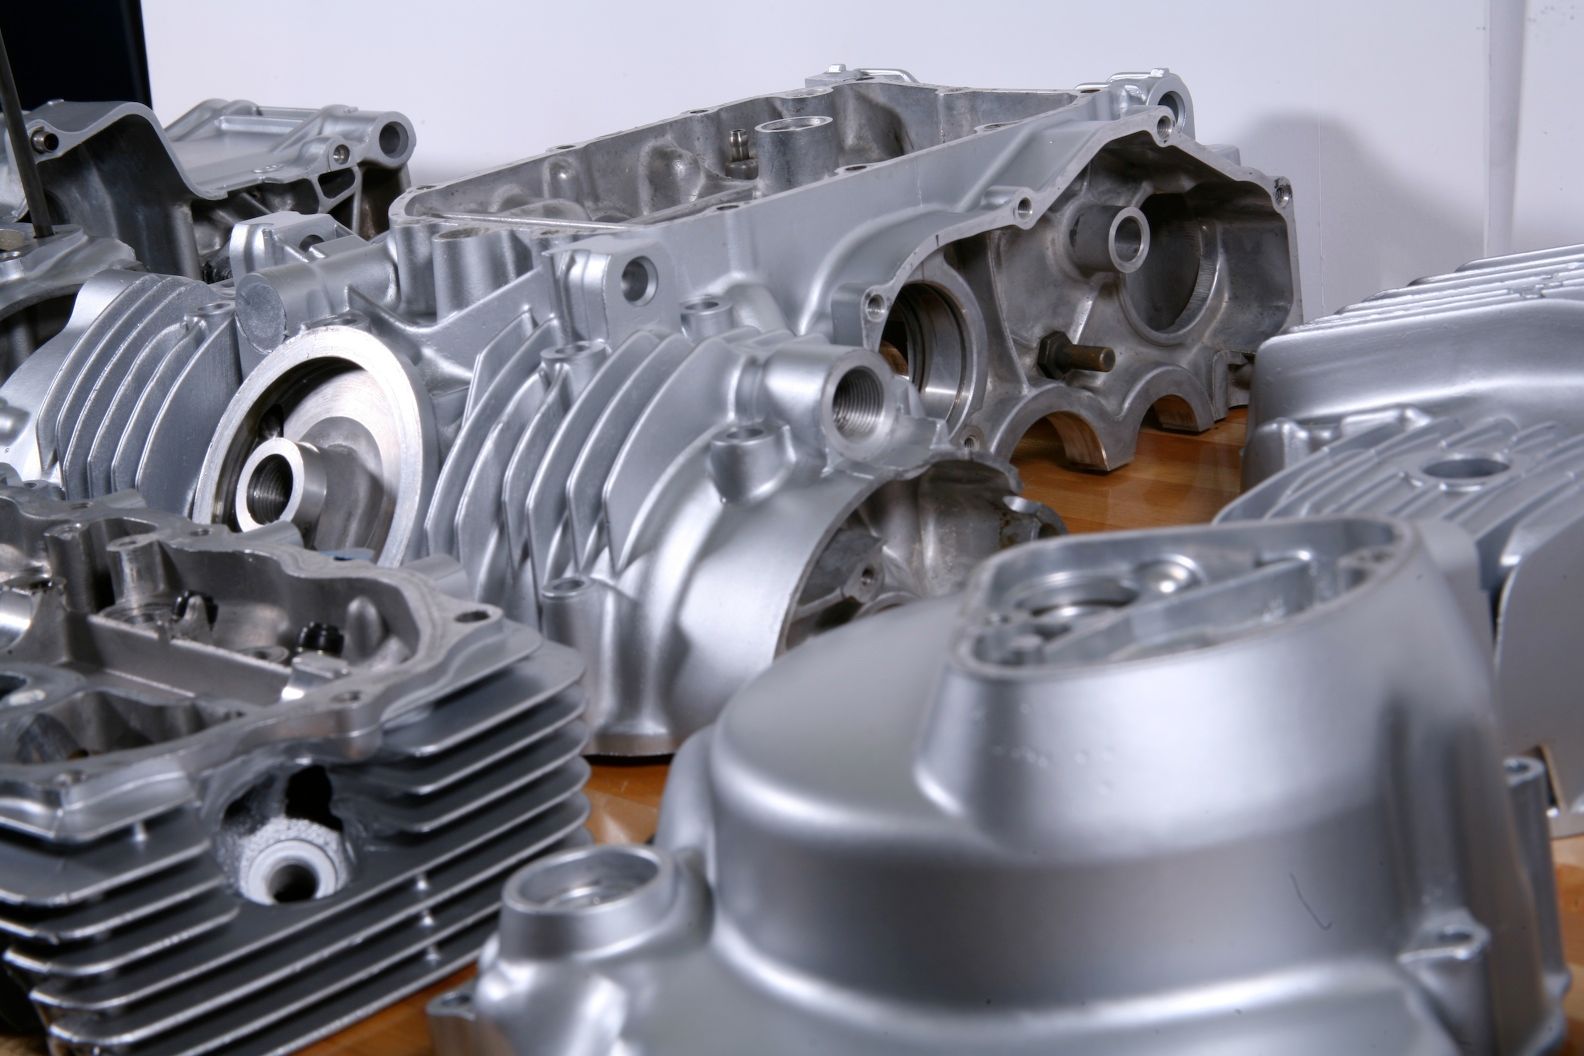
I cleaned the exterior of the motor with a vacuum, wiped off the dust, dead insects and grease with Simple Green and pulled it out of the frame.
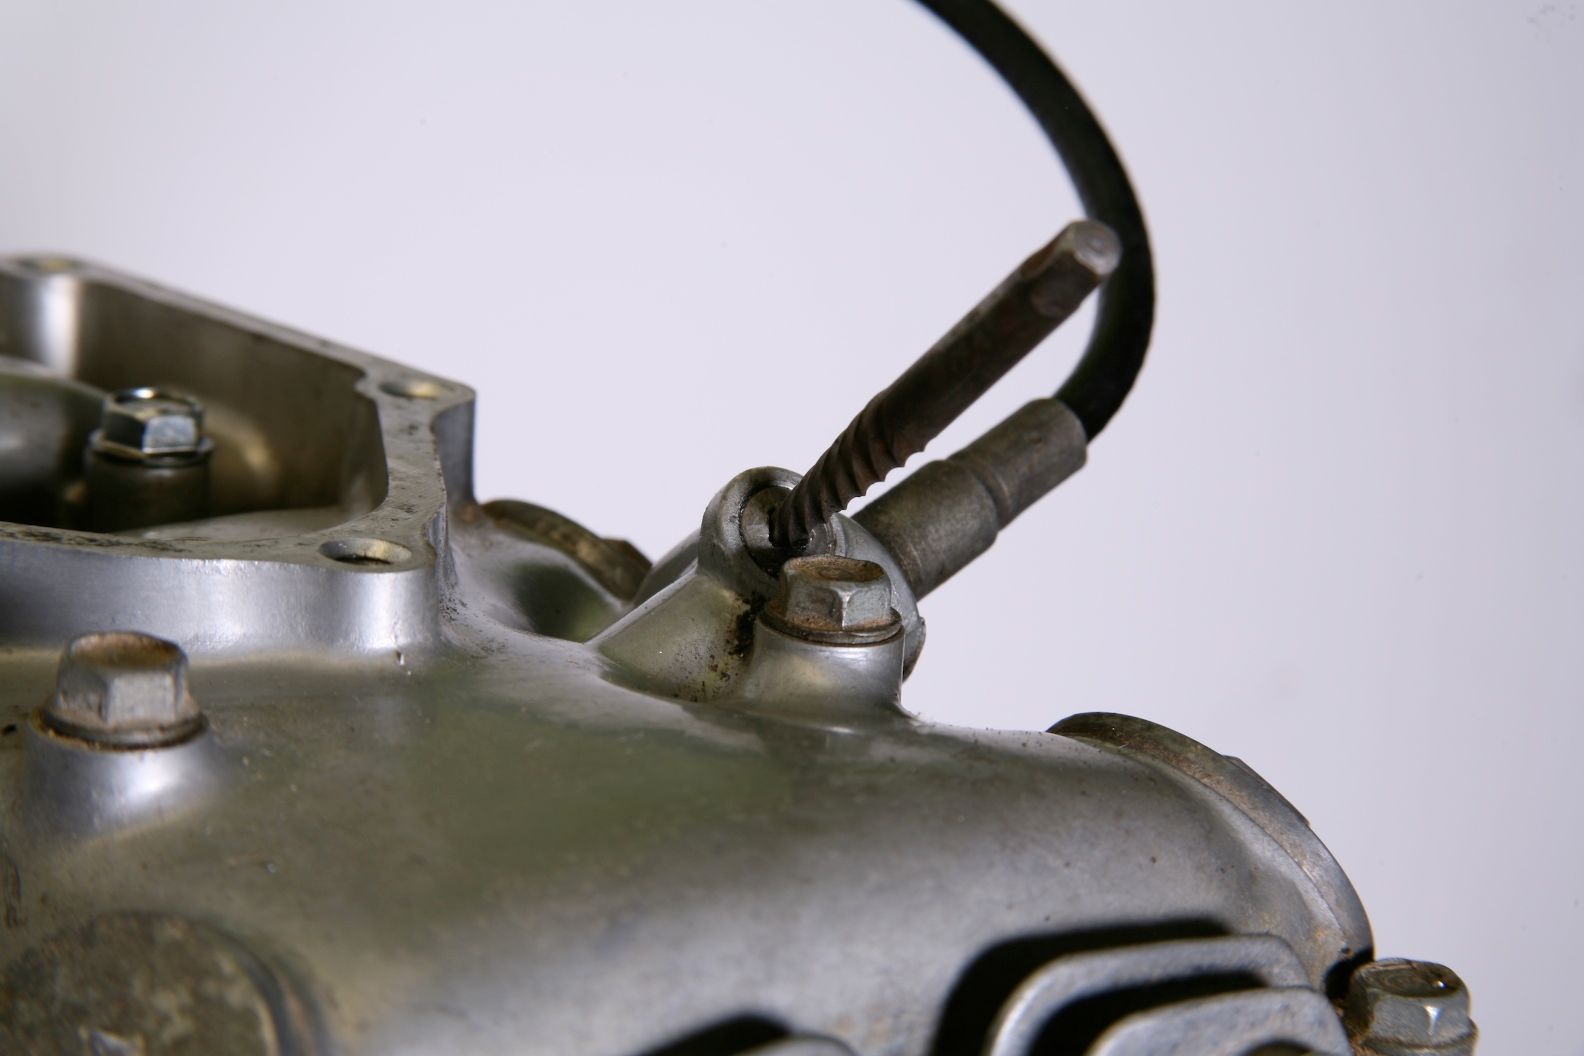
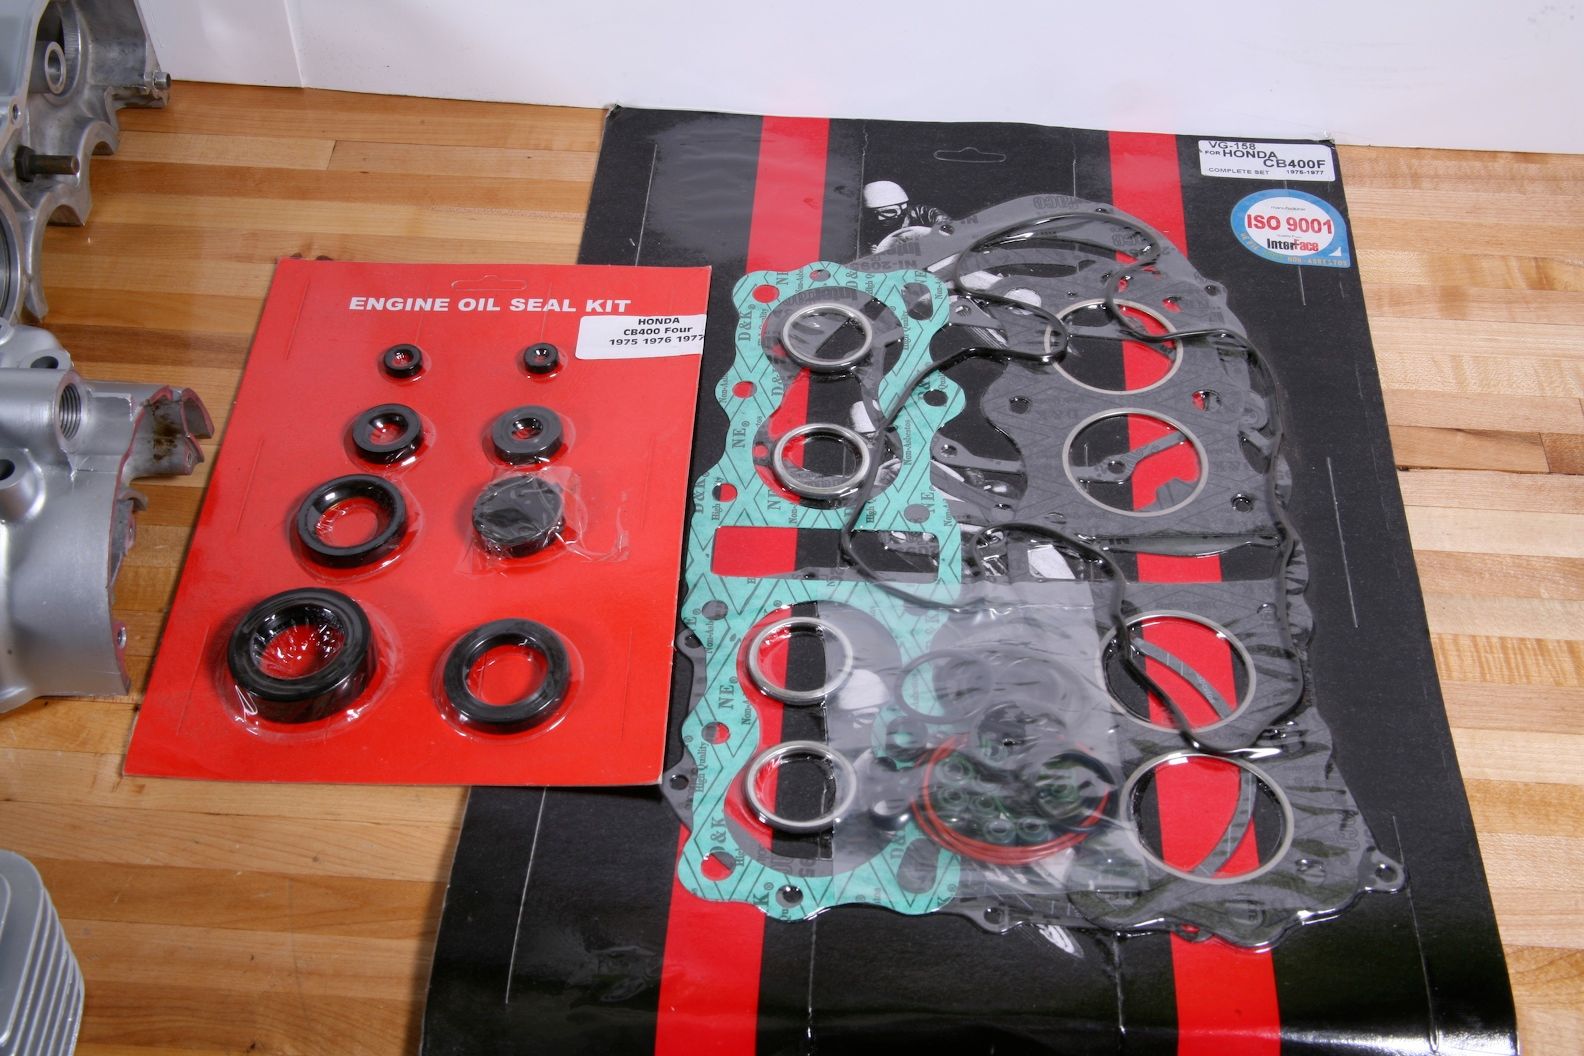
New gasket and seal kits were ordered and I broke it down by the book. Of course the first thing I found was a striped tachometer cable screw. It will be replaced, so I tried soaking it in Kroil and then tapping it with an impact driver, but the phillips head was already stripped. A screw extractor got it out. The rest of the teardown was straightforward, with no drama or surprises. I was happy to find little to no rust on the hardware and none of the other fasteners gave me problems except for two screws on the carb inlets. I photographed, bagged and tagged everything as I made my way down to the crankshaft. Inside, everything was well oiled with no obvious problems. Everything was measured and compared to factory specification and anything out of spec or looked suspect was replaced with new parts.
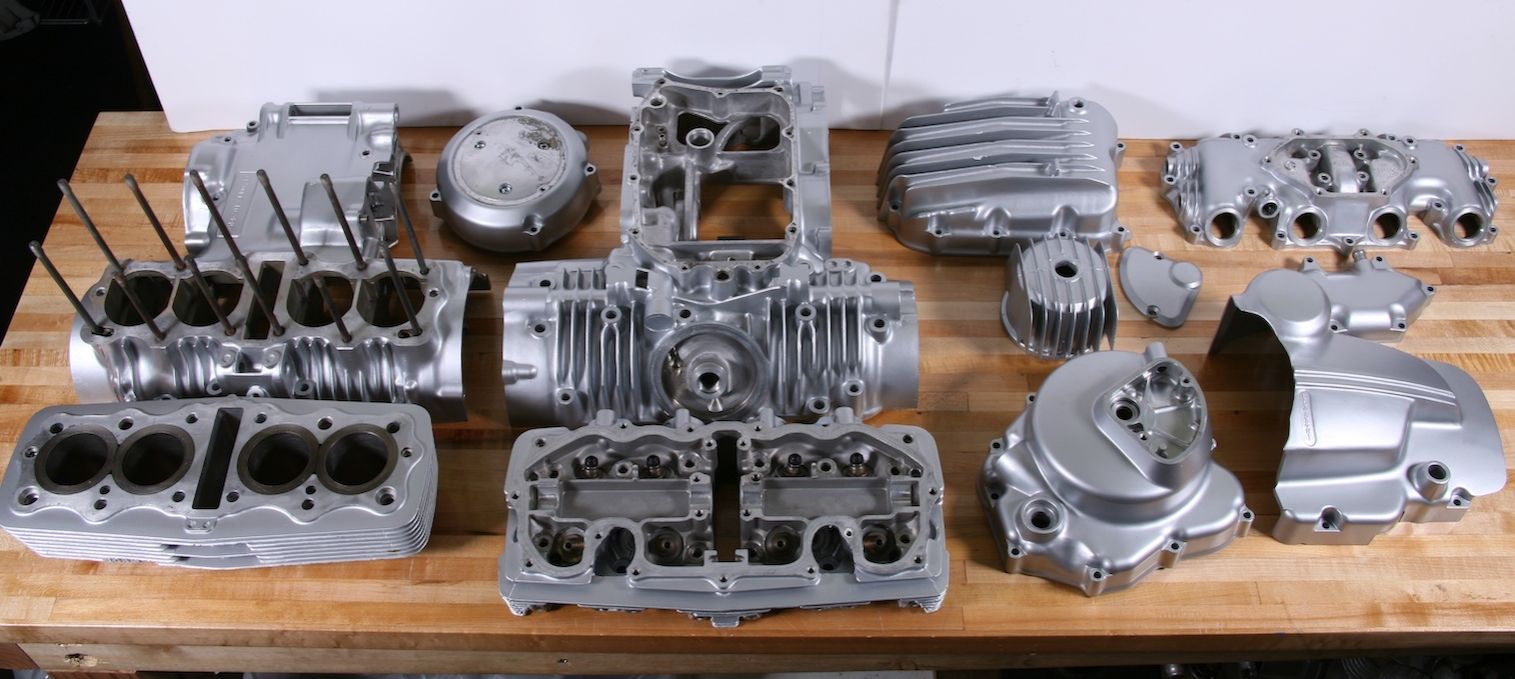
I spent nearly 12 hours cleaning, preparing, priming, painting and heat treated all the external alloy motor parts. The stator cover had some deep scratches so I filled them with Lab Metal (a high temperature body filler) and shaped, filed and sanded it smooth. All the alloy parts were sprayed with a light coat of Dupli-Color VHT grey engine primer and after it dried, sprayed all with two light coats and a third medium coat of Duplicolor 1615 VHT Aluminum paint . Once dry, I baked it in an oven for 30 minute cycles at 250, 350 450 degrees F. to harden and make fuel resistant the paint. Heat treating makes this paint very durable and resistant to fuel and oil.
The clutch plates and springs were well within factory specification so they were cleaned and re-installed.
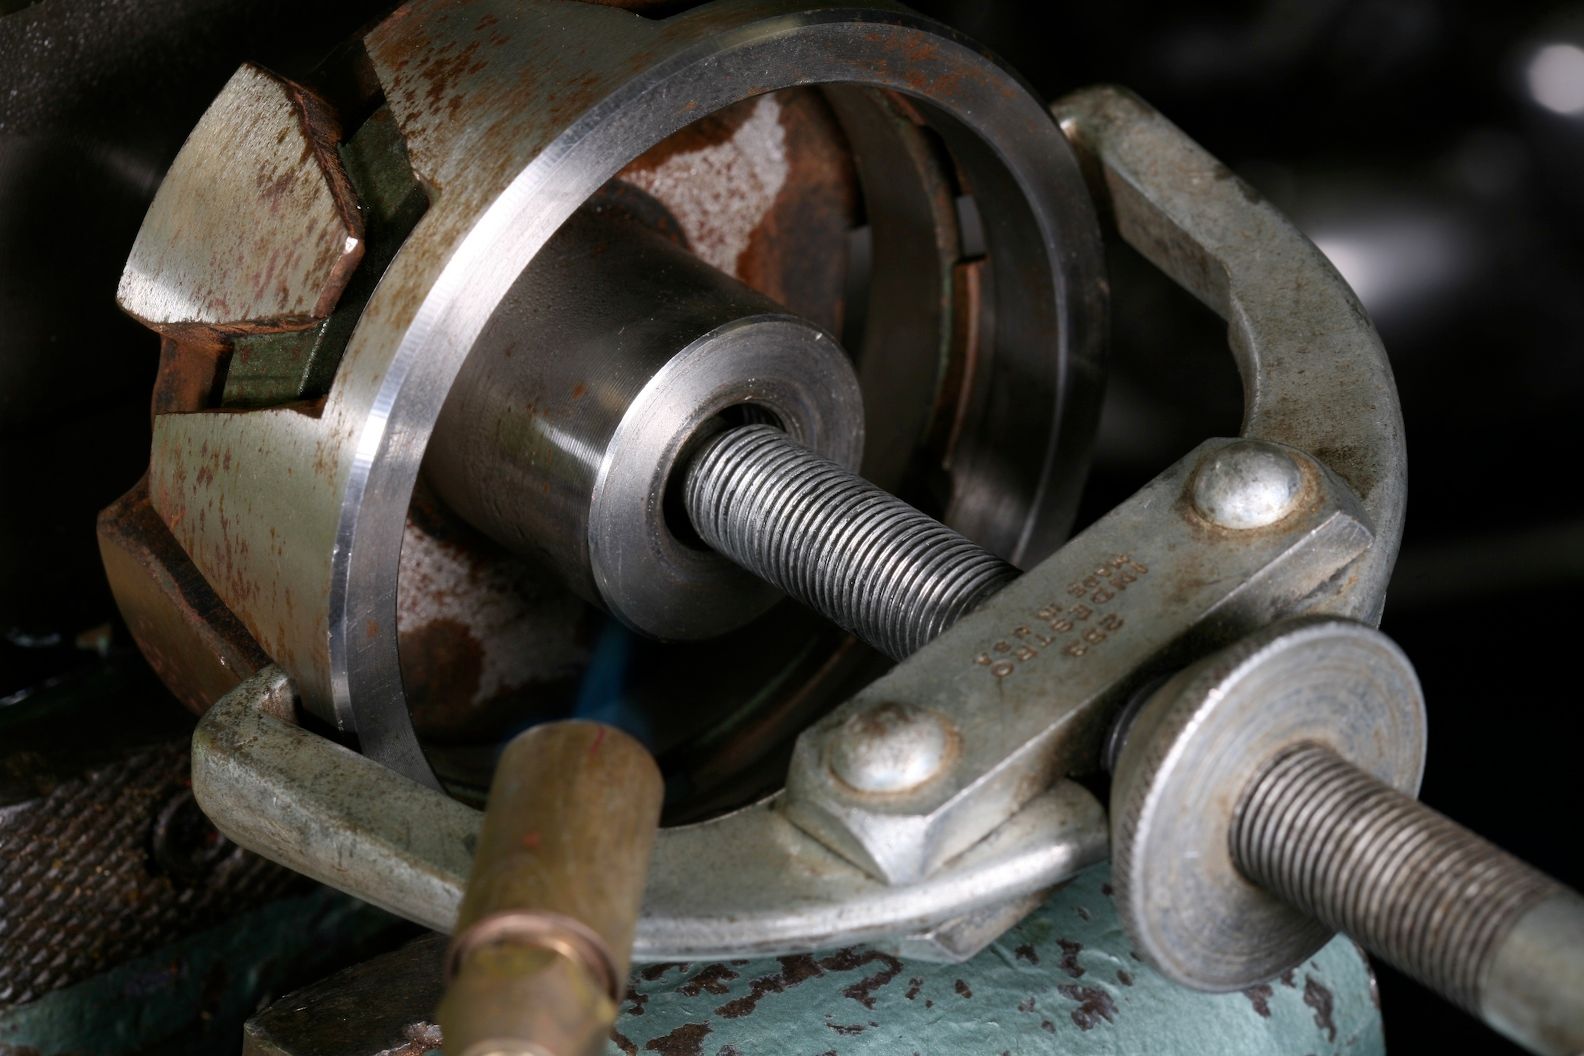
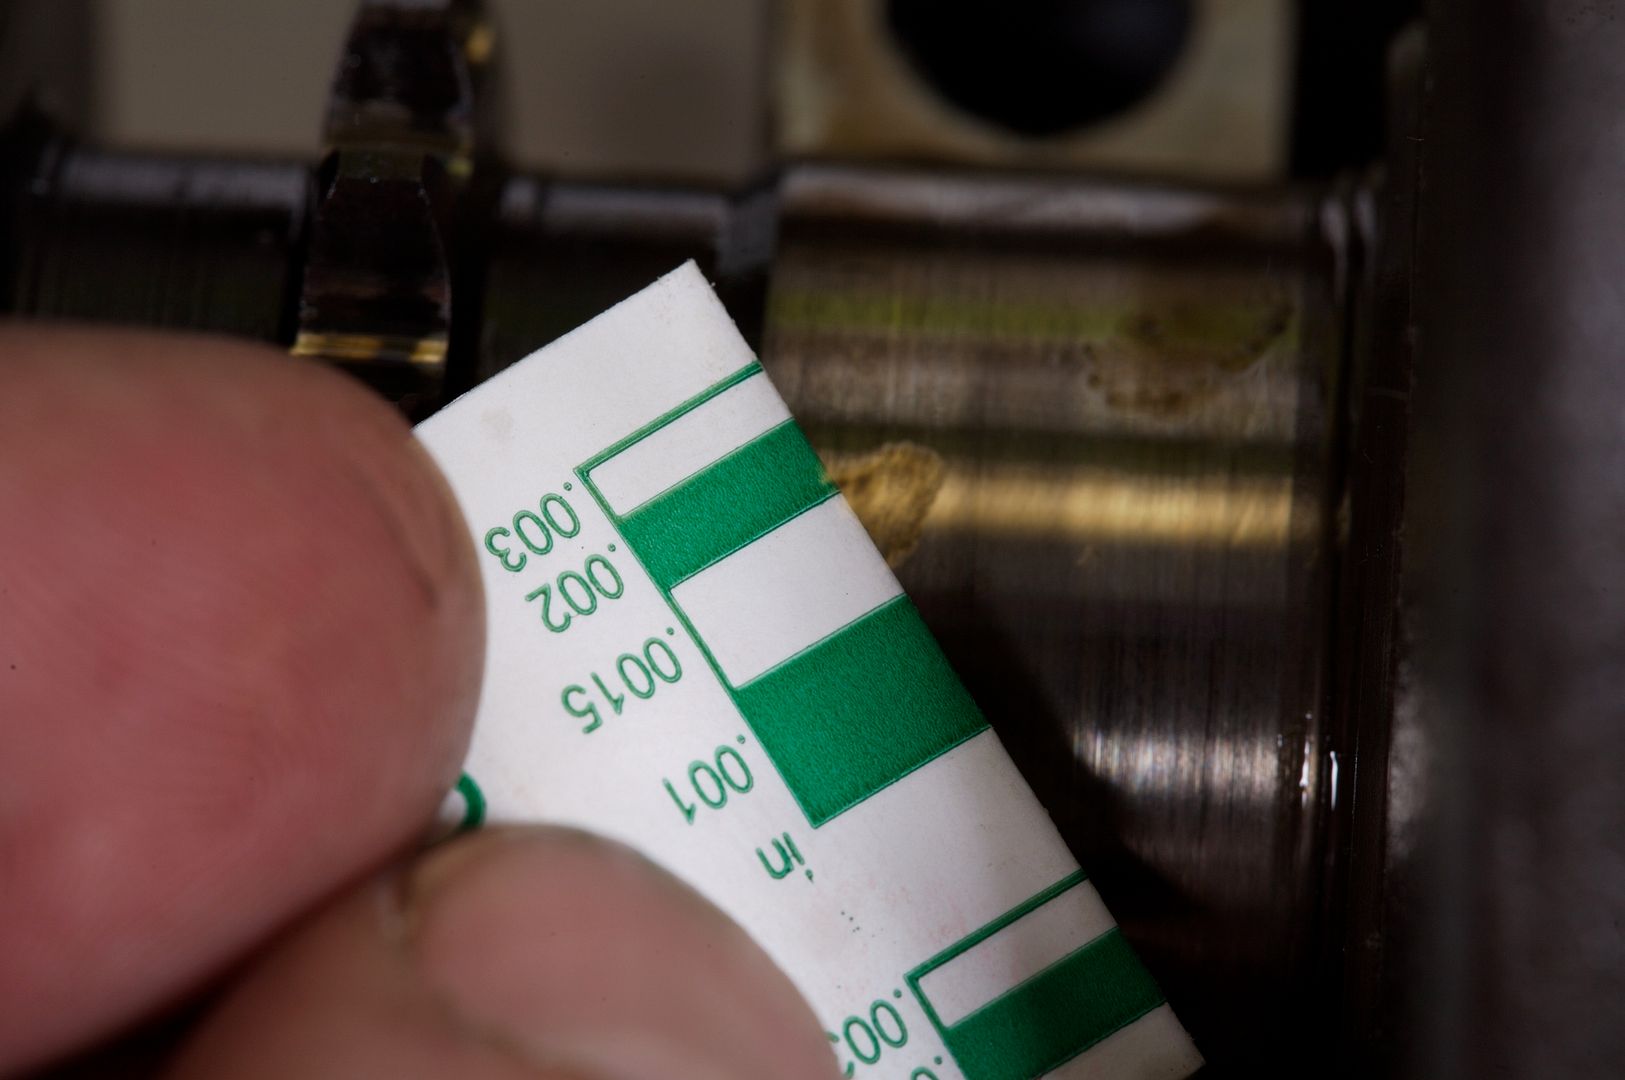
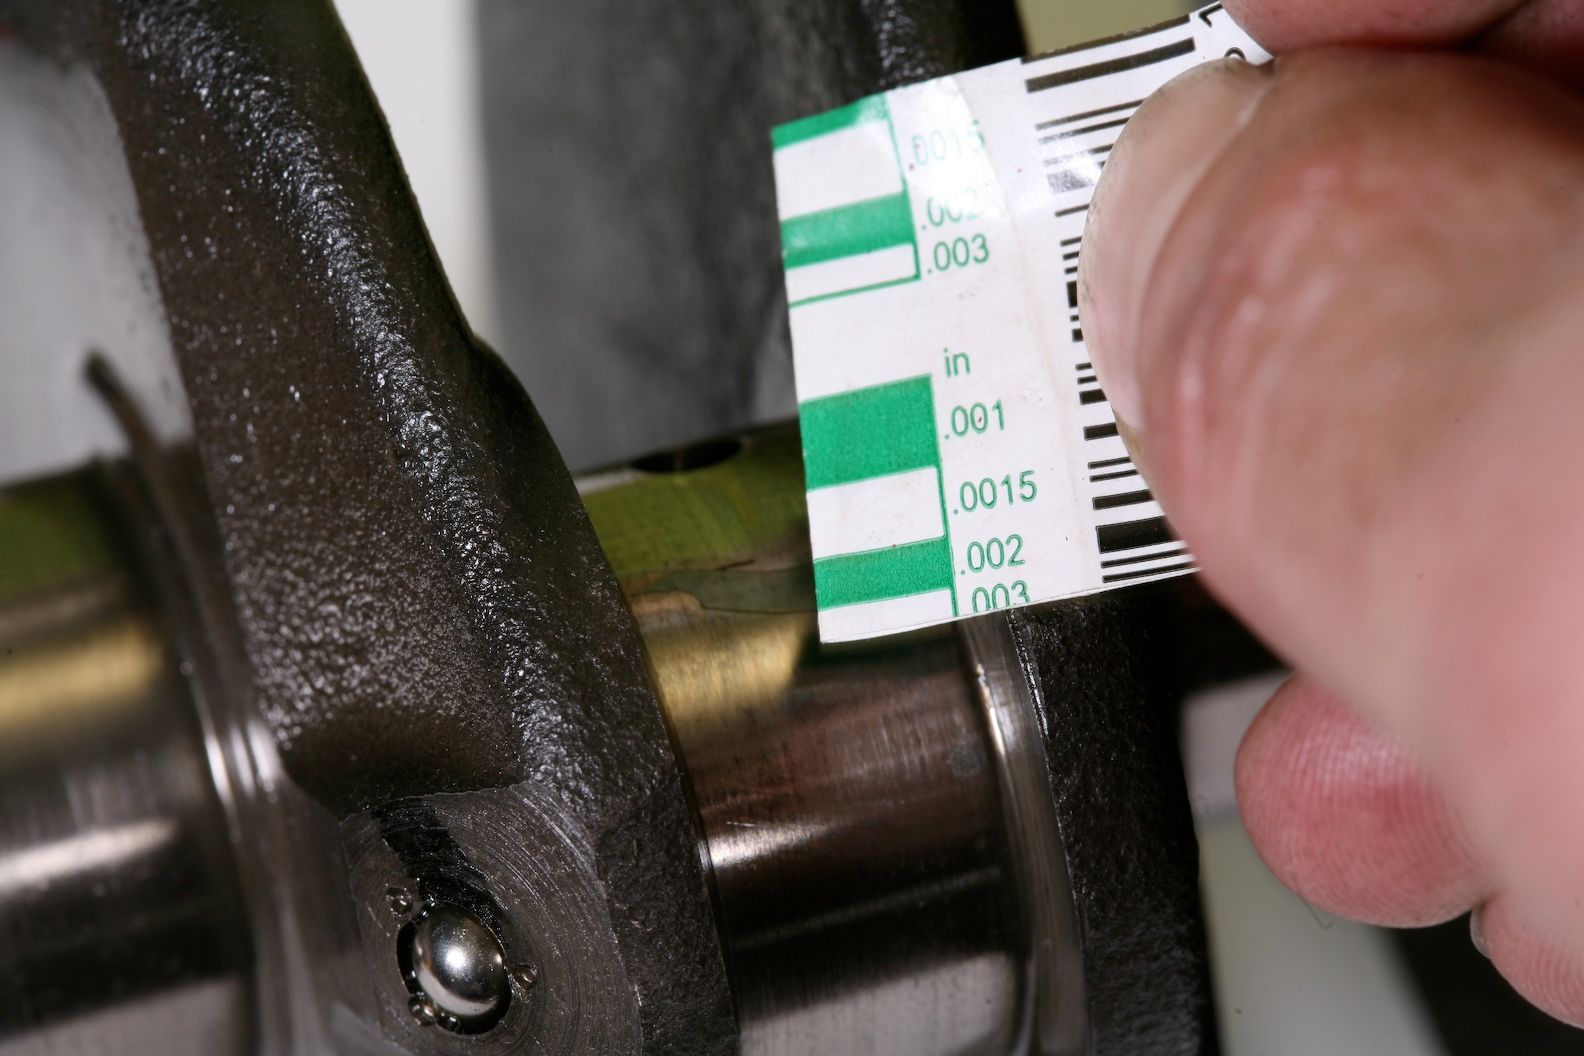
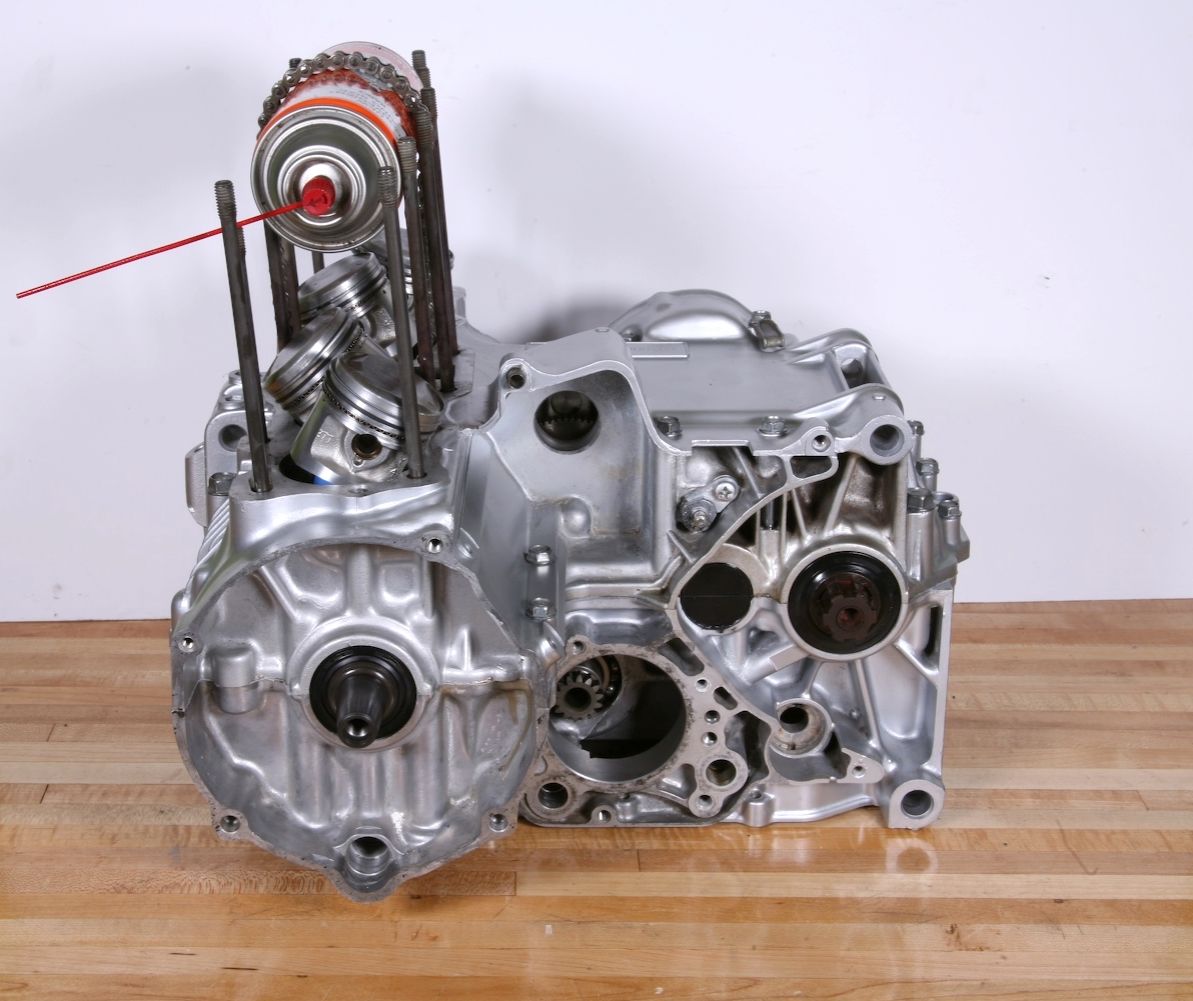
To start I pulled the rotor off the left hand side of the crank. For past projects I ordered the service tool to do this, but was sent the wrong size. Instead, I sprayed with the rotor with Kroil, applied heat from a propane torch and used a 2 jaw puller and it came straight off. Before rebuilding I carefully measured the the tolerance of the bearings on the connecting rods as well as the case and crank shell bearings with green Plasticgauge after cranking all the engine bolts down to their specified torque. All the bearings tolerances came within factory tolerance so they were re-used.
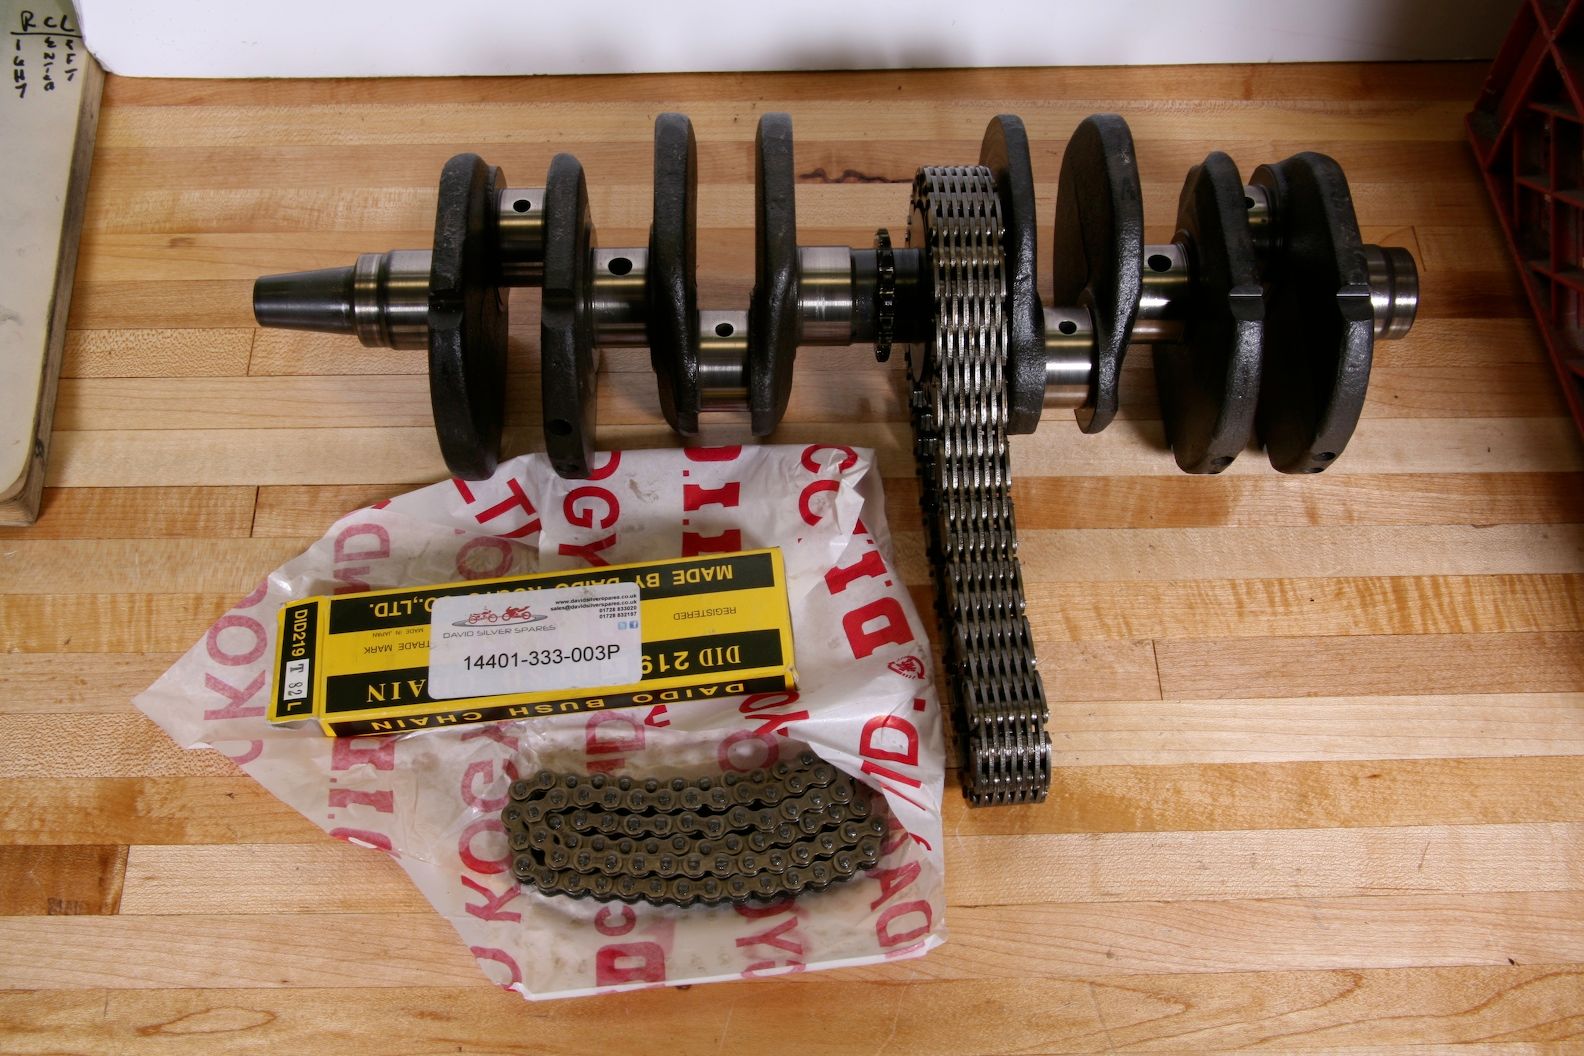
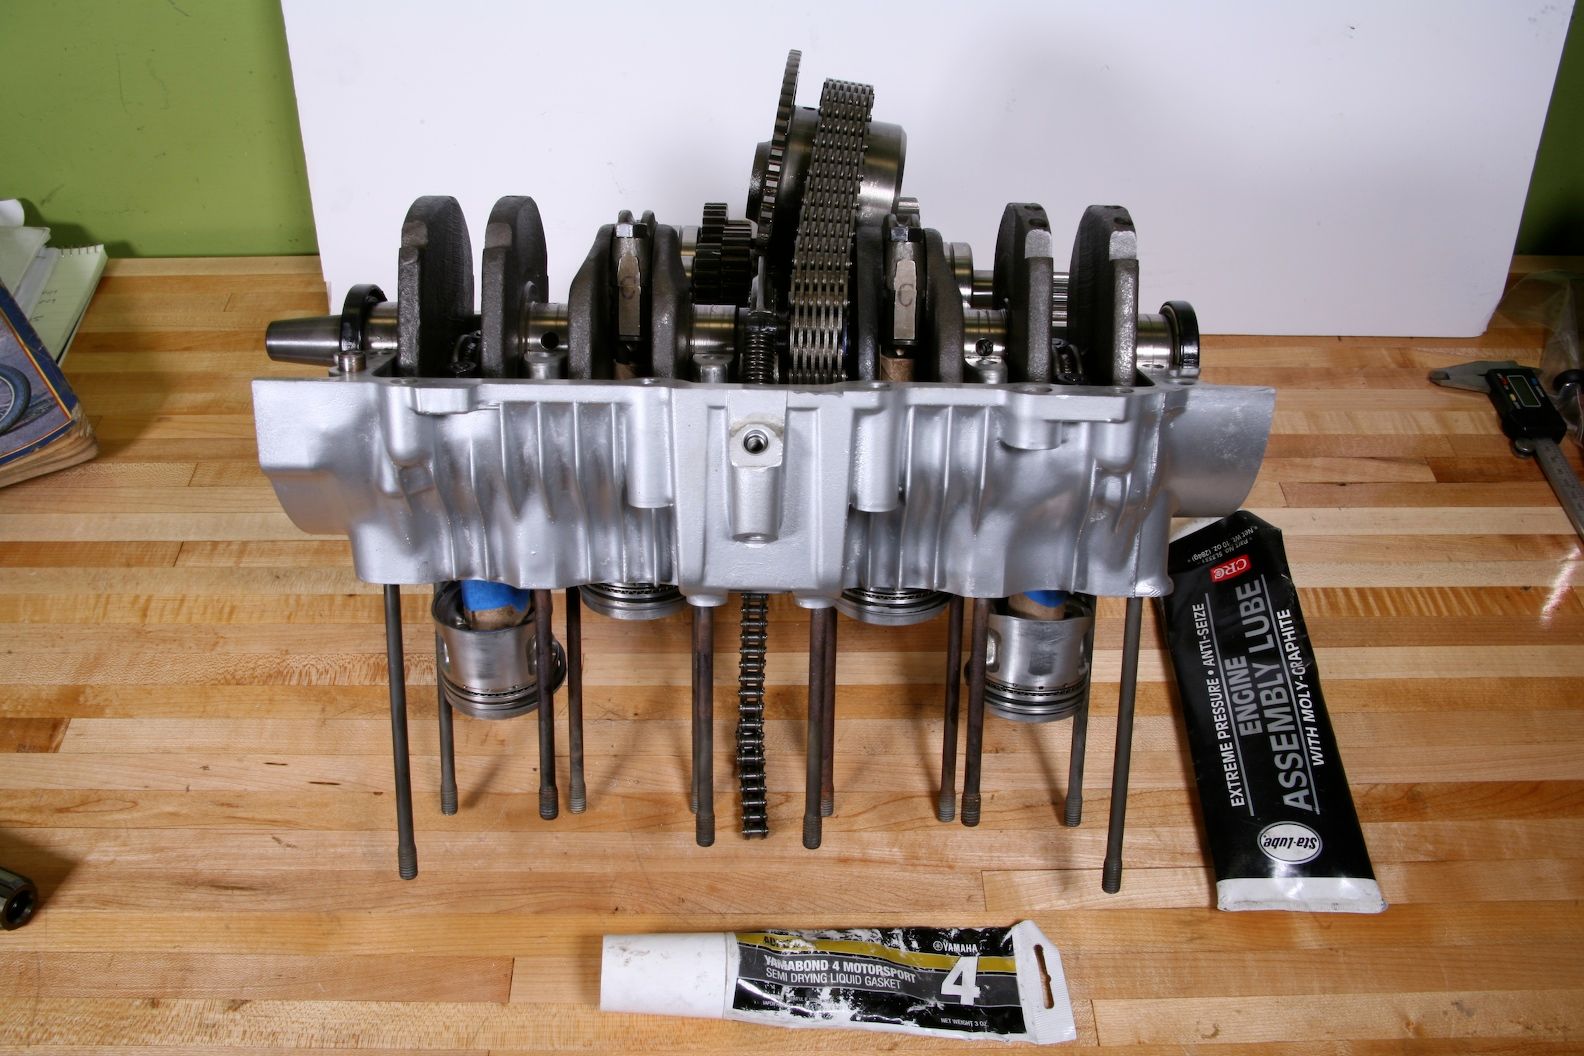
Next, I pre-emptively installed a new DID cam chain, even though the old one appeared to be good. The cam chain is a common problem with this model so now is the time to do it. Both cam chain guides showed very little wear and measured well within factory specs so I reused them. I rebuilt the crankshaft, rods and crankcases by the book and seal both halves of the cases with a light and even smear of Yamabond 3 and of course all moving parts were coated with motor assembly lube and all threaded hardware was coated lightly with anti-sieze lubricant.
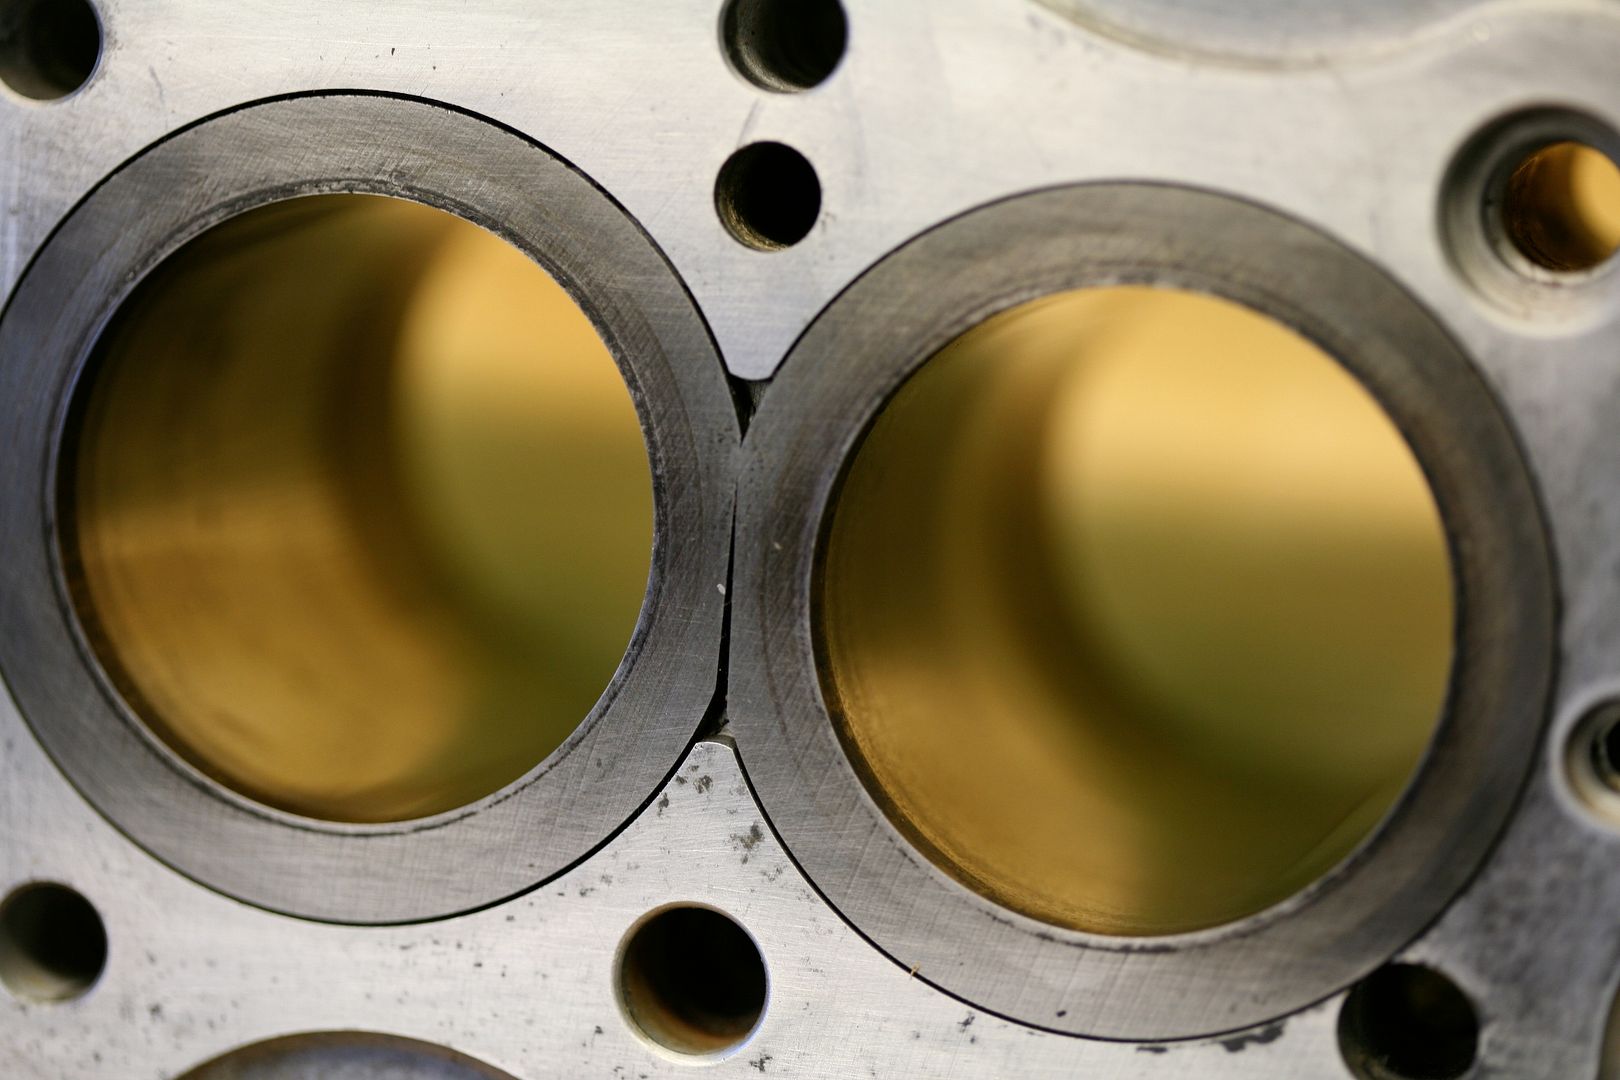
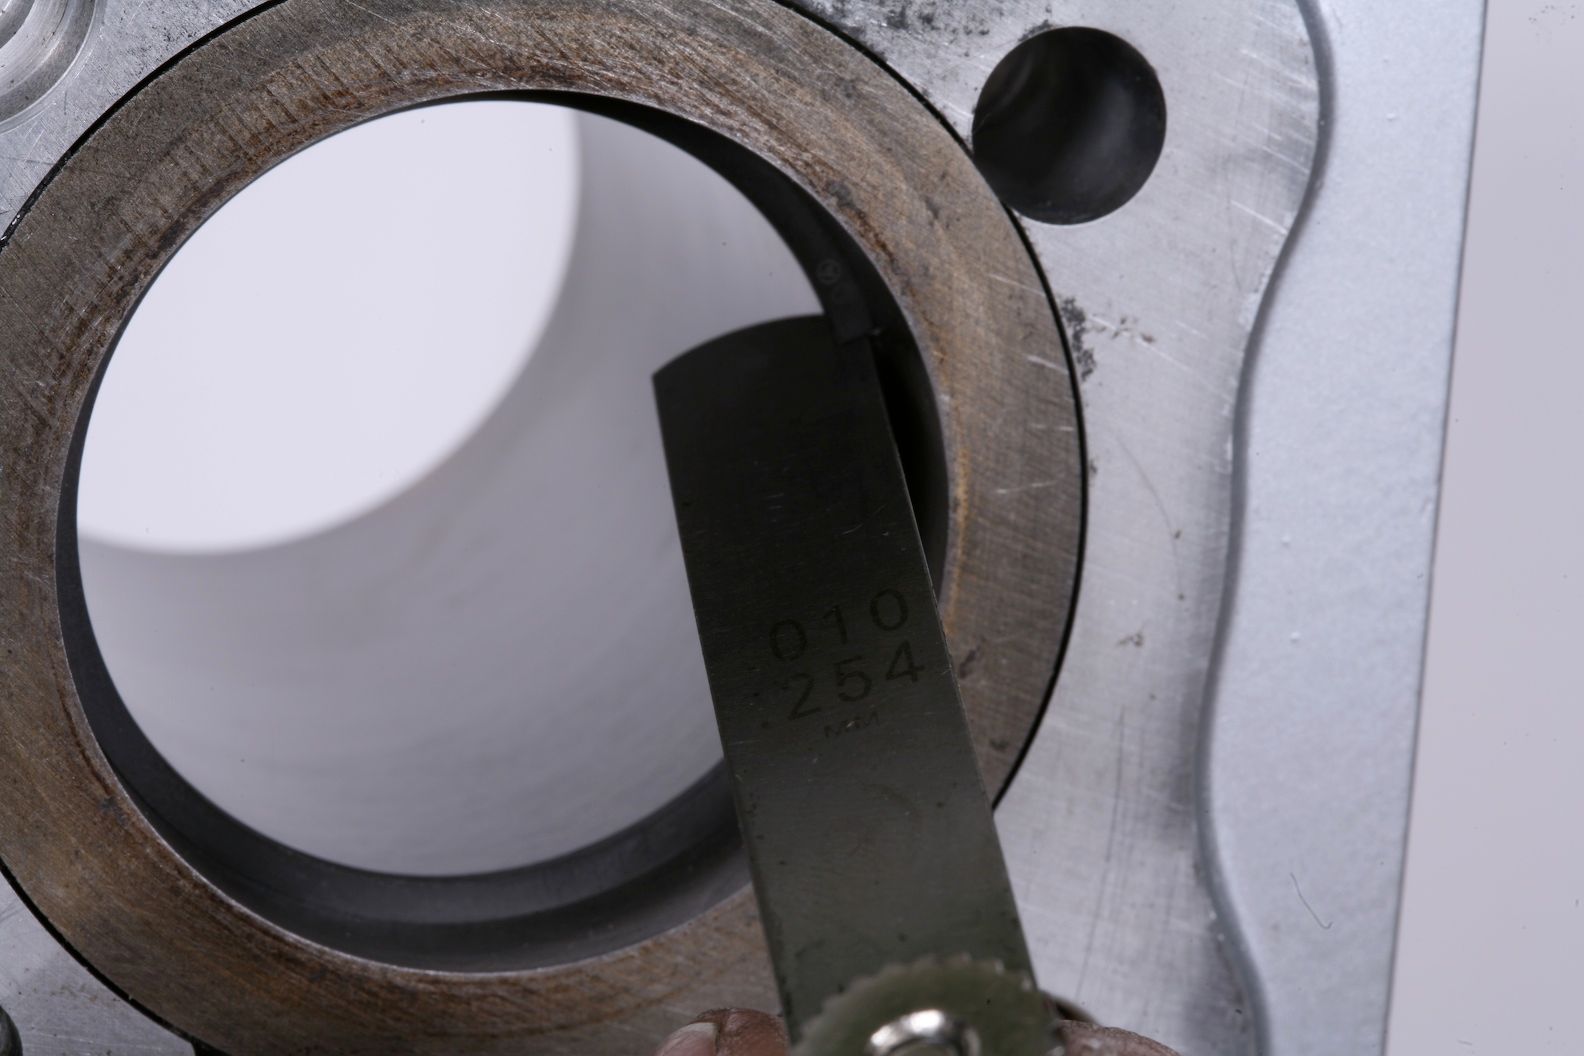
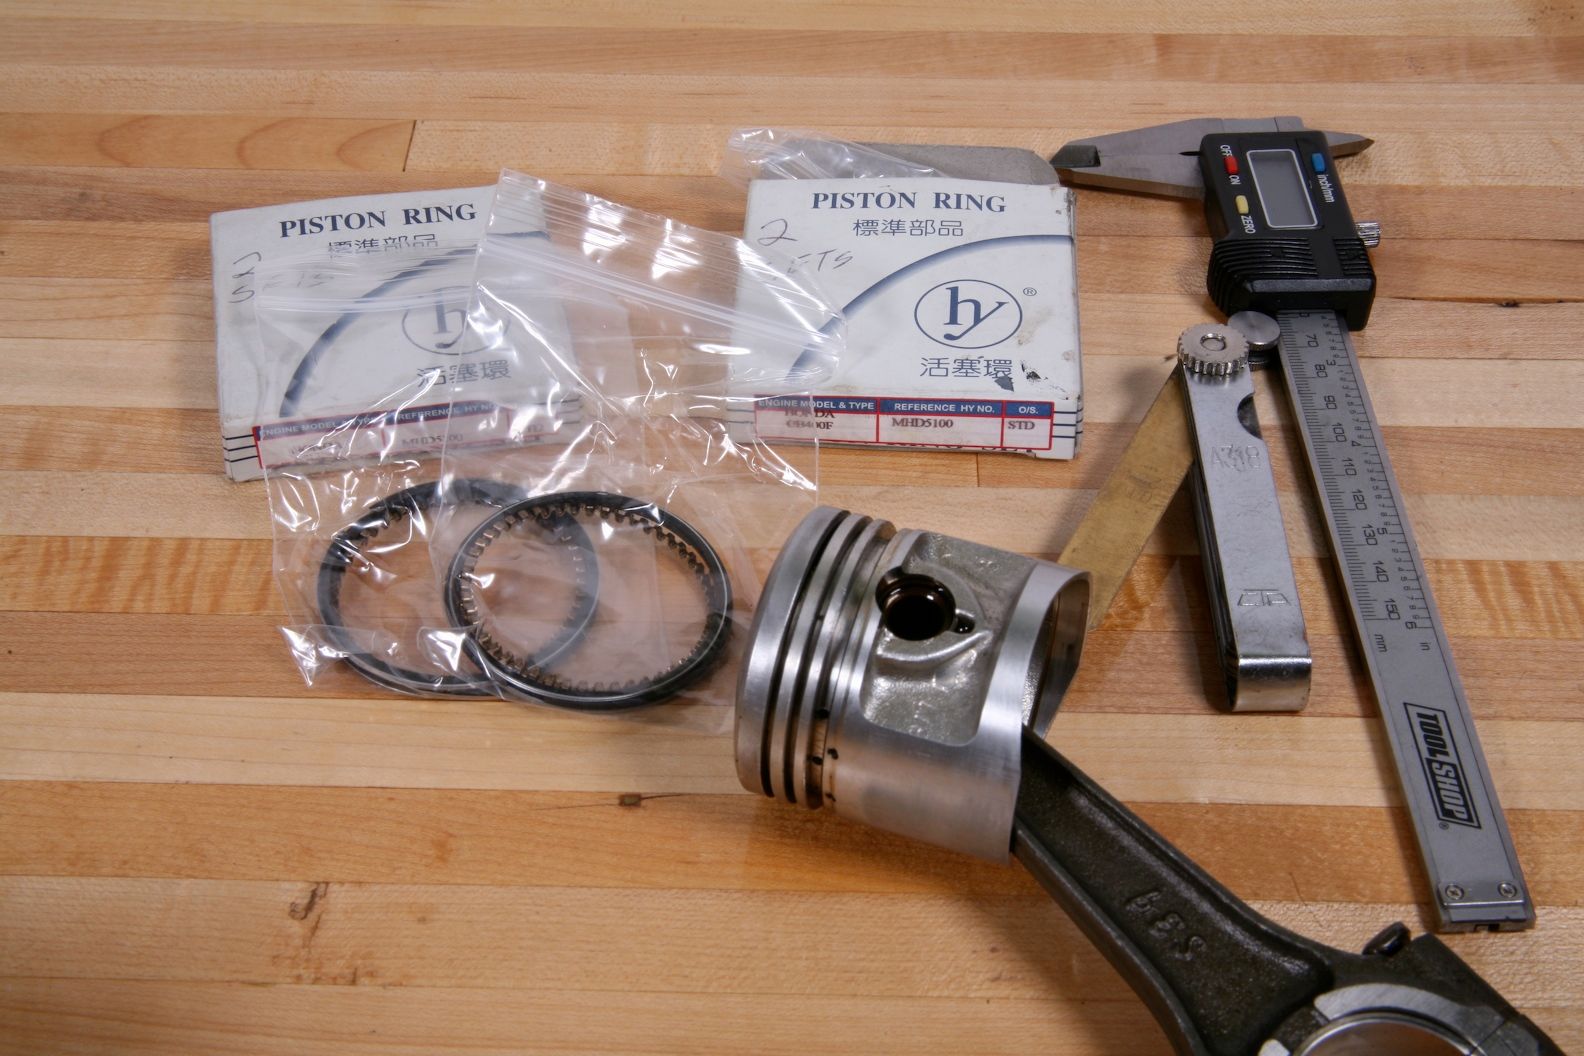
The cylinder bores were all even and within spec. I checked the piston ring gaps and all 12 rings and 2 were nearly out of spec so I replaced all the rings. First, I brought the cylinder to master motorcycle machinist Skip Green from Apparatus MC just down the street and he checked the bores again and give the cylinder a light and proper honing.
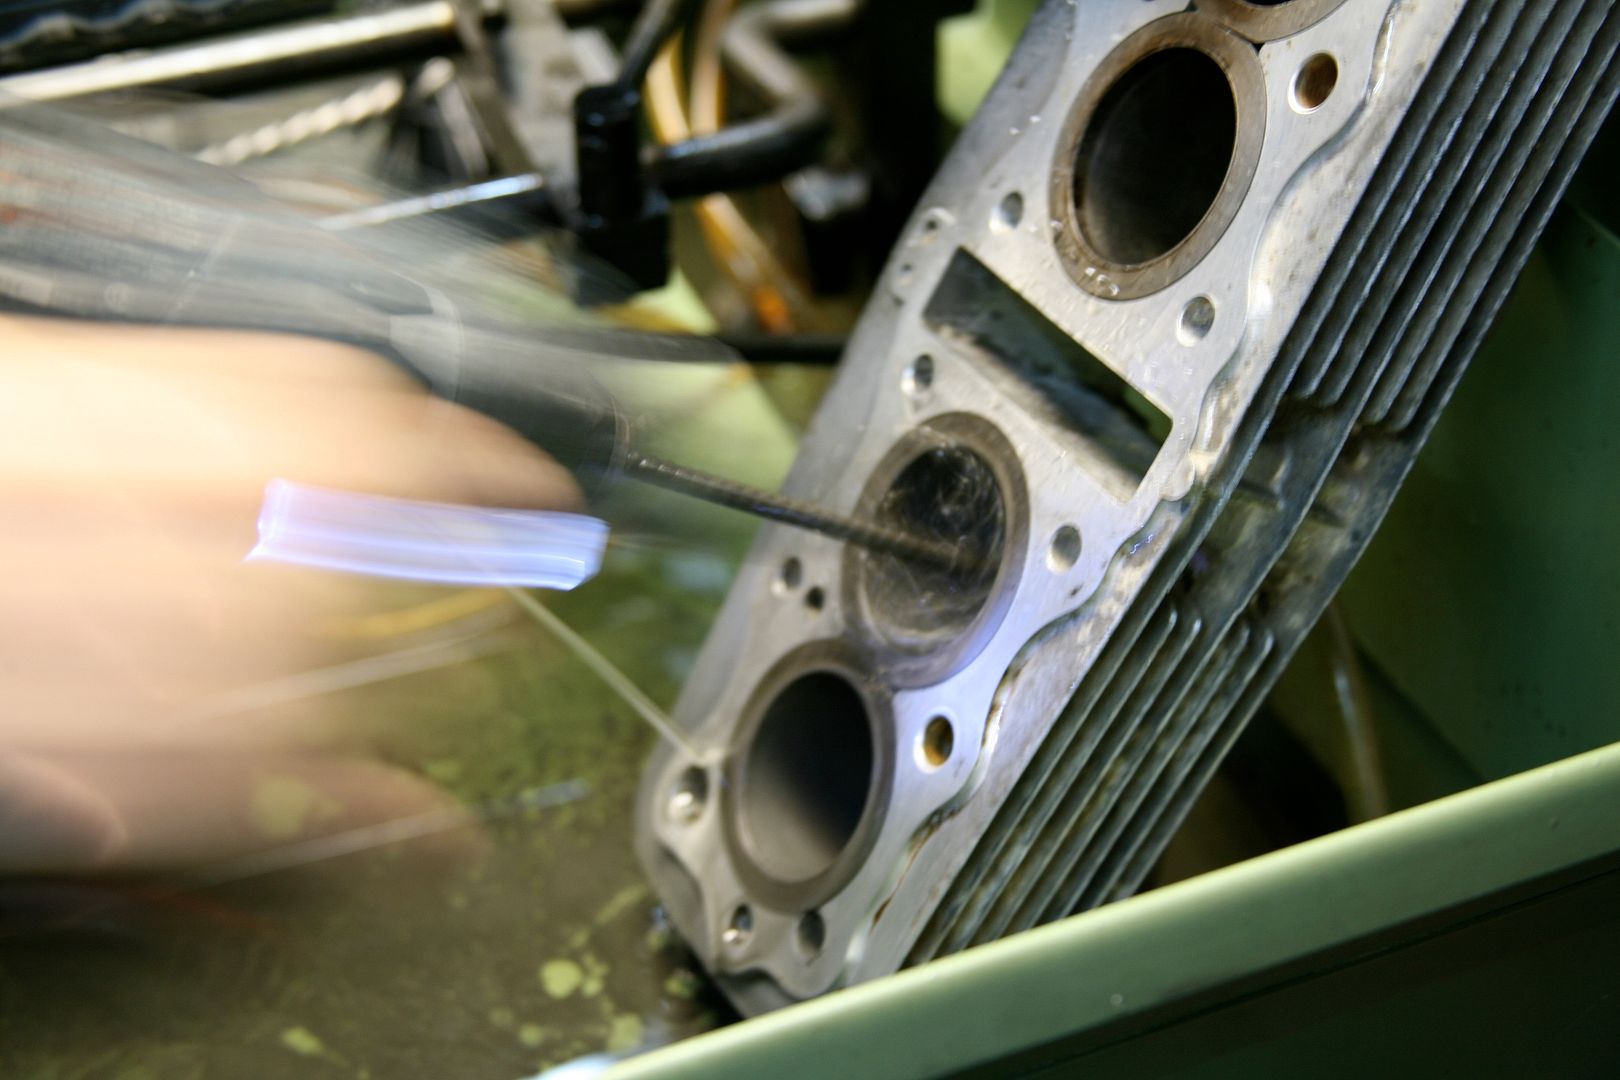

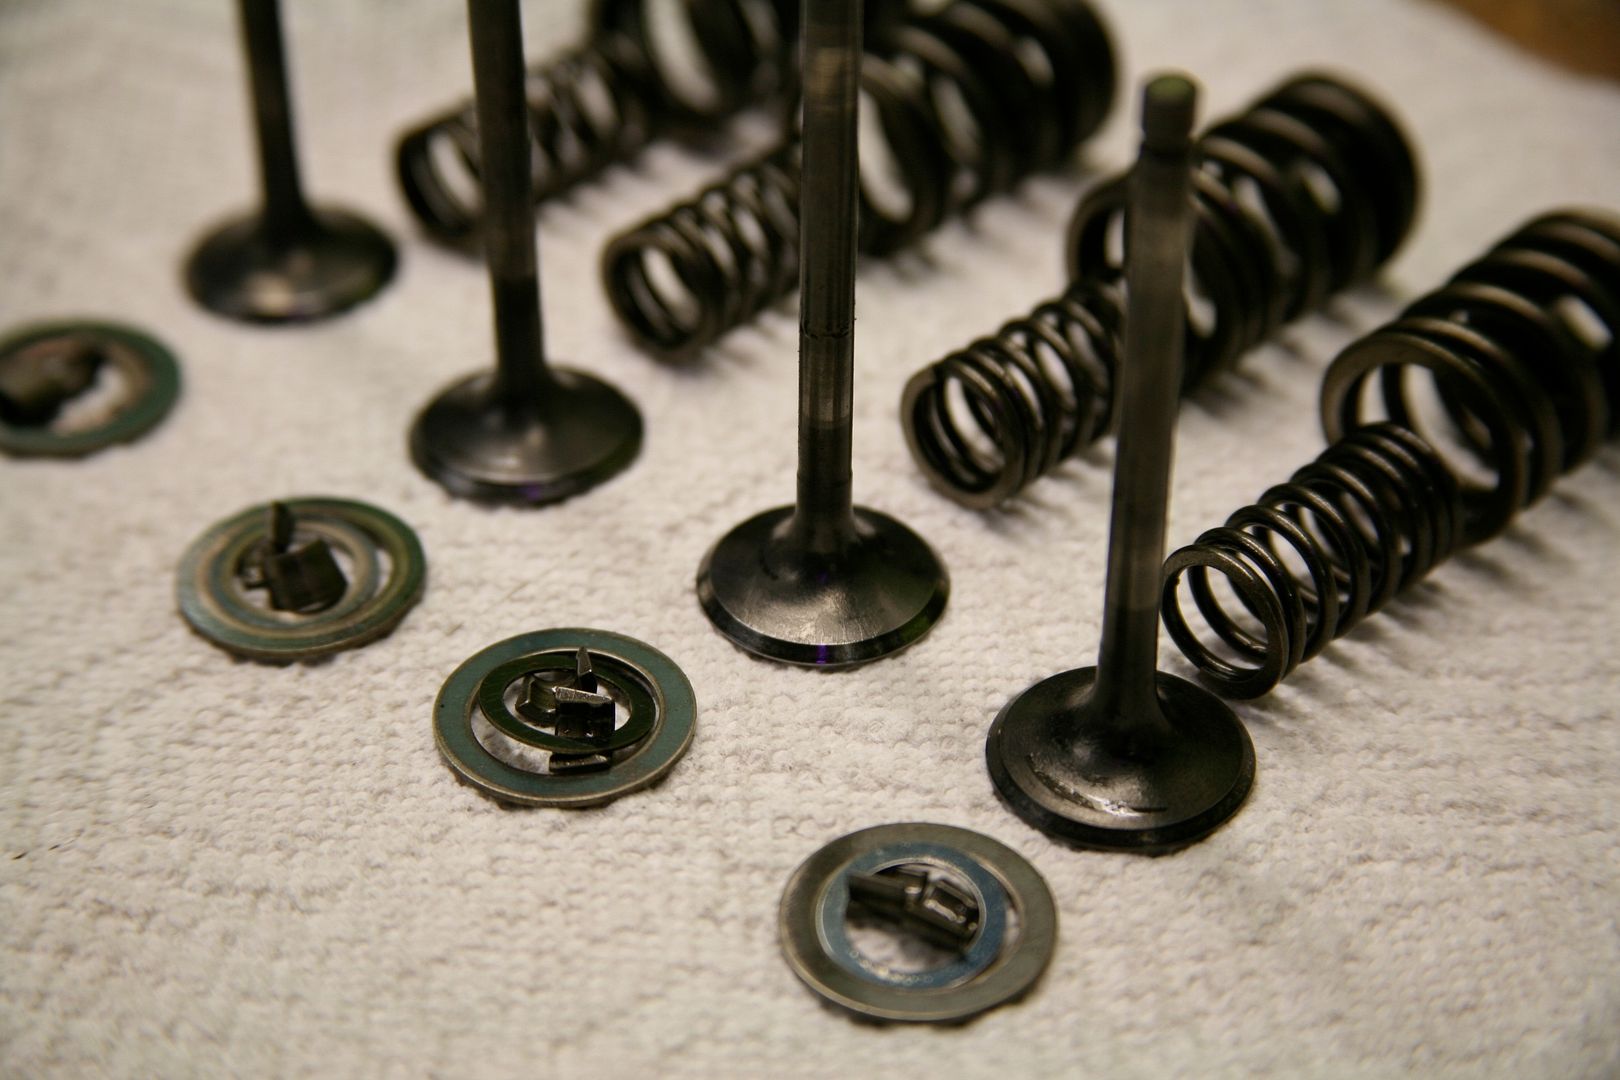
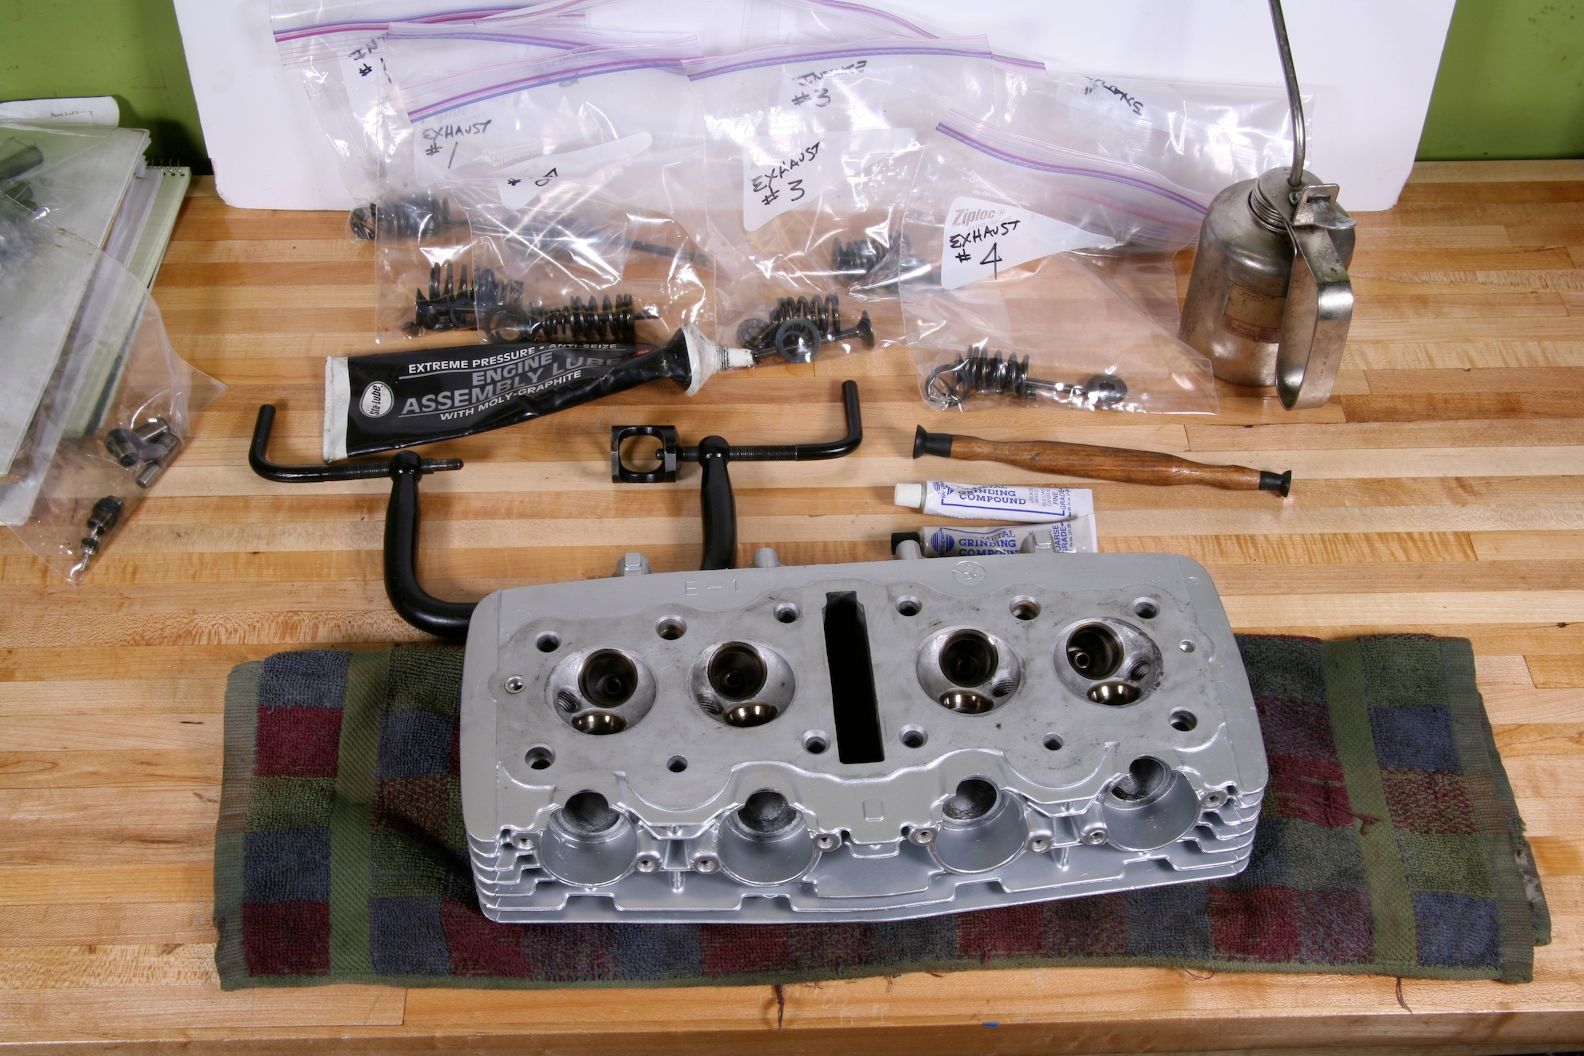
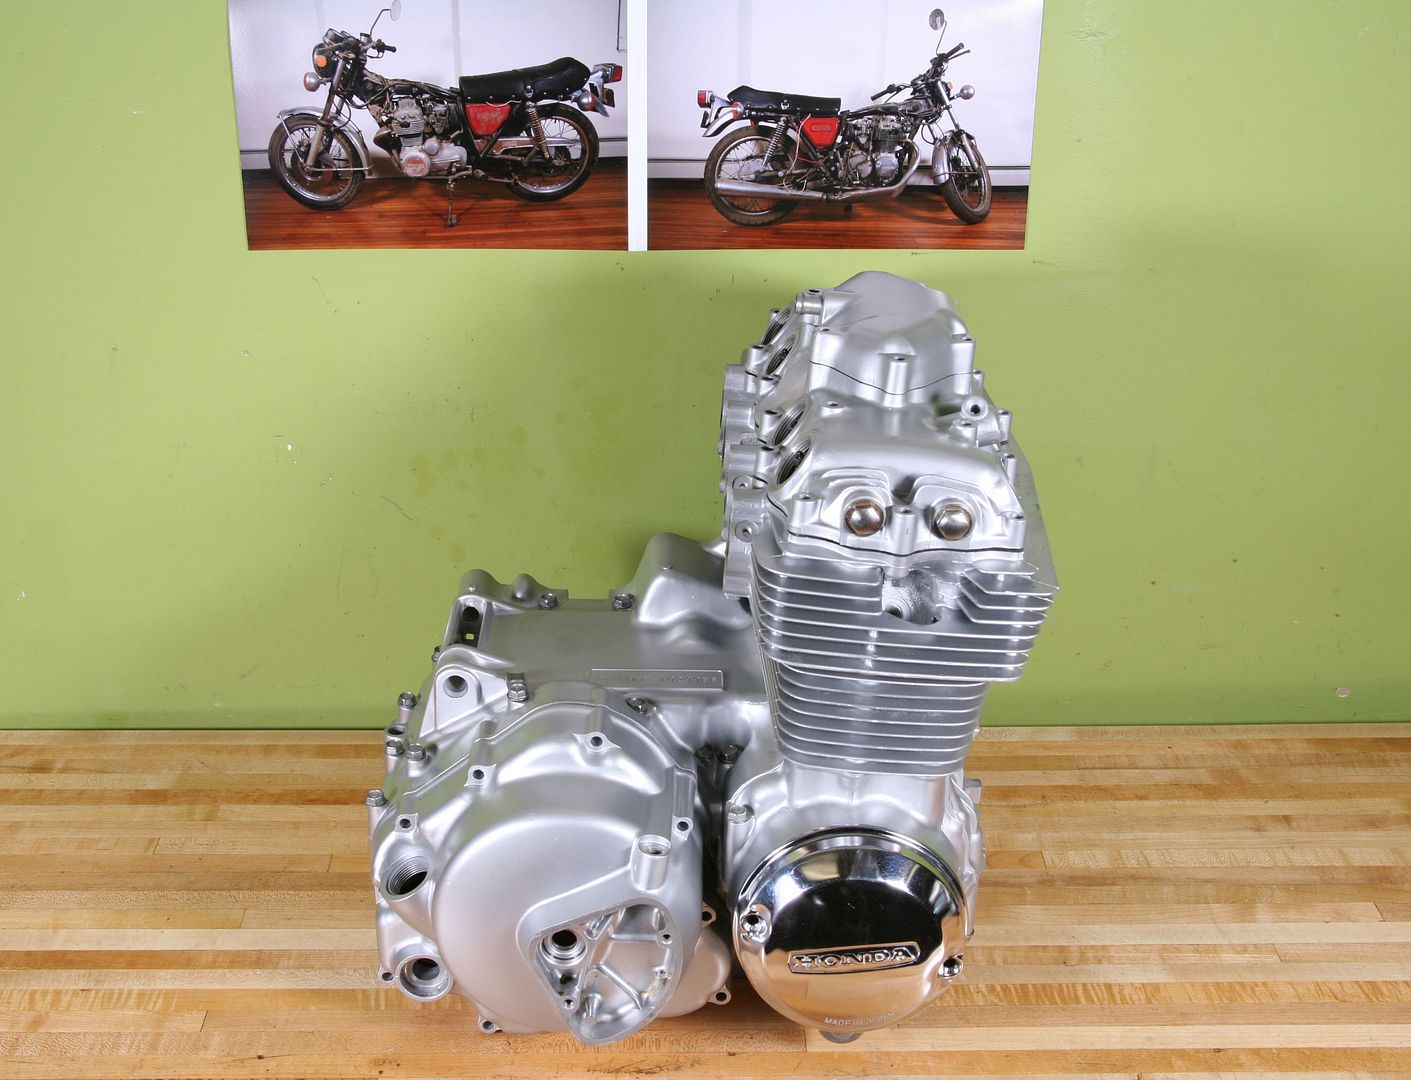
All new seals and gaskets were used on the rebuild. Everything came together nicely with no problems. It is so nice to assemble motor with clean and new parts. The valve stems, guides, springs and seats were all well within spec and reused and replaced in the original cylinder. I did do a light lapping of the valves with fine grit compound to ensure they sat nice and tight. The assembled cylinder head was installed and torqued down in the correct pattern to the correct specs.
The clutch plates and springs were well within factory spec so they were cleaned and re-installed.
Looking good!
(Intermission)


An interesting thing happened when I sold my fourth CB400F Super Sport build last spring. That bike was cafed with British styling (lower bars, black cylinder paint, manx seat, no signals etc) and it took quite a while for the bike to sell. There was a lot of interest from younger poeple but they simply could not afford it. Many of the inquiries I got were people interested in a stock version of the bike, not a cafe racer (even though it was marketed as a Cafe Racer in 1975 and 1976). Older people were trying buy back the bike of their youth or buy the bike they wanted when they were younger but could not afford to back then. A few women wanted a smaller, reliable stock bike. So fighting all desire to modify this one to my tastes, I am leaving this bike 100% bone stock. A really nice low mileage stock CB400F sold recently on Ebay for $8600. The restoration was straightforward and by the book (Honda factory Service and Haynes manuals), and I will include many images so other CB400F owners can use them for reference on their builds.
The Buy:
I found this 1975 CB400F on Craigslist last spring, could not pass it up and drove 7 hours roundtrip to pick it up from a nice guy in southeastern Wisconsin who had a barn full of old Japanese bikes. The price was fair, it was nearly complete (no tank), unmolsested and was titled, so I snapped it up knowing I would not have time to touch it until winter. My empty trailer had a blown tire on the way to pick up the bike, so it made for a 1 hour delay and a $100 replacement tire and rim. Along with the bike, I bought a few spare parts from him which I cleaned up and sold on Ebay to offset the cost of my trailer repair. The bike had 16152 some miles, turned over with even compression across all 4 cylinders. The tank, tool box and lid and air filter lid were missing but everything else was there. I got her back to the shop, completely cleaned the carbs, changed the oil and installed the battery and tank from another CB400F and got her running. She ran very well and I took her out for a short ride until the front brake cylinder froze up (typical bad caliper seal after sitting for years). I pulled the motor, broke her down to the frame and put her into storage. I had a couple days off over X-mas so started the restoration and have been working on it since. It is nearly done with the exception of the graphics on the freshly painted tank. Again, this 100% stock and wanted to rebuild her from the frame and crank up. Here we go:

Motor
I cleaned the exterior of the motor with a vacuum, wiped off the dust, dead insects and grease with Simple Green and pulled it out of the frame.

New gasket and seal kits were ordered and I broke it down by the book. Of course the first thing I found was a striped tachometer cable screw. It will be replaced, so I tried soaking it in Kroil and then tapping it with an impact driver, but the phillips head was already stripped. A screw extractor got it out. The rest of the teardown was straightforward, with no drama or surprises. I was happy to find little to no rust on the hardware and none of the other fasteners gave me problems except for two screws on the carb inlets. I photographed, bagged and tagged everything as I made my way down to the crankshaft. Inside, everything was well oiled with no obvious problems. Everything was measured and compared to factory specification and anything out of spec or looked suspect was replaced with new parts.
I spent nearly 12 hours cleaning, preparing, priming, painting and heat treated all the external alloy motor parts. The stator cover had some deep scratches so I filled them with Lab Metal (a high temperature body filler) and shaped, filed and sanded it smooth. All the alloy parts were sprayed with a light coat of Dupli-Color VHT grey engine primer and after it dried, sprayed all with two light coats and a third medium coat of Duplicolor 1615 VHT Aluminum paint . Once dry, I baked it in an oven for 30 minute cycles at 250, 350 450 degrees F. to harden and make fuel resistant the paint. Heat treating makes this paint very durable and resistant to fuel and oil.

The clutch plates and springs were well within factory specification so they were cleaned and re-installed.
To start I pulled the rotor off the left hand side of the crank. For past projects I ordered the service tool to do this, but was sent the wrong size. Instead, I sprayed with the rotor with Kroil, applied heat from a propane torch and used a 2 jaw puller and it came straight off. Before rebuilding I carefully measured the the tolerance of the bearings on the connecting rods as well as the case and crank shell bearings with green Plasticgauge after cranking all the engine bolts down to their specified torque. All the bearings tolerances came within factory tolerance so they were re-used.


Next, I pre-emptively installed a new DID cam chain, even though the old one appeared to be good. The cam chain is a common problem with this model so now is the time to do it. Both cam chain guides showed very little wear and measured well within factory specs so I reused them. I rebuilt the crankshaft, rods and crankcases by the book and seal both halves of the cases with a light and even smear of Yamabond 3 and of course all moving parts were coated with motor assembly lube and all threaded hardware was coated lightly with anti-sieze lubricant.

The cylinder bores were all even and within spec. I checked the piston ring gaps and all 12 rings and 2 were nearly out of spec so I replaced all the rings. First, I brought the cylinder to master motorcycle machinist Skip Green from Apparatus MC just down the street and he checked the bores again and give the cylinder a light and proper honing.


All new seals and gaskets were used on the rebuild. Everything came together nicely with no problems. It is so nice to assemble motor with clean and new parts. The valve stems, guides, springs and seats were all well within spec and reused and replaced in the original cylinder. I did do a light lapping of the valves with fine grit compound to ensure they sat nice and tight. The assembled cylinder head was installed and torqued down in the correct pattern to the correct specs.
The clutch plates and springs were well within factory spec so they were cleaned and re-installed.


Looking good!
(Intermission)


