Follow along with the video below to see how to install our site as a web app on your home screen.
Note: This feature currently requires accessing the site using the built-in Safari browser.
We noticed you are blocking ads. DO THE TON only works with community supporters. Most are active members of the site with small businesses. Please consider disabling your ad blocking tool and checking out the businesses that help keep our site up and free.
Thanks Tim. Are you referring to the guys that powdercoat the whole assembly? The rear is ready also. I retained the chain guard as it has a seal in it but I removed a portion of it as it was all buggered up. There were some funky washers that once installed would be bent upwards to prevent the nuts from loosening up, I replaced them with standard washers and put lock tight on the nuts..
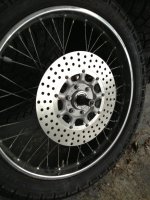
Those wheels came out awesome. If you want to give your front wheel a bit of a meaner look and improve your braking at the same time check out Godfrey's to get your rotor thinned and drilled.
Well there are always issues right, no matter what you do.. The frame, swing arm and forks are back from getting powder coated. The material adds dimension and needed to be scrapped off in areas. He also removed the vin tag, will have to ask for that back.
The seat arrived minus the tail light. I will have to email to see if he can send me one separate. It does fit nicely and bolted on just right. I removed the original seat hinges and helmet hangers. The tail section of the frame is remaining to hang the turn signals.
So working on the brakes, I have a rebuild kit for the master and a seal on the way for the caliper which is stuck, shocker. I hooked the master up to it and it pumped right out, I got that tip on here as air is dangerous and hasn't worked for me yet..
If it hadn't come out with the master cylinder you can also thread a grease gun into the brake line threads and pump it out with grease. It's a littler messier cleanup but it works wonders and won't take a finger off like an air compressor.
I painted mine sort of mid way in the rebuild. I pull the piston and cleaned out all and honed the bore. Then I soda blasted and repainted the outside. I left the old hose and bleeder in during painting to keep the threads clear. Once it hardened, I reinstalled the piston.
I painted mine sort of mid way in the rebuild. I pull the piston and cleaned out all and honed the bore. Then I soda blasted and repainted the outside. I left the old hose and bleeder in during painting to keep the threads clear. Once it hardened, I reinstalled the piston.
Good plan, did it that way and turned out fine. Cut the fender, I know some of you hate that but that is how I roll. I am planning on painting it as the main color is pewter and there will be no chrome..
early fathers day in my house. The 1/4 impact is a must have. It removes the screws that otherwise strip the heads off with ease. $99 at Home Depot for the complete kit..
It's hard to say with that much of a mess. If the engine is still turns over I'd clean up the area then kick it over until the oil's up to pressure and see where it's leaking. It could be the o-ring behind the pump or possibly the primary drive seal. It'll be way easier to tell once it's clean and under pressure.
This site uses cookies to help personalise content, tailor your experience and to keep you logged in if you register.
By continuing to use this site, you are consenting to our use of cookies.